> ## Documentation Index
> Fetch the complete documentation index at: https://manual.voiceping.net/llms.txt
> Use this file to discover all available pages before exploring further.

# SSO Setup Manual (Microsoft Entra ID)

> Single sign-on setup guide using Microsoft Entra ID (formerly Azure AD)

export const ContactEn = () => <>
    <Tip>
      If you have any questions, please contact us via <a href="https://forms.gle/6AUho7oj3zBr79e96">this form</a>.
    </Tip>

    <h2>Official Links</h2>

    <CardGroup cols={2}>
      <Card title="Official Website" icon="globe" href="https://voiceping.net/en/">
        Visit our official website
      </Card>
      <Card title="X (Twitter)" icon="x-twitter" href="https://x.com/VoicePingMedia">
        Follow us on X
      </Card>
      <Card title="Facebook" icon="facebook" href="https://www.facebook.com/voiceping.inc">
        Like us on Facebook
      </Card>
      <Card title="LinkedIn" icon="linkedin" href="https://www.linkedin.com/company/28684130/">
        Connect on LinkedIn
      </Card>
    </CardGroup>
  </>;

## Single Sign-On Feature

Enterprise plan clients can enable single sign-on (SSO) in their workspace, allowing users to log in to VoicePing using Microsoft Entra ID.

This manual explains how to enable SSO in the workspace and how to configure Microsoft Entra ID as the IdP (Identity Provider).

## Prerequisites

<Check>Have a VoicePing Enterprise plan user account</Check>
<Check>Have a Microsoft Azure account</Check>

***

## Registering Identity Provider

### Microsoft Entra ID Configuration

<Steps>
  <Step title="Add VoicePing to Enterprise Applications">
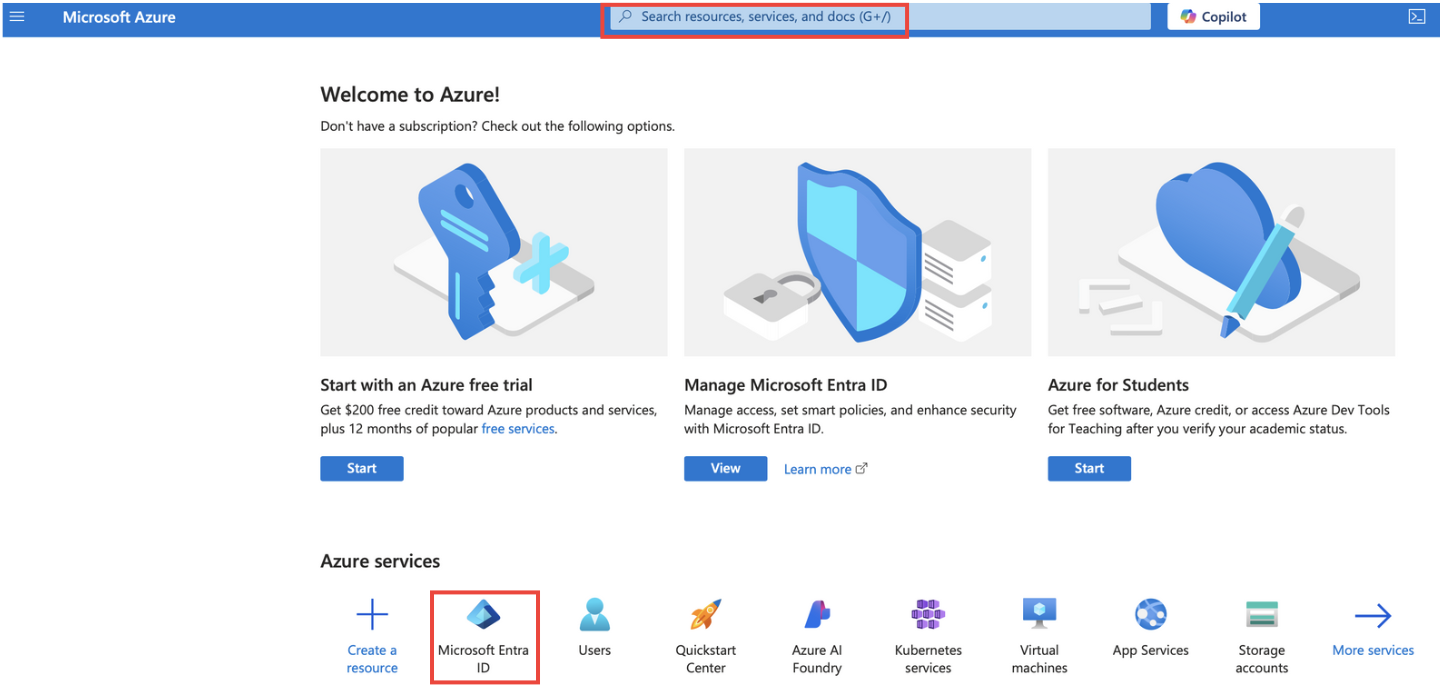
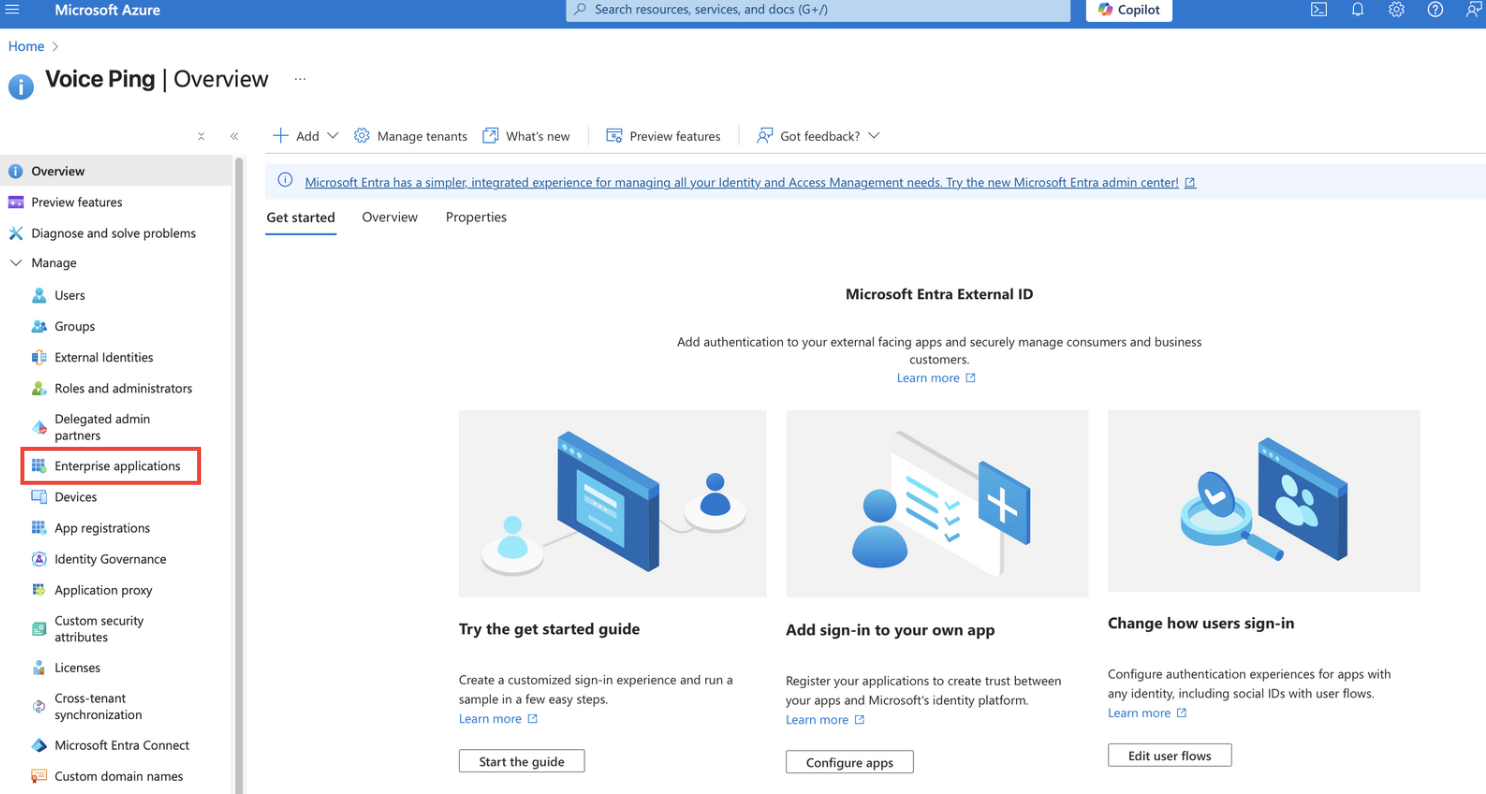
    Open Microsoft Entra ID from the Azure portal and open the Enterprise Applications page.
    <Frame>
      <img src="https://mintcdn.com/test-cf63e467/UDonPy9U4TF-4rTr/ja/images/sso-entra/01-azure-entra-id.png?fit=max&auto=format&n=UDonPy9U4TF-4rTr&q=85&s=b02e79d9bff931861b8146854d8716bf" alt="Azure Entra ID" width="1440" height="700" data-path="ja/images/sso-entra/01-azure-entra-id.png" />
    </Frame>

    Click "New application" and add VoicePing.
    <Frame>
      <img src="https://mintcdn.com/test-cf63e467/UDonPy9U4TF-4rTr/ja/images/sso-entra/02-enterprise-apps.png?fit=max&auto=format&n=UDonPy9U4TF-4rTr&q=85&s=d15a2f004f309344646ec9a9cec6d924" alt="Enterprise applications" width="1486" height="794" data-path="ja/images/sso-entra/02-enterprise-apps.png" />
    </Frame>
  </Step>

  <Step title="Configure SAML 2.0 Protocol">
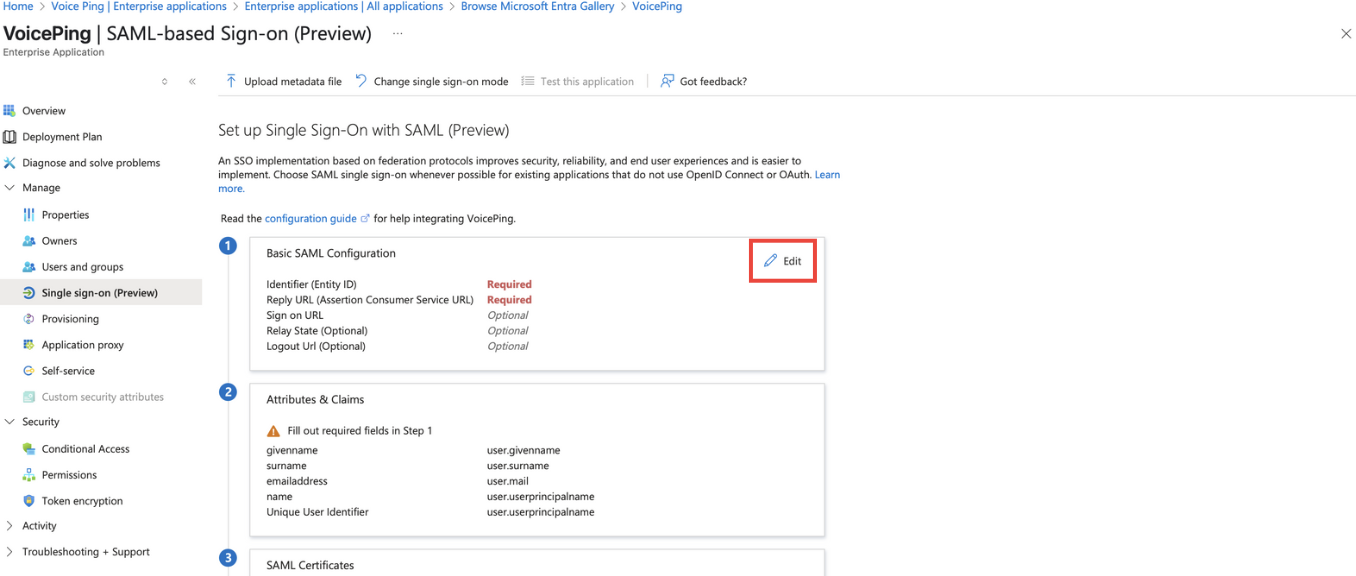
    Configure the VoicePing application on the IdP to use the SAML 2.0 protocol for SSO.

    <Frame>
      <img src="https://mintcdn.com/test-cf63e467/UDonPy9U4TF-4rTr/ja/images/sso-entra/03-saml-setup.png?fit=max&auto=format&n=UDonPy9U4TF-4rTr&q=85&s=d1ee7ef387296219c8e00eb18e29544f" alt="SAML setup" width="1420" height="688" data-path="ja/images/sso-entra/03-saml-setup.png" />
    </Frame>
  </Step>

  <Step title="Configure Service Provider (SP) Information">
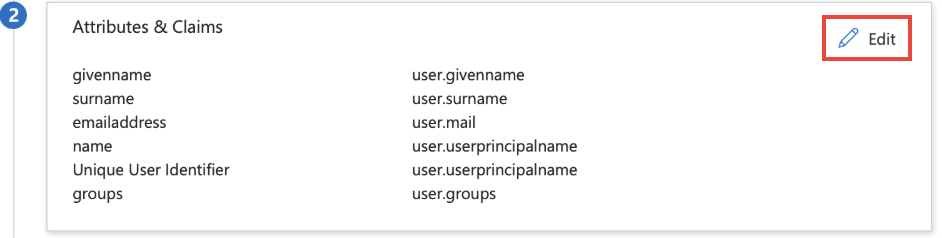
    You can check the required fields in the "Team Management > SSO Settings" tab of the workspace management dashboard within the VoicePing application.

    <Info>
      Only accessible to owners or managers of workspaces with SSO enabled.
    </Info>

    | Item      | Value                                      |
    | --------- | ------------------------------------------ |
    | ACS URL   | `https://api.voiceping.io/api/v1/user/acs` |
    | Entity ID | `voice-ping`                               |
    <Frame>
      <img src="https://mintcdn.com/test-cf63e467/UDonPy9U4TF-4rTr/ja/images/sso-entra/04-sp-config.png?fit=max&auto=format&n=UDonPy9U4TF-4rTr&q=85&s=d37efd4c234fecf241e8a29ee119a637" alt="SP configuration" width="1356" height="576" data-path="ja/images/sso-entra/04-sp-config.png" />
    </Frame>
  </Step>

  <Step title="Include Email Address in SAML Claim">
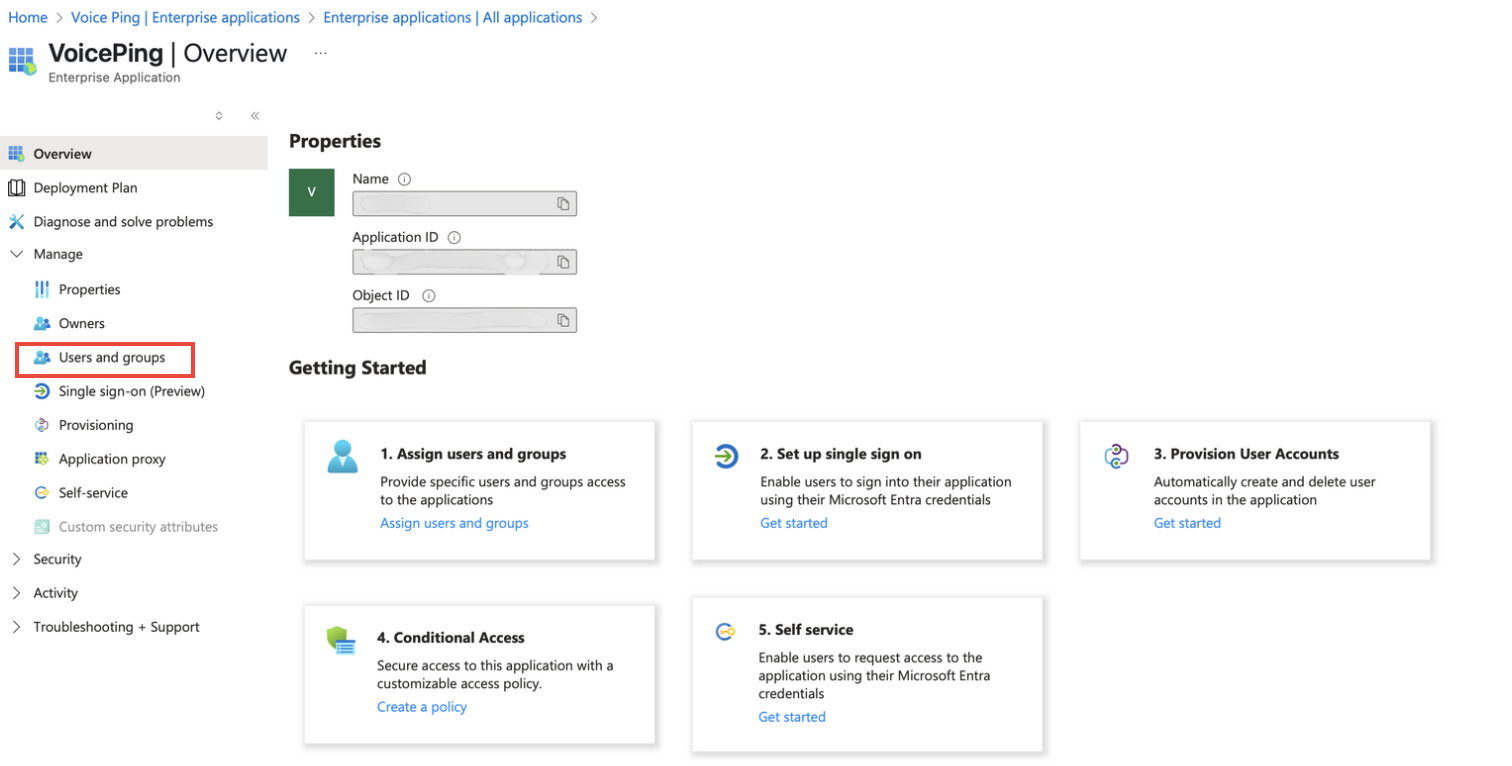
    Include the user's email address in the SAML claim. This is necessary for authentication within the VoicePing platform.

    <Warning>
      The email address defined in the IdP must match the one used when registering the user in VoicePing.
    </Warning>

    This should be set by default in Microsoft Entra ID, but add it if not configured.
    <Frame>
      <img src="https://mintcdn.com/test-cf63e467/UDonPy9U4TF-4rTr/ja/images/sso-entra/05-claims.png?fit=max&auto=format&n=UDonPy9U4TF-4rTr&q=85&s=88af2ee3cc1463233ab55b5a9b46852e" alt="Claims configuration" width="942" height="238" data-path="ja/images/sso-entra/05-claims.png" />
    </Frame>

    <Frame>
      <img src="https://mintcdn.com/test-cf63e467/LU3oFsc_lcA5rDjy/ja/images/sso-entra/14-configuration-step.png?fit=max&auto=format&n=LU3oFsc_lcA5rDjy&q=85&s=0d361d1f642bbad50d2bb306a5c519de" alt="Configuration step" width="1132" height="942" data-path="ja/images/sso-entra/14-configuration-step.png" />
    </Frame>

    <Frame>
      <img src="https://mintcdn.com/test-cf63e467/LU3oFsc_lcA5rDjy/ja/images/sso-entra/15-attributes-mapping.png?fit=max&auto=format&n=LU3oFsc_lcA5rDjy&q=85&s=62b9ba6c8f3b5013a59763be13ca4541" alt="Attributes mapping" width="1126" height="422" data-path="ja/images/sso-entra/15-attributes-mapping.png" />
    </Frame>

    <Frame>
      <img src="https://mintcdn.com/test-cf63e467/LU3oFsc_lcA5rDjy/ja/images/sso-entra/16-claim-configuration.png?fit=max&auto=format&n=LU3oFsc_lcA5rDjy&q=85&s=6b55f0de6c87852a3de9e50ea708f5d6" alt="Claim configuration" width="1324" height="514" data-path="ja/images/sso-entra/16-claim-configuration.png" />
    </Frame>
  </Step>

  <Step title="Add Users">
    Add users to the created VoicePing app.

    1. Open the "Users and groups" page from the VoicePing app in Microsoft Entra ID
    2. Click "Add user/group"
    3. Select users or groups you want to grant access to
    4. Click "Select" and "Assign"
    <Frame>
      <img src="https://mintcdn.com/test-cf63e467/UDonPy9U4TF-4rTr/ja/images/sso-entra/06-add-users.png?fit=max&auto=format&n=UDonPy9U4TF-4rTr&q=85&s=669c43583e467126f06e9ad0db5c4024" alt="Add users" width="1512" height="766" data-path="ja/images/sso-entra/06-add-users.png" />
    </Frame>
  </Step>

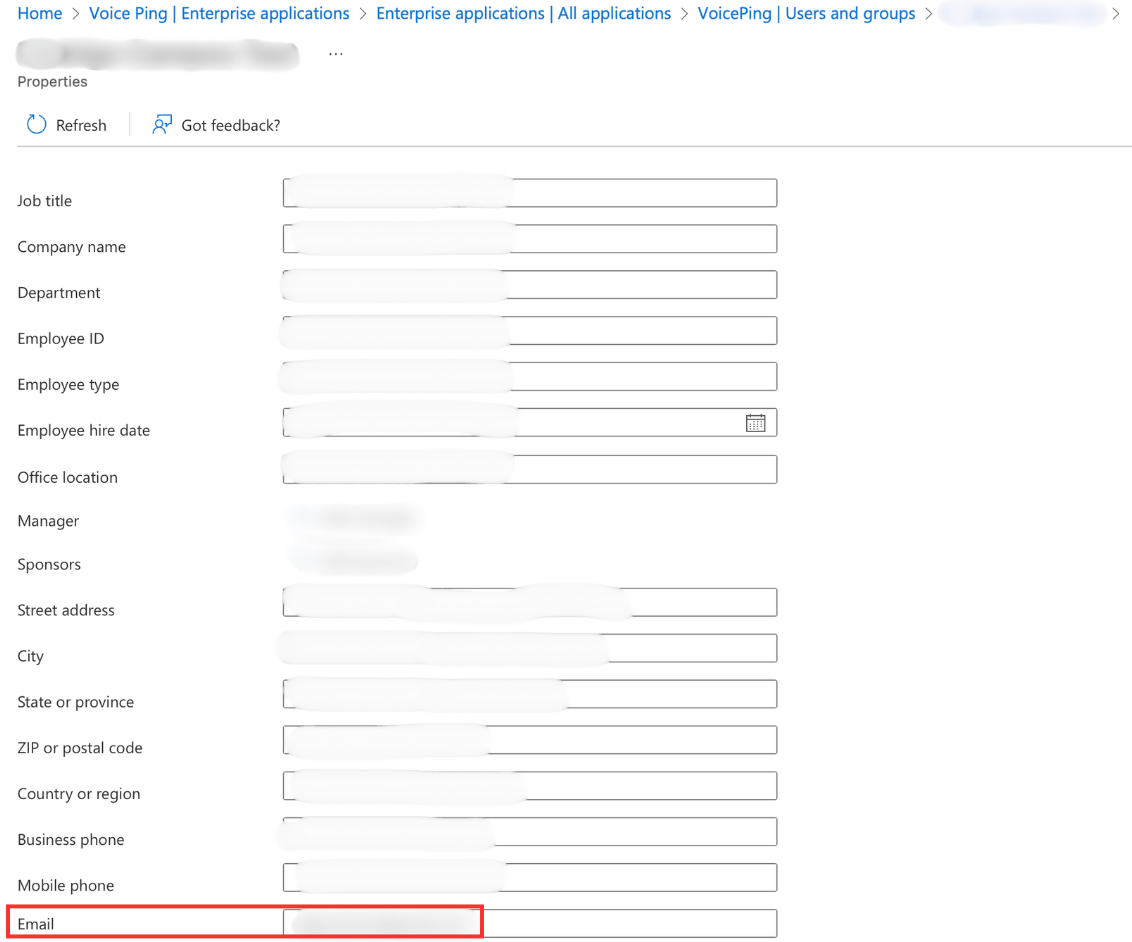
  <Step title="Verify Email Addresses">
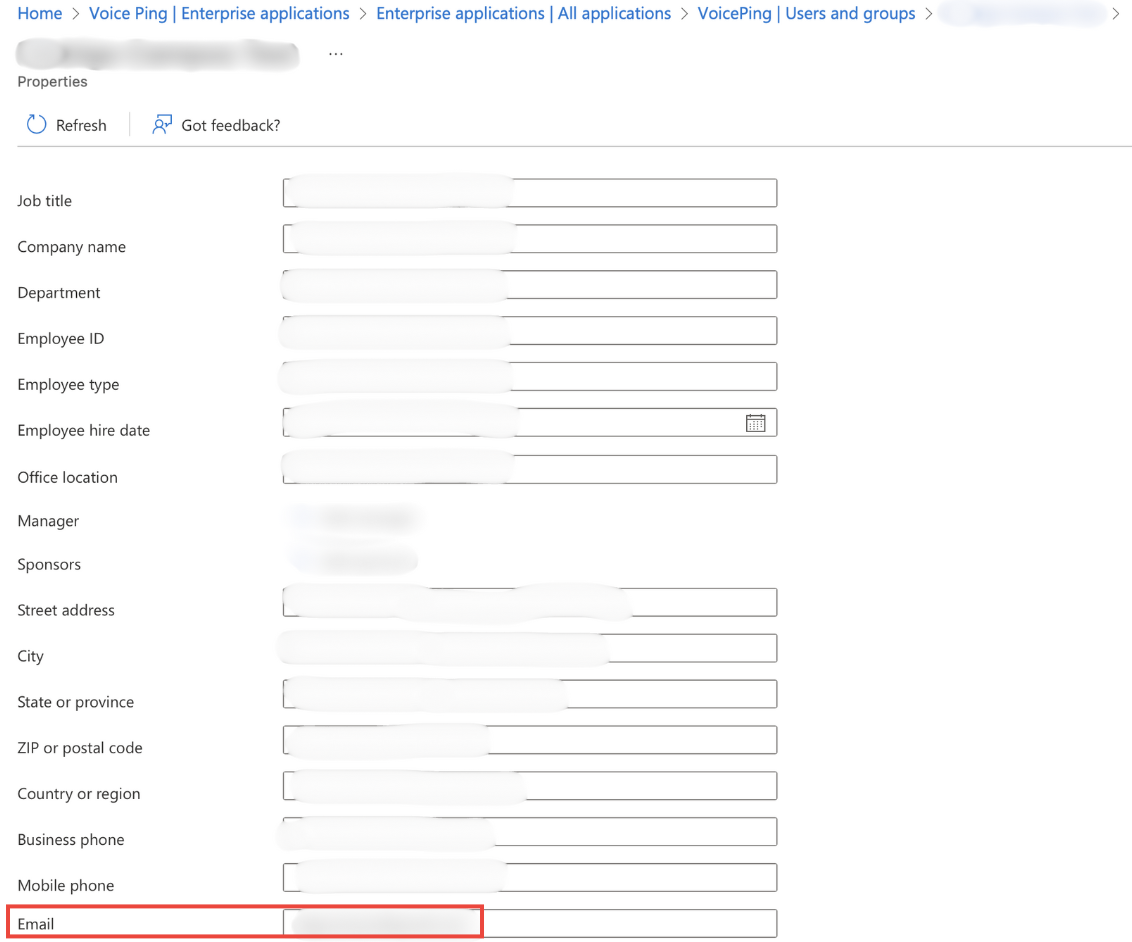
    Ensure that added users have set up their email addresses in Microsoft Azure.
    <Frame>
      <img src="https://mintcdn.com/test-cf63e467/LU3oFsc_lcA5rDjy/ja/images/sso-entra/07-verify-email.png?fit=max&auto=format&n=LU3oFsc_lcA5rDjy&q=85&s=4a4424d581be8ffc3db16bd508527283" alt="Verify email addresses" width="1132" height="942" data-path="ja/images/sso-entra/07-verify-email.png" />
    </Frame>
  </Step>

  <Step title="Download Metadata File">
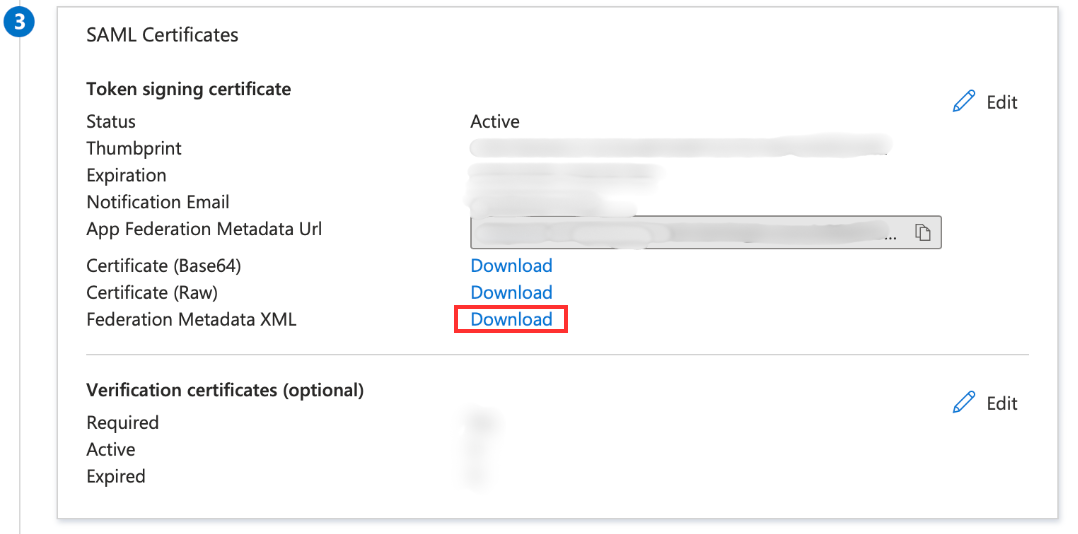
    Download the metadata file from the IdP (Microsoft Entra ID). This file will be used later on the VoicePing side.
    <Frame>
      <img src="https://mintcdn.com/test-cf63e467/LU3oFsc_lcA5rDjy/ja/images/sso-entra/17-download-metadata.png?fit=max&auto=format&n=LU3oFsc_lcA5rDjy&q=85&s=eebd136808932f4a3df27ff401669a08" alt="Download metadata" width="1078" height="534" data-path="ja/images/sso-entra/17-download-metadata.png" />
    </Frame>
  </Step>
</Steps>

***

## VoicePing Configuration

<Steps>
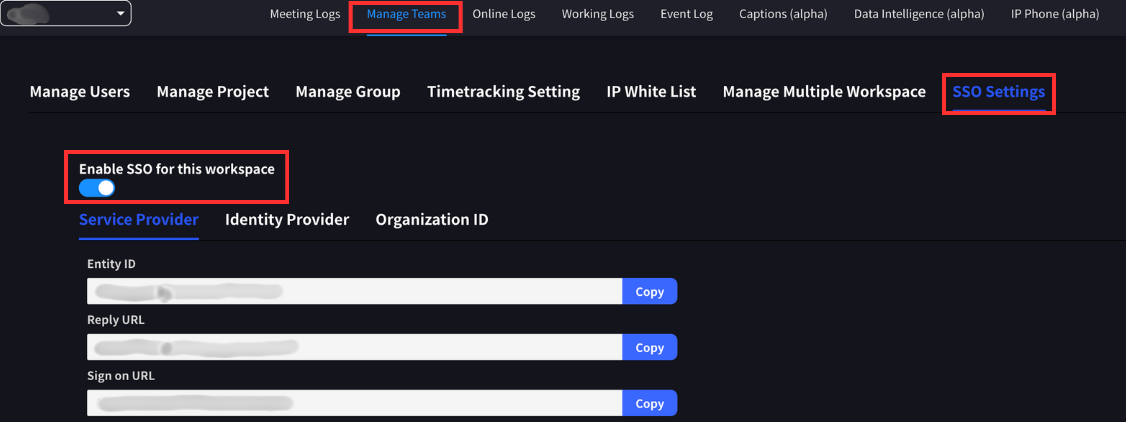
  <Step title="Enable SSO">
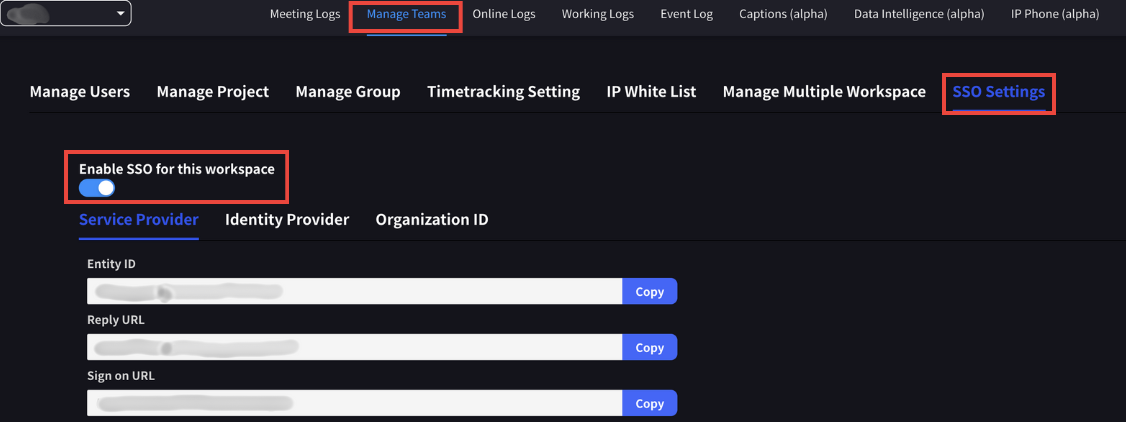
    Go to the workspace management dashboard, open the "Team Management > SSO Settings" tab, and enable SSO.
    <Frame>
      <img src="https://mintcdn.com/test-cf63e467/LU3oFsc_lcA5rDjy/ja/images/sso-entra/08-enable-sso.png?fit=max&auto=format&n=LU3oFsc_lcA5rDjy&q=85&s=455be44d72a3955447f0438c5ee0e50f" alt="Enable SSO" width="1126" height="422" data-path="ja/images/sso-entra/08-enable-sso.png" />
    </Frame>
  </Step>

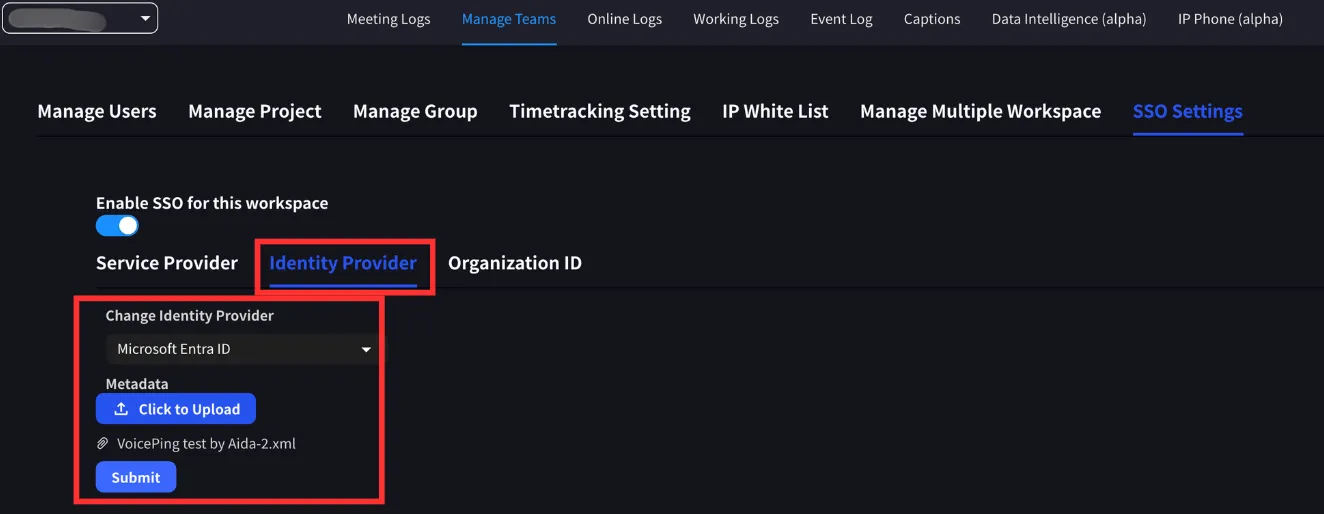
  <Step title="Upload IdP Metadata">
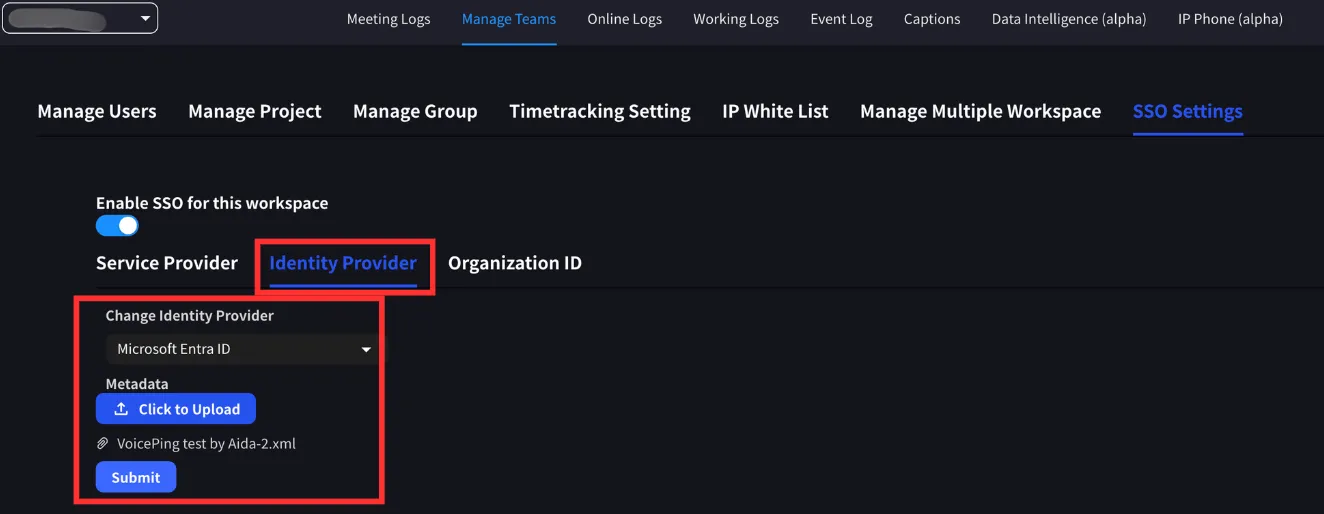
    Switch to the Identity Provider tab. Select Microsoft Entra ID as the IdP, upload the IdP metadata file, and submit changes.

    <Info>
      The metadata file can be obtained from Microsoft Entra ID.
    </Info>

    <Frame>
      <img src="https://mintcdn.com/test-cf63e467/LU3oFsc_lcA5rDjy/ja/images/sso-entra/09-upload-metadata.png?fit=max&auto=format&n=LU3oFsc_lcA5rDjy&q=85&s=83ccfb799777efc8bc4fcf0b73888d2c" alt="Upload metadata" width="1324" height="514" data-path="ja/images/sso-entra/09-upload-metadata.png" />
    </Frame>

    <Frame>
      <img src="https://mintcdn.com/test-cf63e467/LU3oFsc_lcA5rDjy/ja/images/sso-entra/18-voiceping-sso-settings.png?fit=max&auto=format&n=LU3oFsc_lcA5rDjy&q=85&s=e7d9b124a8056dc8b94c2be2422df5f5" alt="VoicePing SSO settings" width="1134" height="370" data-path="ja/images/sso-entra/18-voiceping-sso-settings.png" />
    </Frame>

    <Frame>
      <img src="https://mintcdn.com/test-cf63e467/LU3oFsc_lcA5rDjy/ja/images/sso-entra/19-upload-metadata-xml.png?fit=max&auto=format&n=LU3oFsc_lcA5rDjy&q=85&s=168dae8854d6775e31f6c99f7bacc6da" alt="Upload metadata XML" width="940" height="306" data-path="ja/images/sso-entra/19-upload-metadata-xml.png" />
    </Frame>
  </Step>

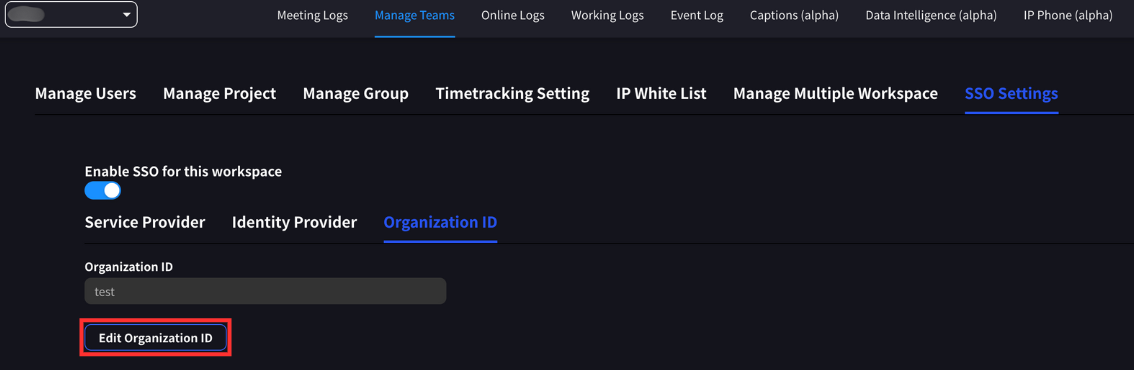
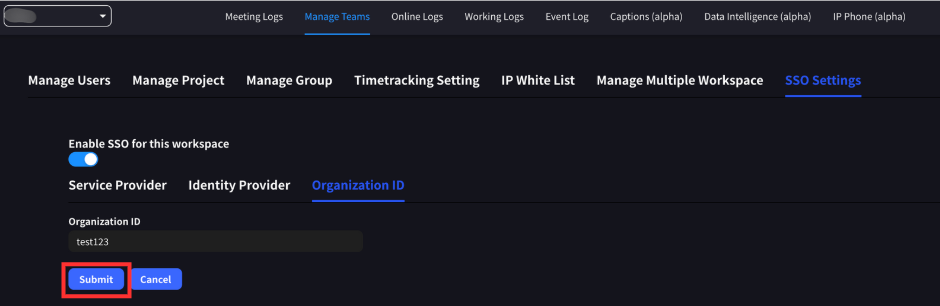
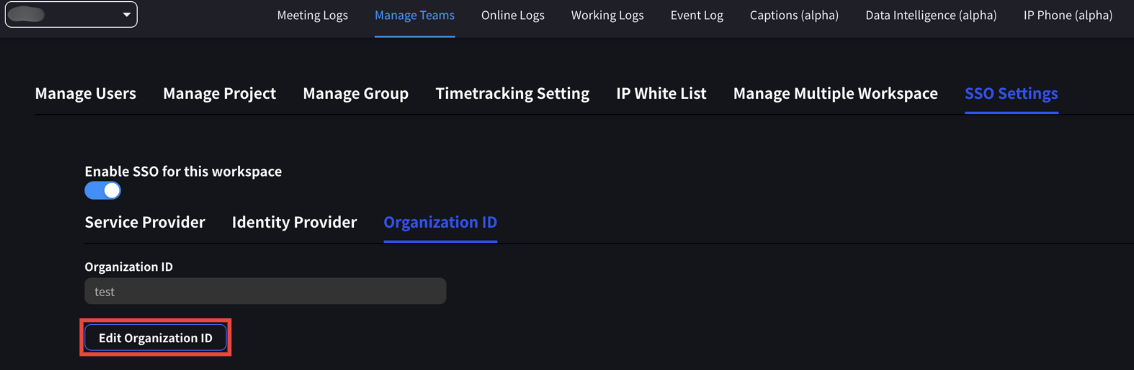
  <Step title="Define Organization ID">
    Define the organization ID. This must be a unique string of at least 3 characters and maximum 20 characters.

    <Warning>
      The organization ID will be required from users when logging in with SSO.
    </Warning>

    <Frame>
      <img src="https://mintcdn.com/test-cf63e467/LU3oFsc_lcA5rDjy/ja/images/sso-entra/10-org-id.png?fit=max&auto=format&n=LU3oFsc_lcA5rDjy&q=85&s=6ab40a533c140ac9482eb9e3b519f474" alt="Organization ID setup" width="1134" height="370" data-path="ja/images/sso-entra/10-org-id.png" />
    </Frame>

    <Frame>
      <img src="https://mintcdn.com/test-cf63e467/LU3oFsc_lcA5rDjy/ja/images/sso-entra/20-organization-id.png?fit=max&auto=format&n=LU3oFsc_lcA5rDjy&q=85&s=0ff5b81ad00148106d961eadf624377c" alt="Organization ID input screen" width="1468" height="360" data-path="ja/images/sso-entra/20-organization-id.png" />
    </Frame>

    <Frame>
      <img src="https://mintcdn.com/test-cf63e467/LU3oFsc_lcA5rDjy/ja/images/sso-entra/21-sso-enabled-confirmation.png?fit=max&auto=format&n=LU3oFsc_lcA5rDjy&q=85&s=c6f12c9adccded7db5cd5412e3979461" alt="SSO enabled confirmation" width="934" height="762" data-path="ja/images/sso-entra/21-sso-enabled-confirmation.png" />
    </Frame>
  </Step>

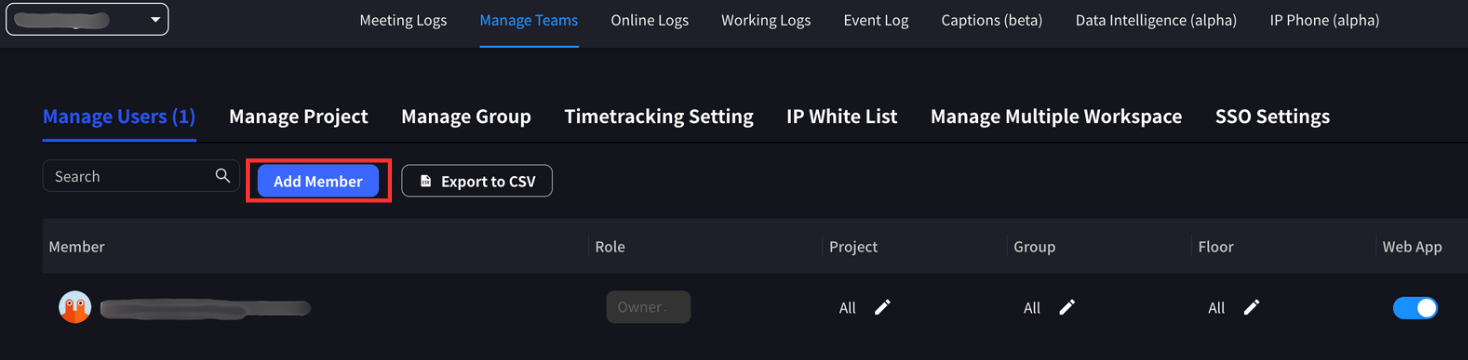
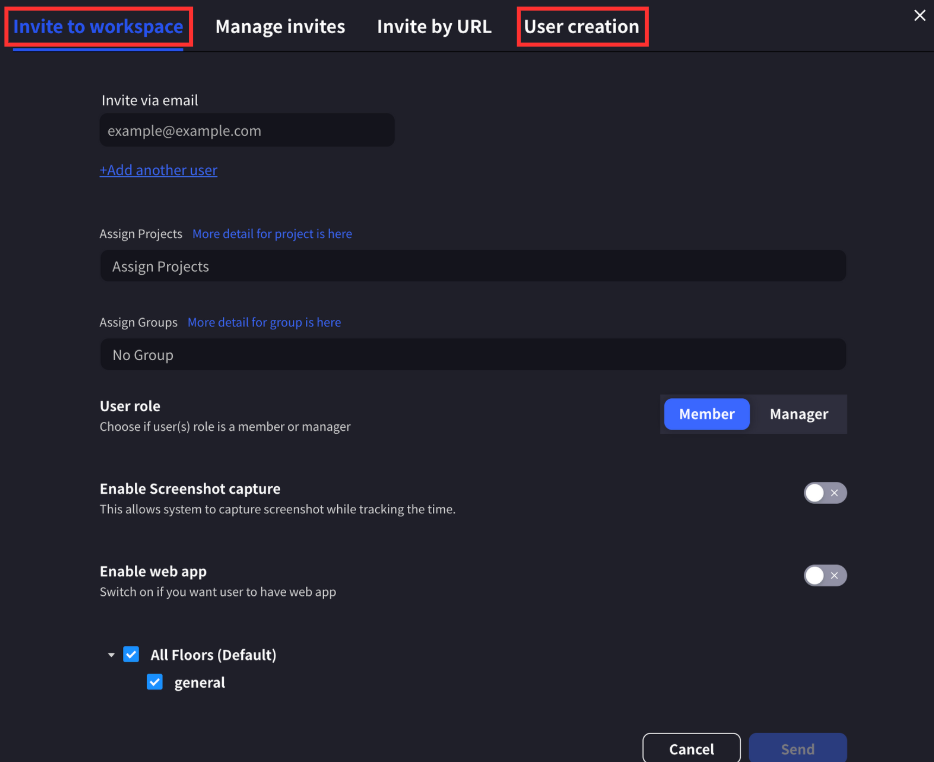
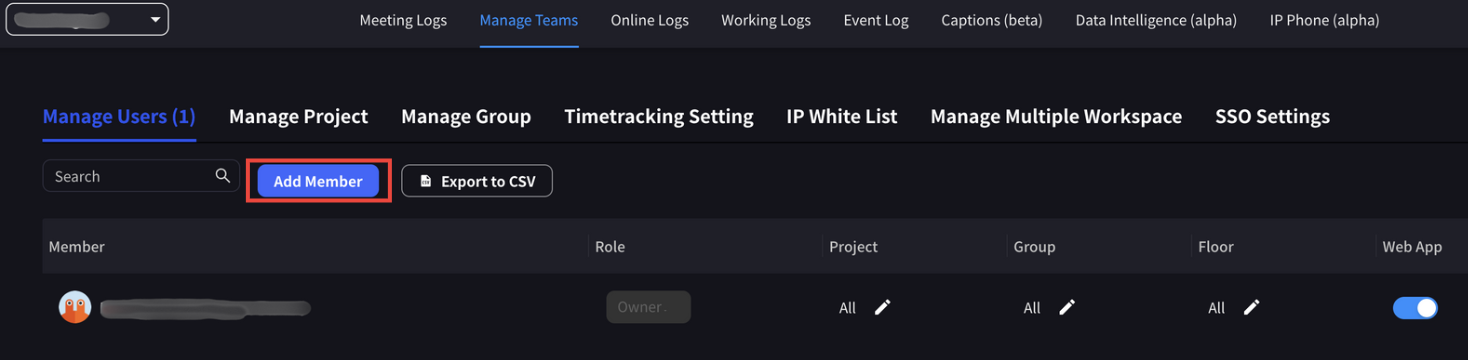
  <Step title="Add Users">
    Add users to the workspace. User email addresses must match the email addresses of users selected in the Microsoft Entra ID configuration.

    Users can be added by either invitation or direct creation.
    <Frame>
      <img src="https://mintcdn.com/test-cf63e467/LU3oFsc_lcA5rDjy/ja/images/sso-entra/11-add-workspace-users.png?fit=max&auto=format&n=LU3oFsc_lcA5rDjy&q=85&s=d5f8aaf20d9af87901c7181838ccbbf7" alt="Add workspace users" width="1468" height="360" data-path="ja/images/sso-entra/11-add-workspace-users.png" />
    </Frame>

    <Frame>
      <img src="https://mintcdn.com/test-cf63e467/LU3oFsc_lcA5rDjy/ja/images/sso-entra/22-user-assignment.png?fit=max&auto=format&n=LU3oFsc_lcA5rDjy&q=85&s=bc4bc3baab78f34b9d9a227d3939a8b1" alt="User assignment" width="1024" height="1667" data-path="ja/images/sso-entra/22-user-assignment.png" />
    </Frame>
  </Step>
</Steps>

***

## Logging in with SSO

Once SSO is configured in the workspace:

* **Owners and Managers**: Can log in to VoicePing using other methods as well
* **Member Users**: Authentication via SSO is required

When you invite new VoicePing users to an SSO workspace, a VoicePing user account will be provided when the user signs up with SSO.

### Login Steps

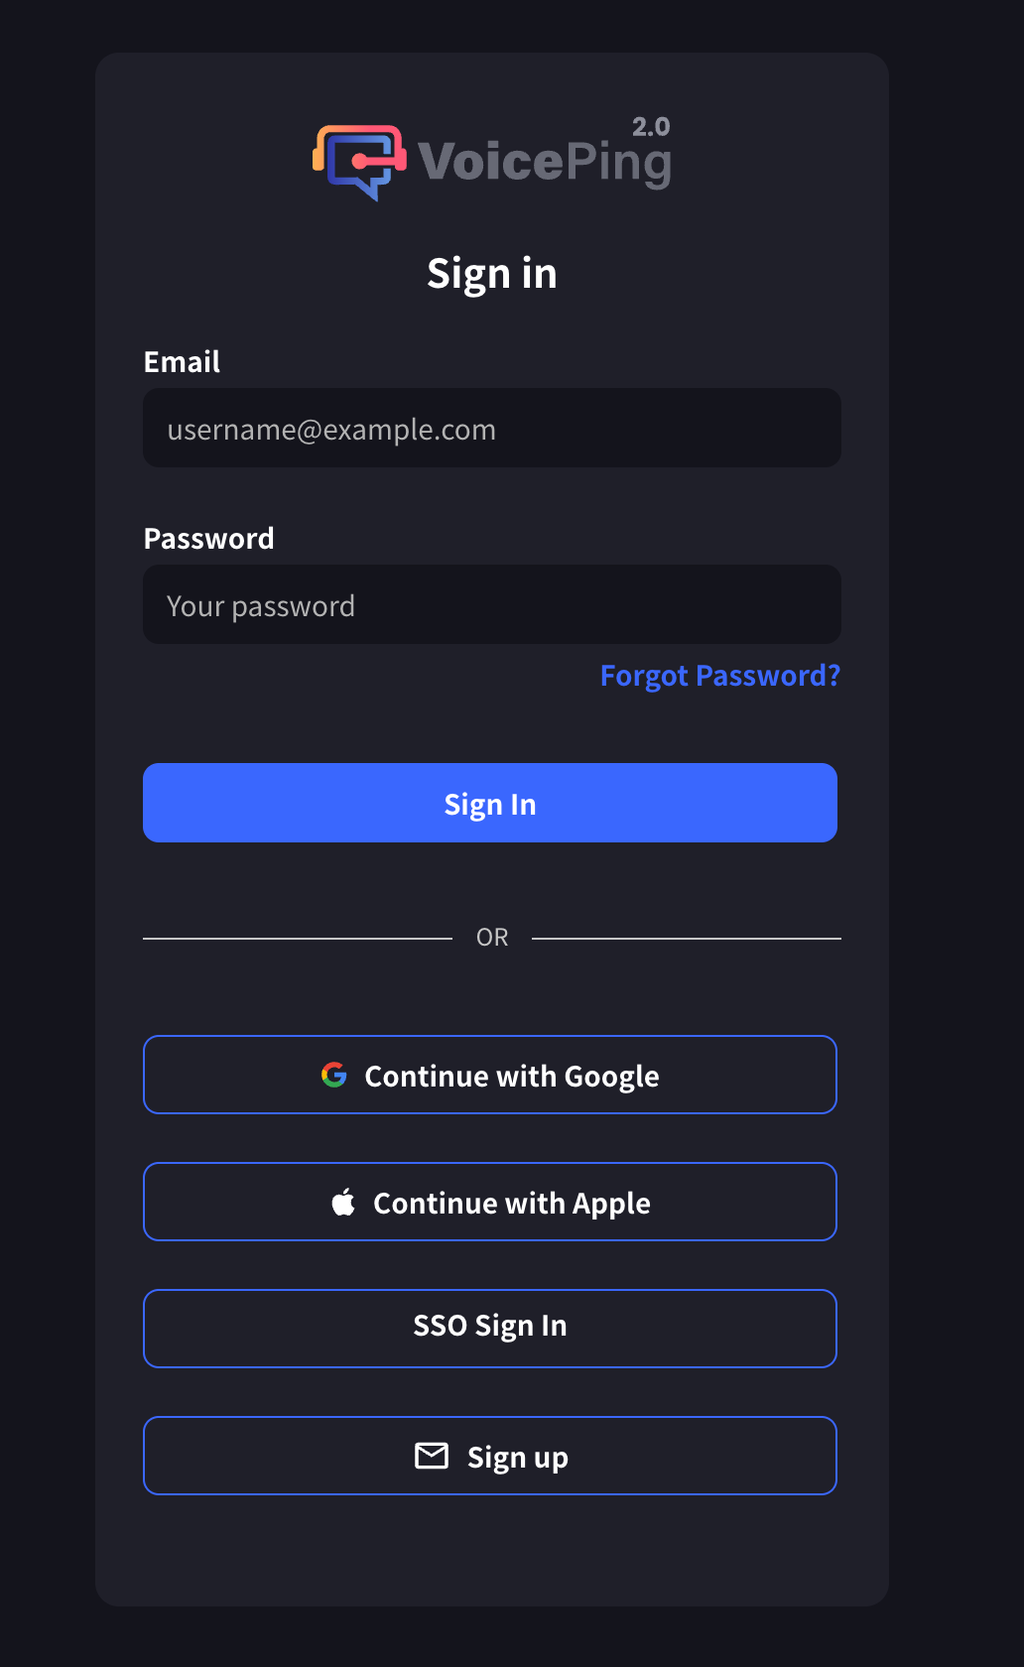
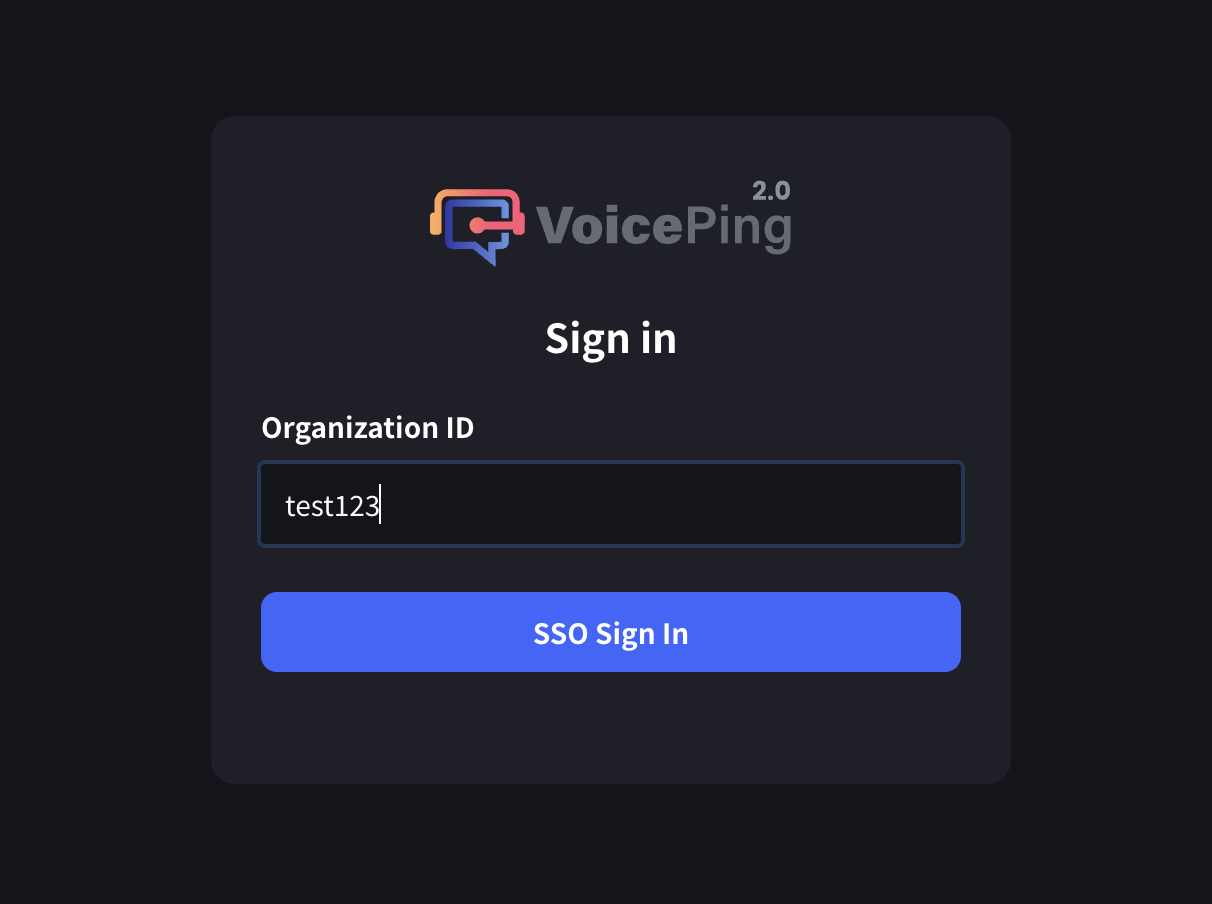
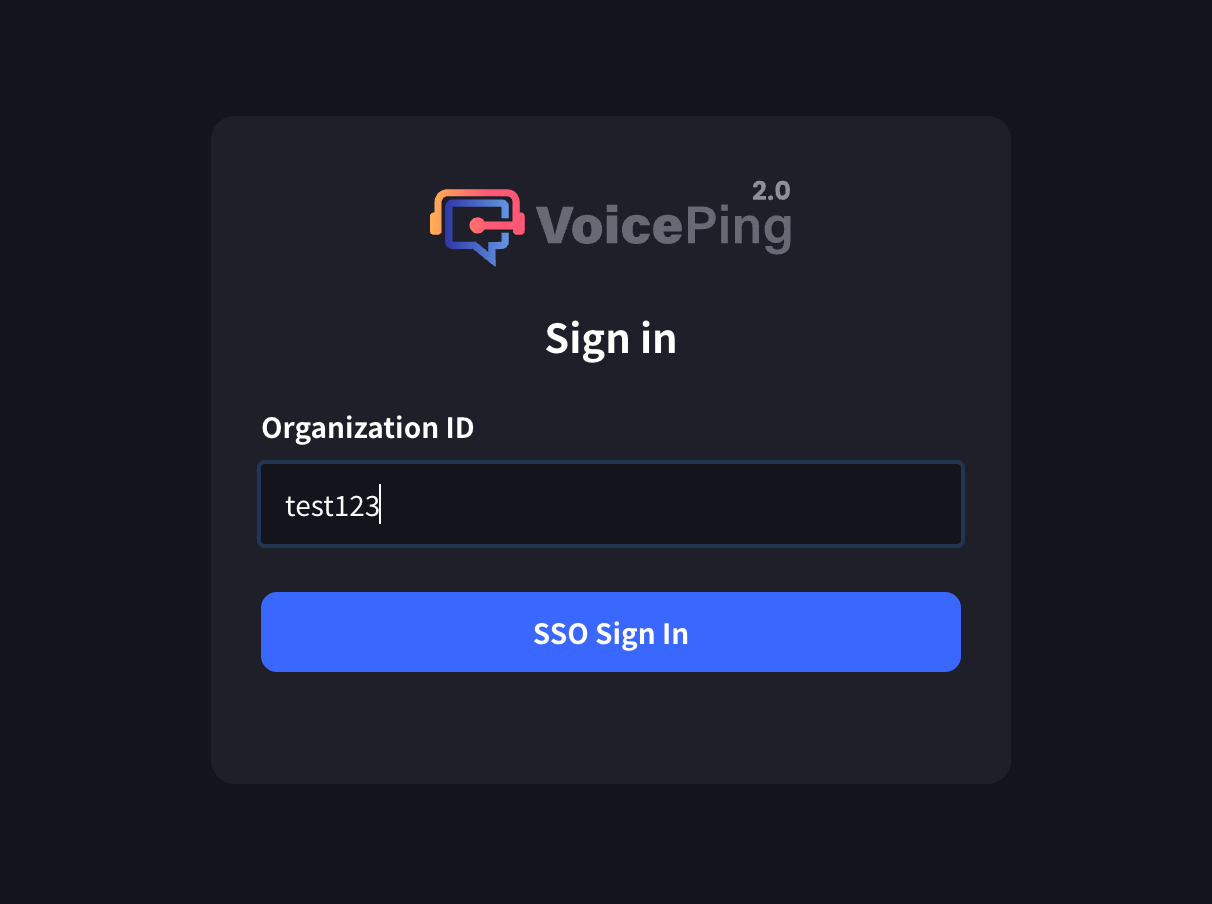
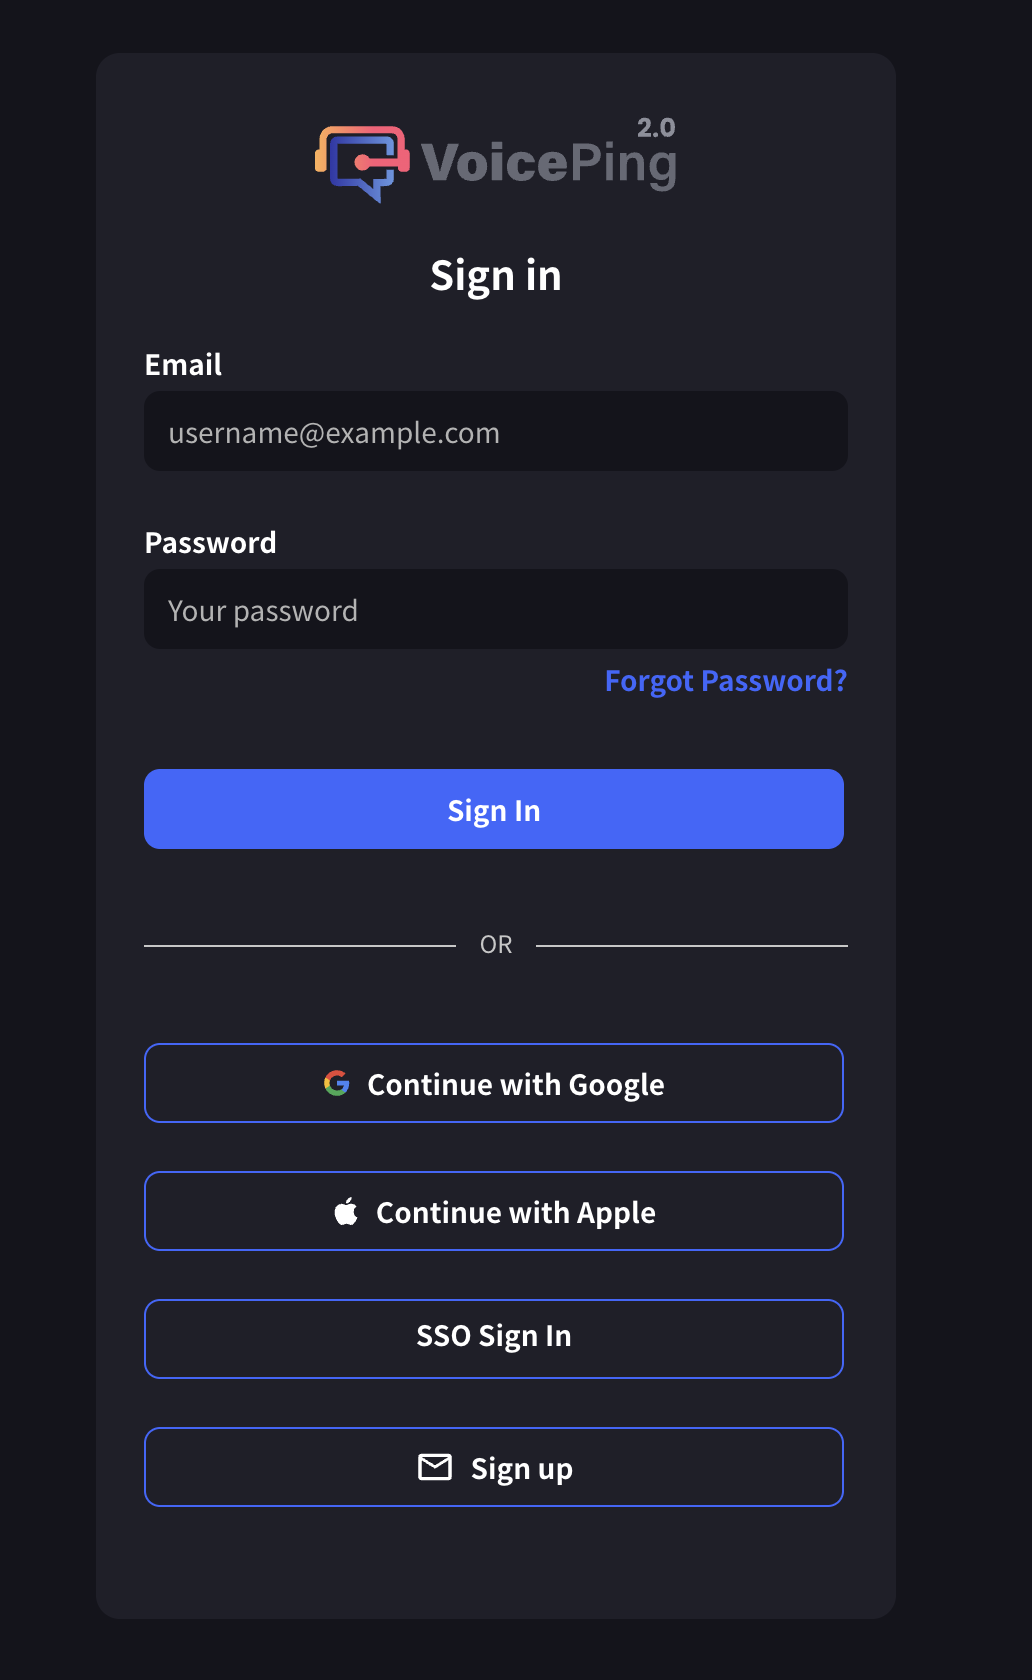
1. Go to the VoicePing sign-in page
2. Click the "SSO Sign In" button
<Frame>
  <img src="https://mintcdn.com/test-cf63e467/LU3oFsc_lcA5rDjy/ja/images/sso-entra/12-sso-login.png?fit=max&auto=format&n=LU3oFsc_lcA5rDjy&q=85&s=2bc56d7ceb21cab227505830301b5ec8" alt="SSO login" width="1032" height="1680" data-path="ja/images/sso-entra/12-sso-login.png" />
</Frame>

3. Enter organization ID

<Frame>
  <img src="https://mintcdn.com/test-cf63e467/LU3oFsc_lcA5rDjy/ja/images/sso-entra/13-org-id-input.png?fit=max&auto=format&n=LU3oFsc_lcA5rDjy&q=85&s=b83087d876e61fc2f03f303cf0c8a92a" alt="Organization ID input" width="1212" height="904" data-path="ja/images/sso-entra/13-org-id-input.png" />
</Frame>

<Frame>
  <img src="https://mintcdn.com/test-cf63e467/LU3oFsc_lcA5rDjy/ja/images/sso-entra/23-test-sso-login.png?fit=max&auto=format&n=LU3oFsc_lcA5rDjy&q=85&s=23c62802ec383efc5a51a13ee3f8745e" alt="SSO login test" width="1212" height="904" data-path="ja/images/sso-entra/23-test-sso-login.png" />
</Frame>

<Frame>
  <img src="https://mintcdn.com/test-cf63e467/LU3oFsc_lcA5rDjy/ja/images/sso-entra/24-org-id-login-screen.png?fit=max&auto=format&n=LU3oFsc_lcA5rDjy&q=85&s=694925b91b1594a04ea55b51c7922e00" alt="Organization ID login screen" width="1268" height="886" data-path="ja/images/sso-entra/24-org-id-login-screen.png" />
</Frame>

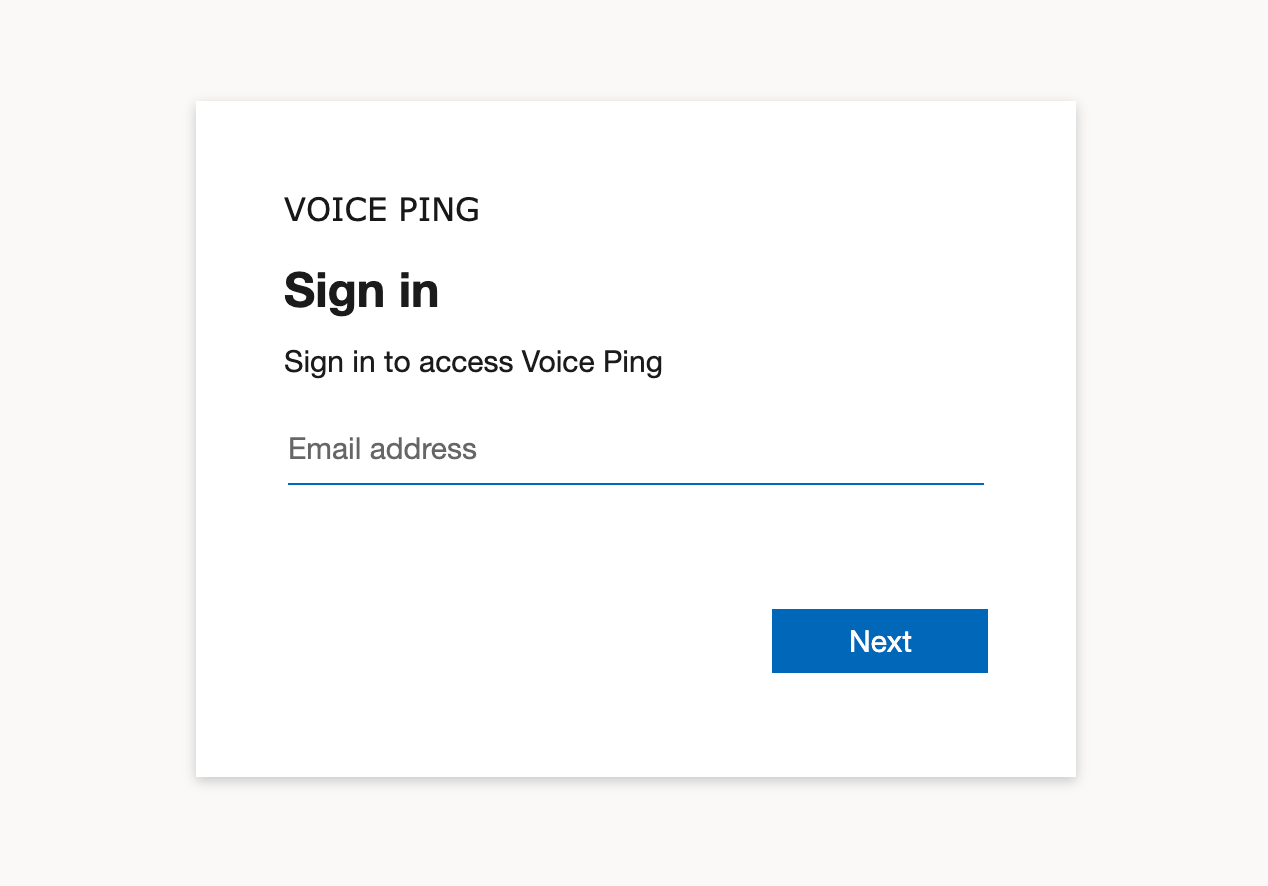
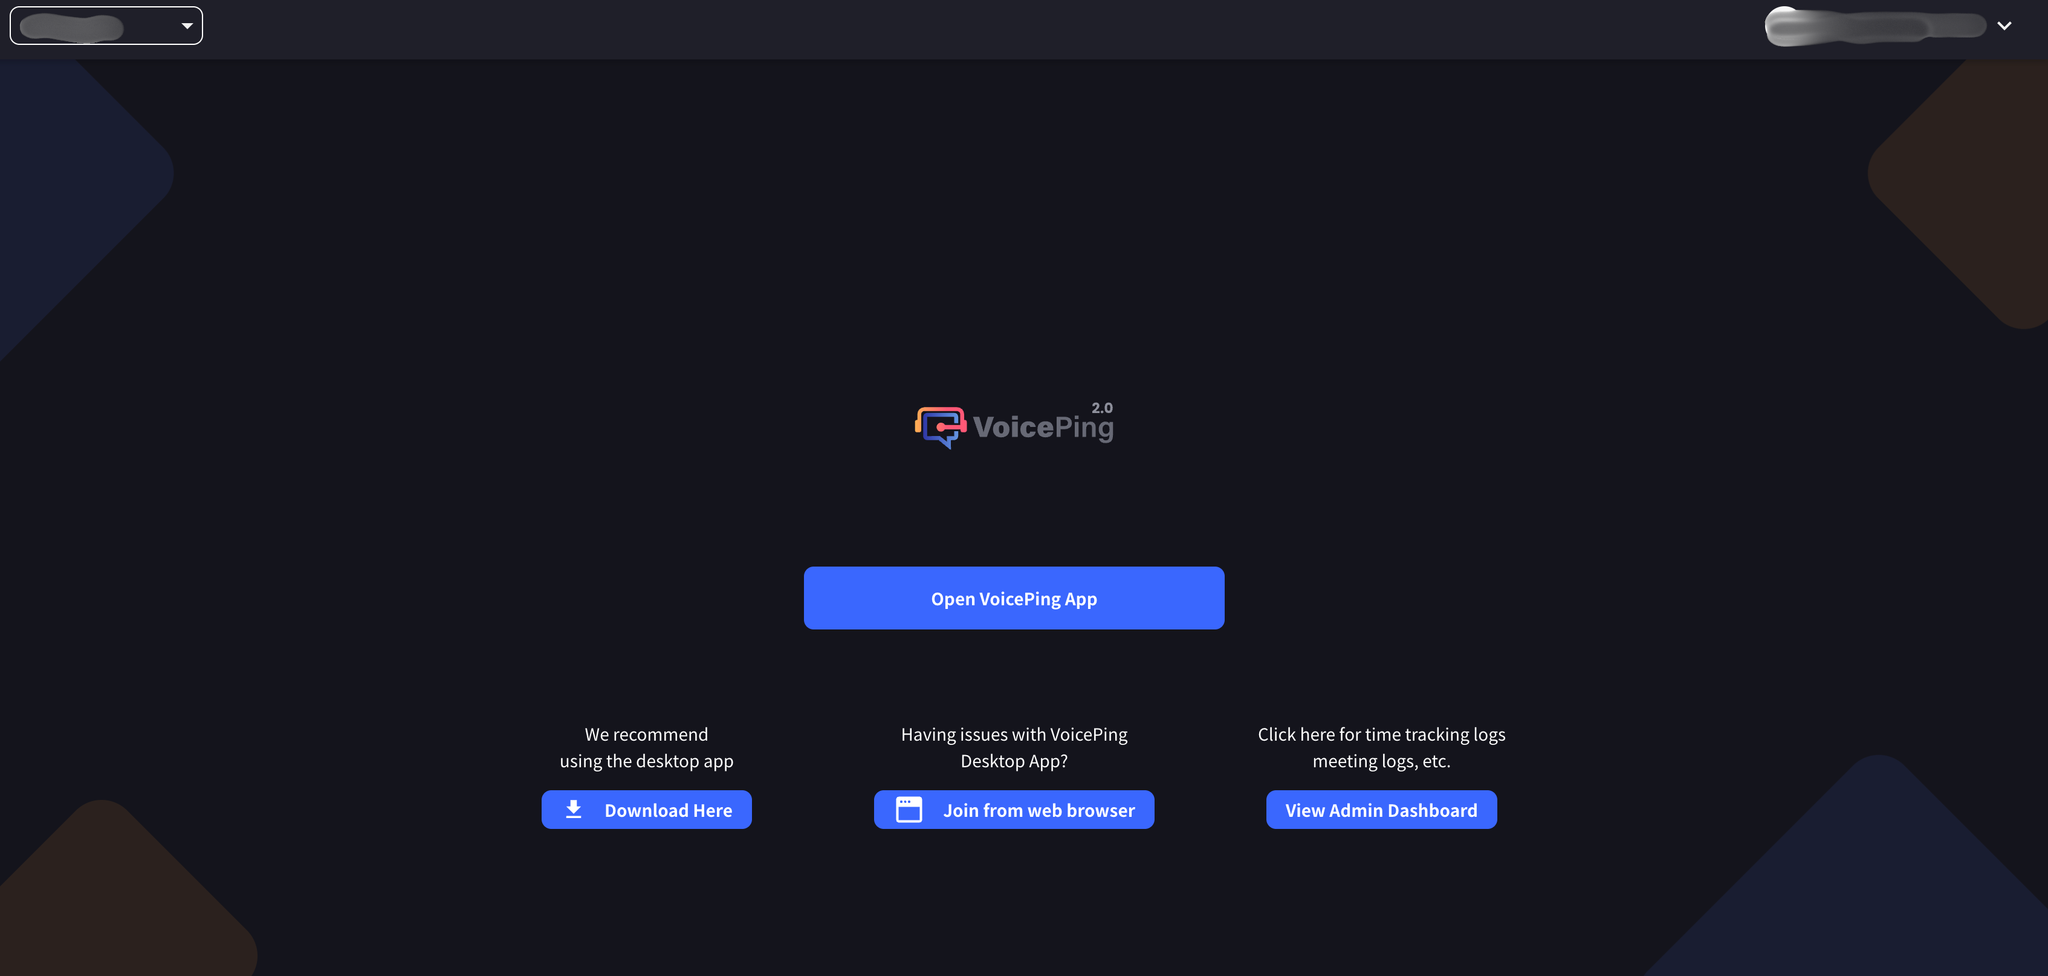
4. Authenticate on the Microsoft Entra ID authentication page
<Frame>
  <img src="https://mintcdn.com/test-cf63e467/LU3oFsc_lcA5rDjy/ja/images/sso-entra/25-sso-complete.png?fit=max&auto=format&n=LU3oFsc_lcA5rDjy&q=85&s=80a9bea3e92e40bc0d7219204a464783" alt="SSO authentication complete" width="2048" height="976" data-path="ja/images/sso-entra/25-sso-complete.png" />
</Frame>

***

<ContactEn />