> ## Documentation Index
> Fetch the complete documentation index at: https://manual.voiceping.net/llms.txt
> Use this file to discover all available pages before exploring further.
# 모바일에서 결제 관리
> 플랜, 카드, 인보이스, 결제 내역을 모바일 앱 안에서 관리하세요.
export const ContactKo = () => <>
문의 사항이 있으시면 이 양식을 통해 연락해 주세요.
공식 링크
공식 웹사이트 방문
X에서 팔로우
Facebook에서 좋아요
LinkedIn에서 연결
;
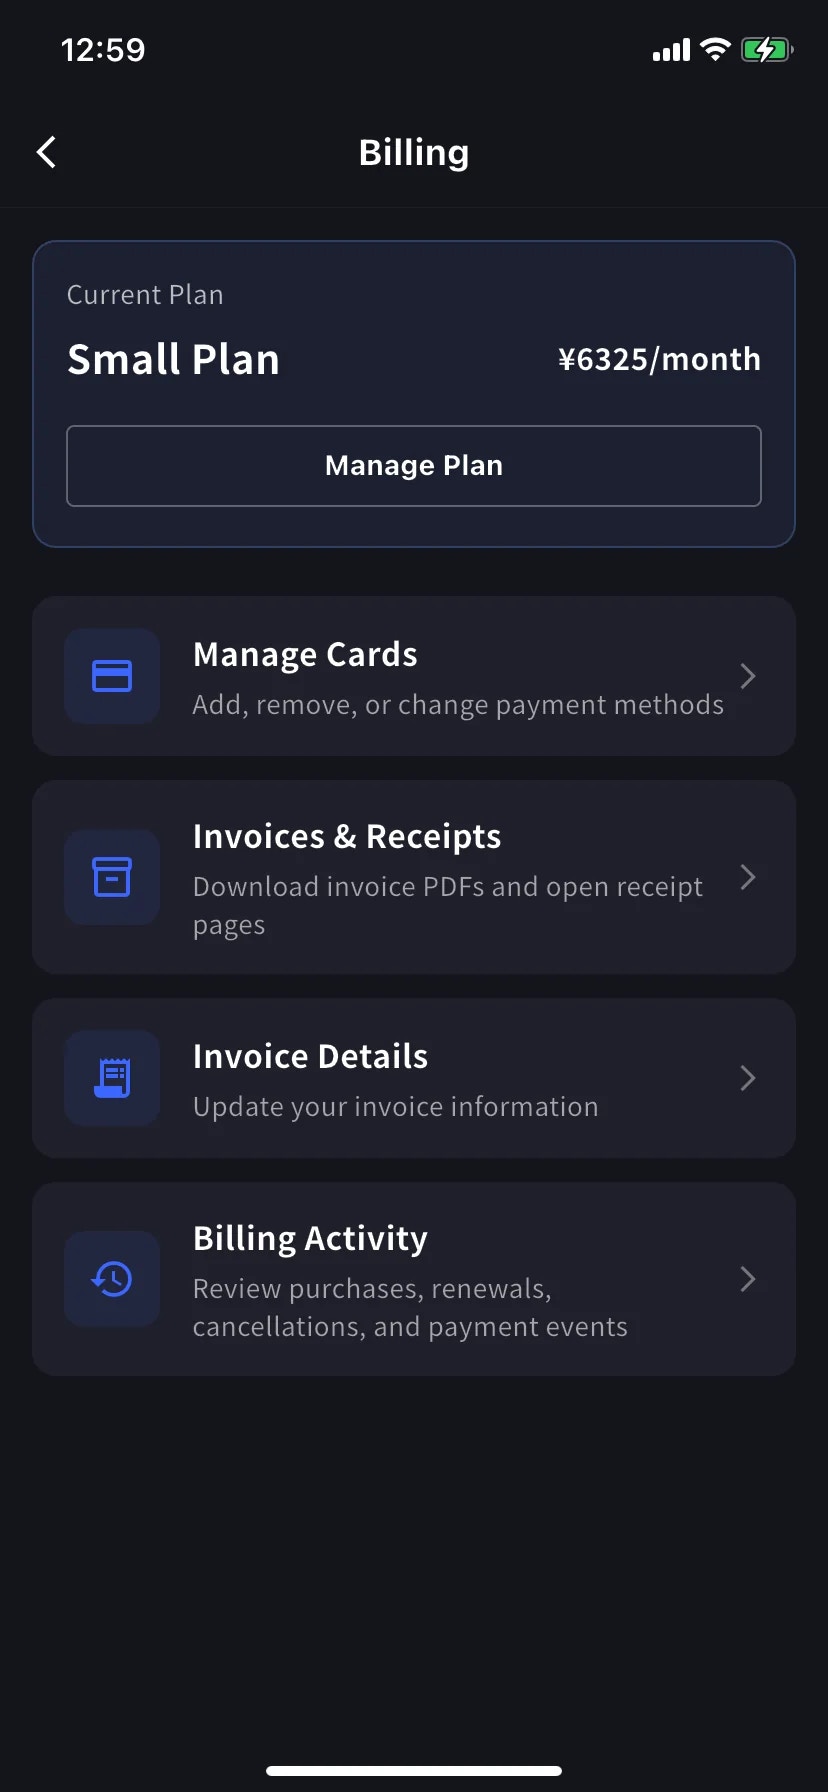
 PC 관리자 대시보드에서 하던 일들 — 카드 변경, 영수증 받기, 기록 확인 — 이 모두 모바일 앱의 **Billing** 화면에 모여 있습니다. 열면 현재 플랜과 5개의 바로가기가 바로 나타납니다.
## 이런 상황에 사용하세요
PC 관리자 대시보드에서 하던 일들 — 카드 변경, 영수증 받기, 기록 확인 — 이 모두 모바일 앱의 **Billing** 화면에 모여 있습니다. 열면 현재 플랜과 5개의 바로가기가 바로 나타납니다.
## 이런 상황에 사용하세요
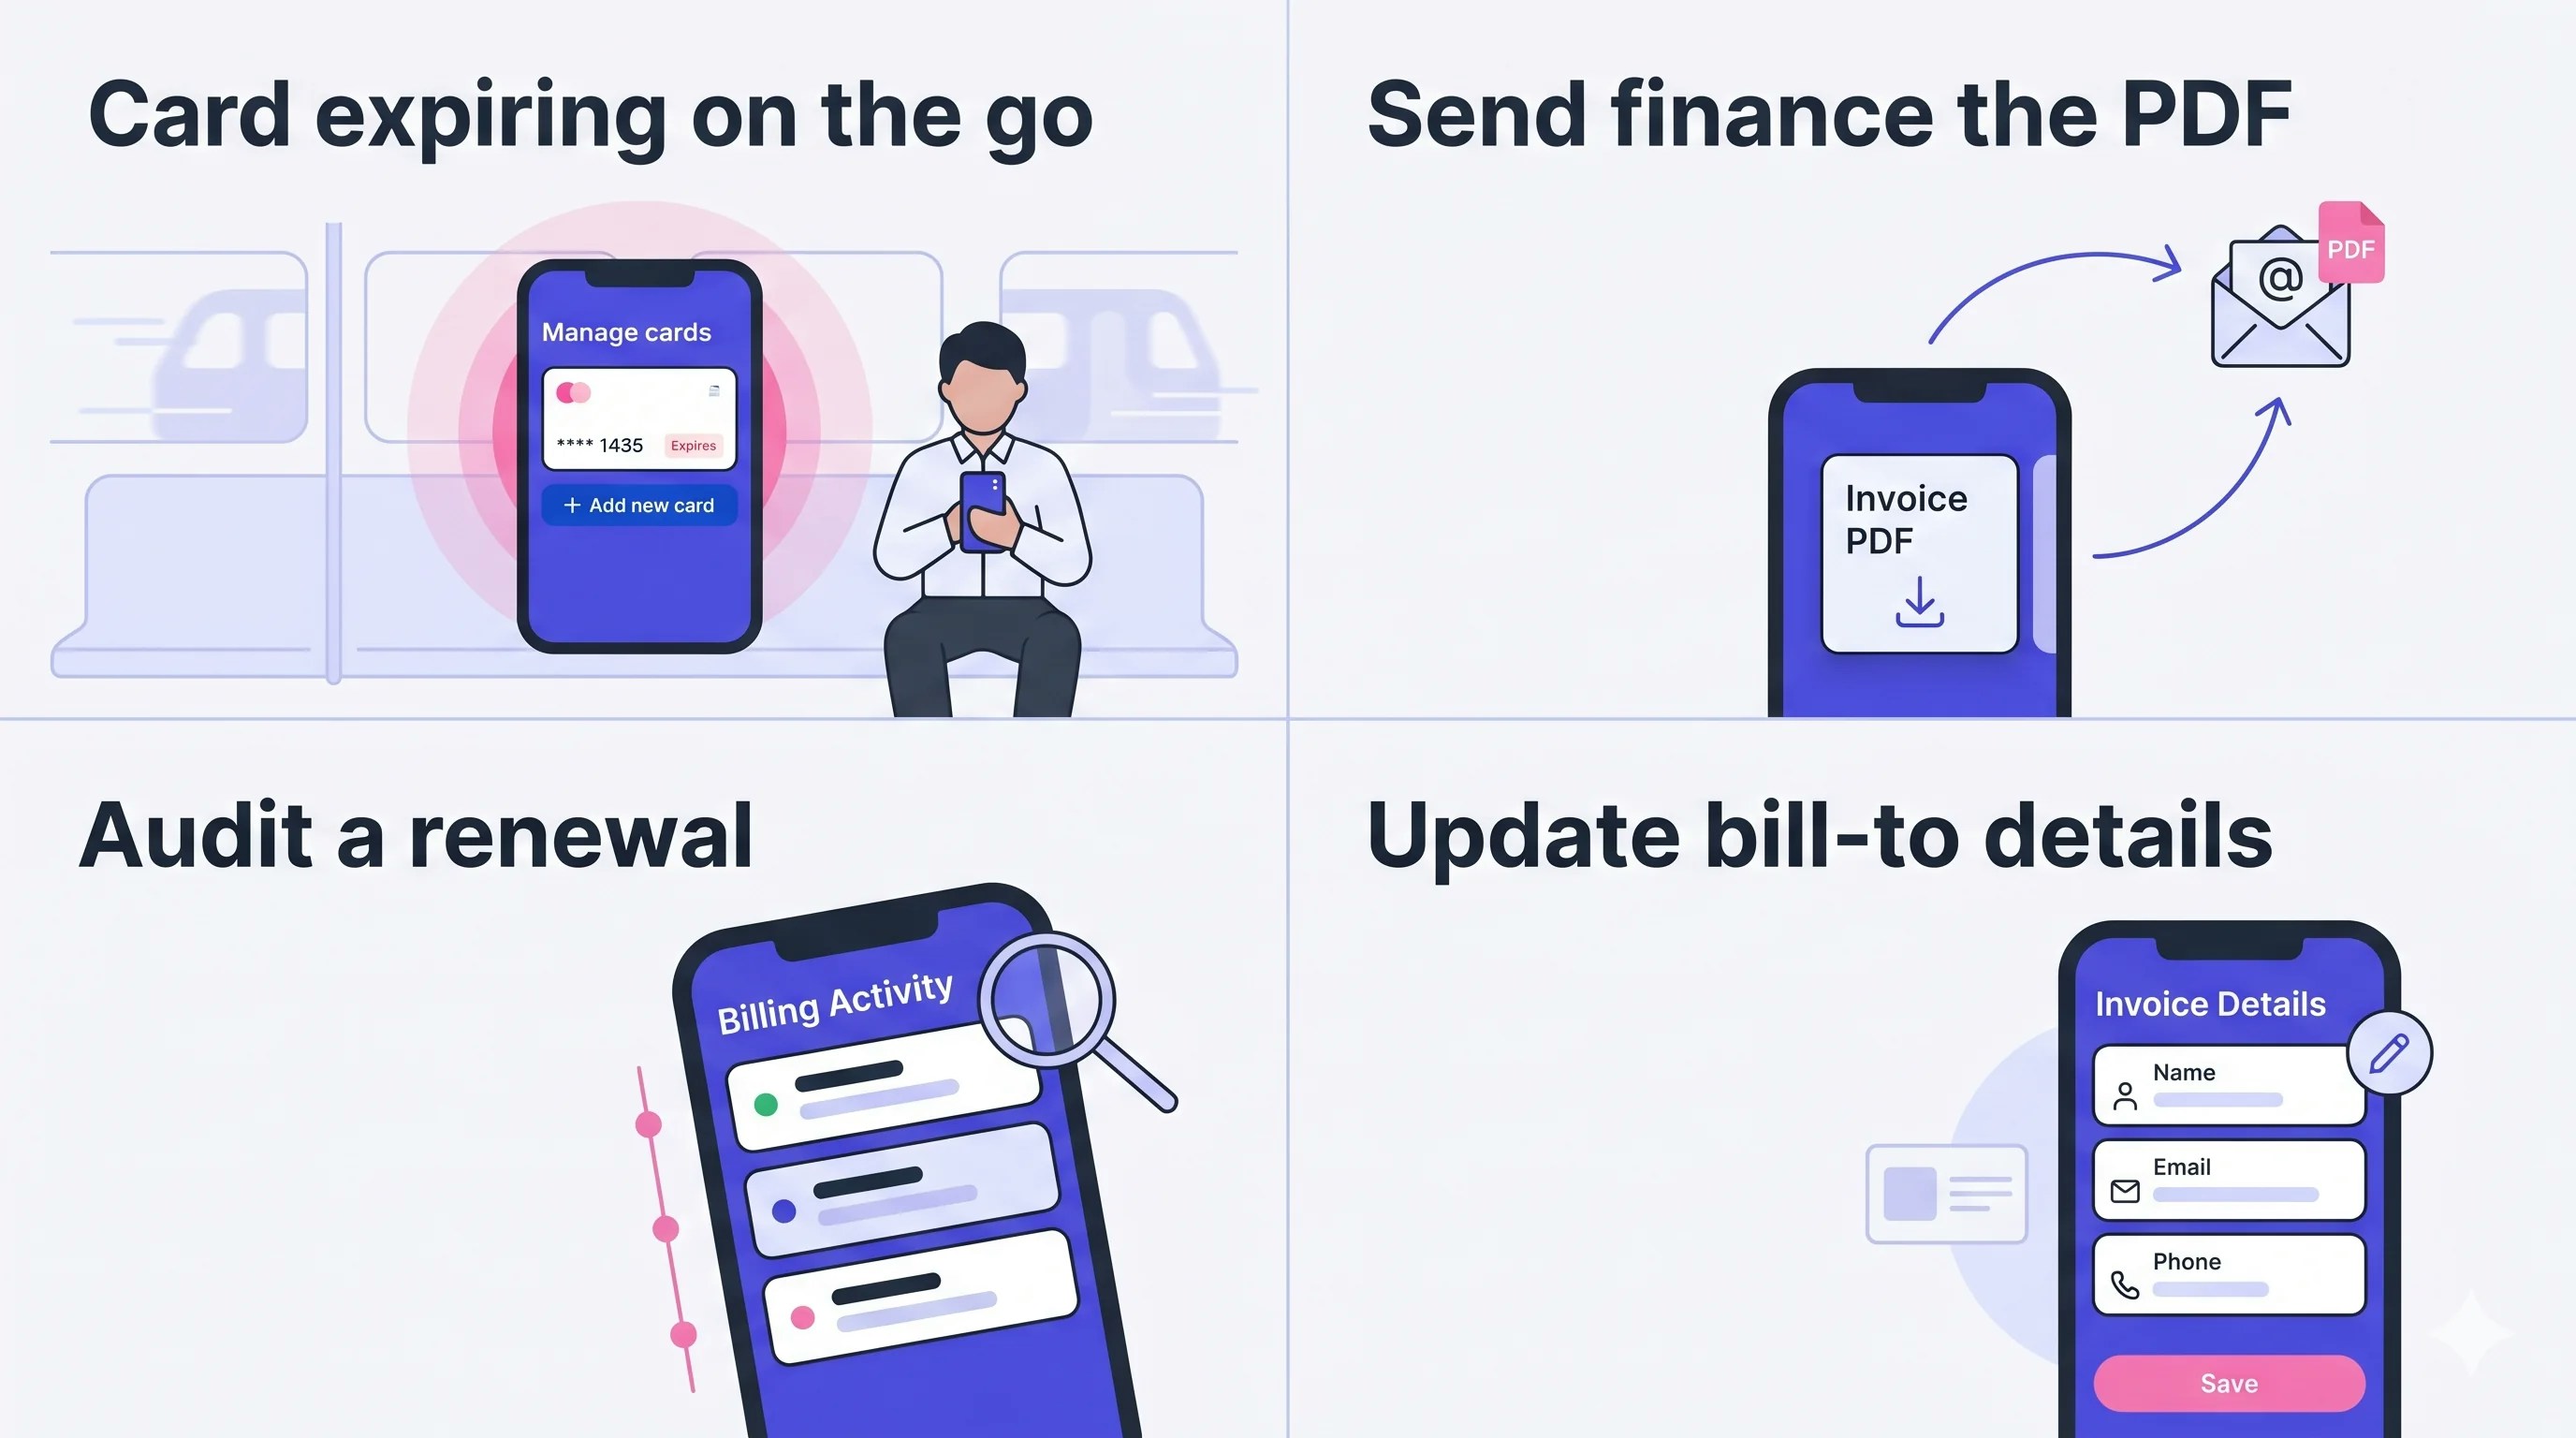 * **이동 중 카드 만료 임박** — 지하철에서도 새 카드로 전환. 노트북도, 월요일까지 기다릴 필요도 없음.
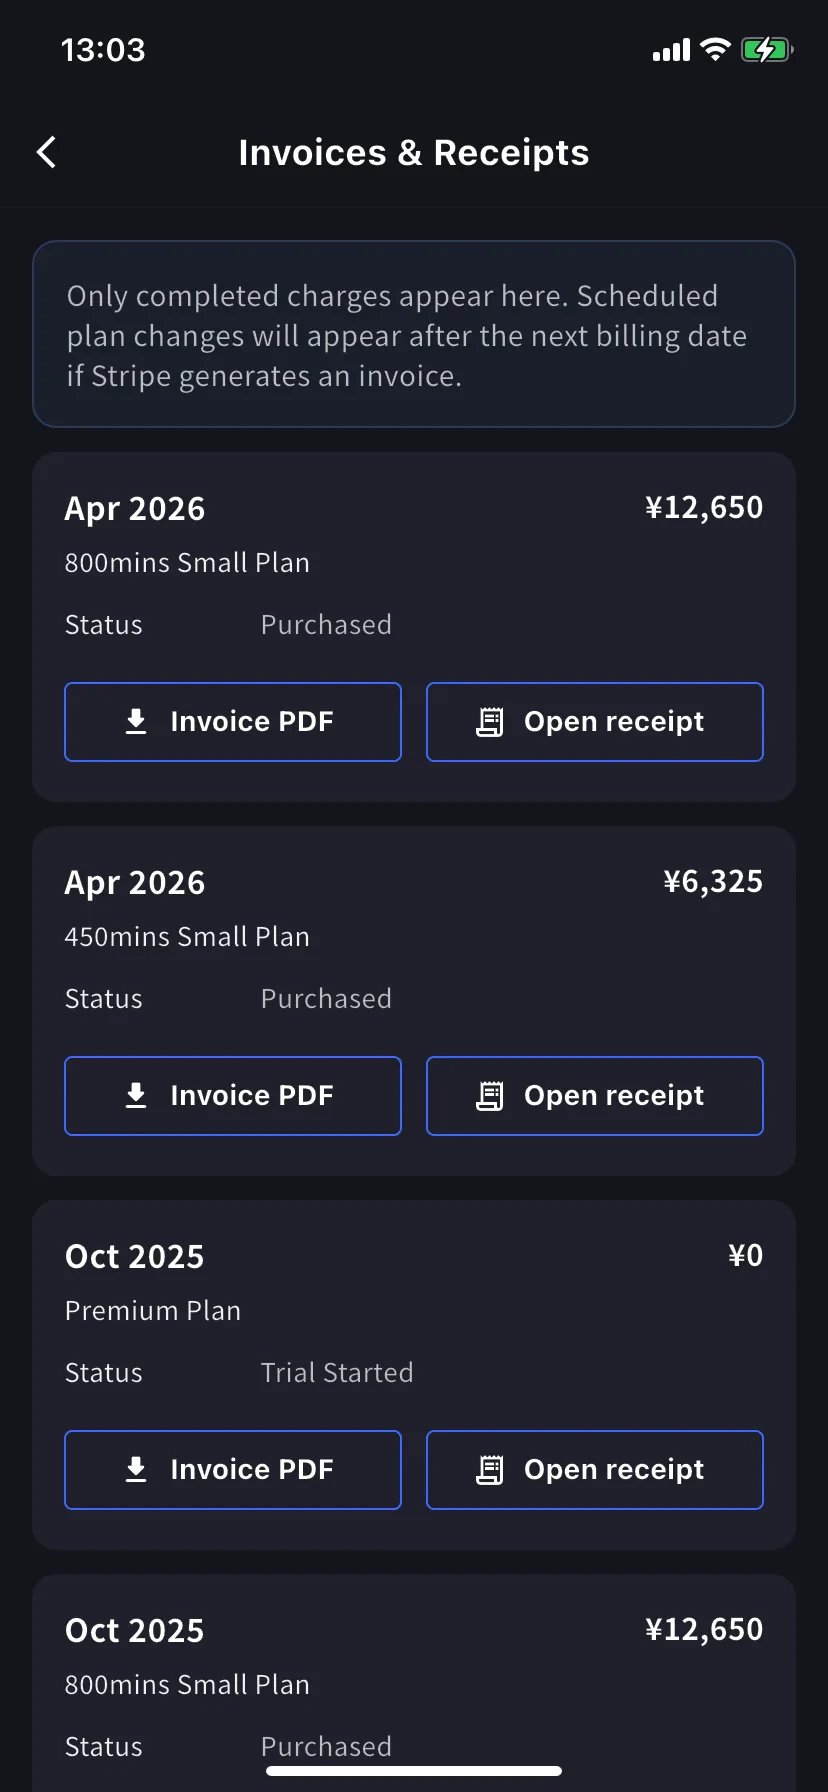
* **재무팀에 PDF 전송** — Invoices & Receipts 목록에서 Invoice PDF를 받아 메일로 전달.
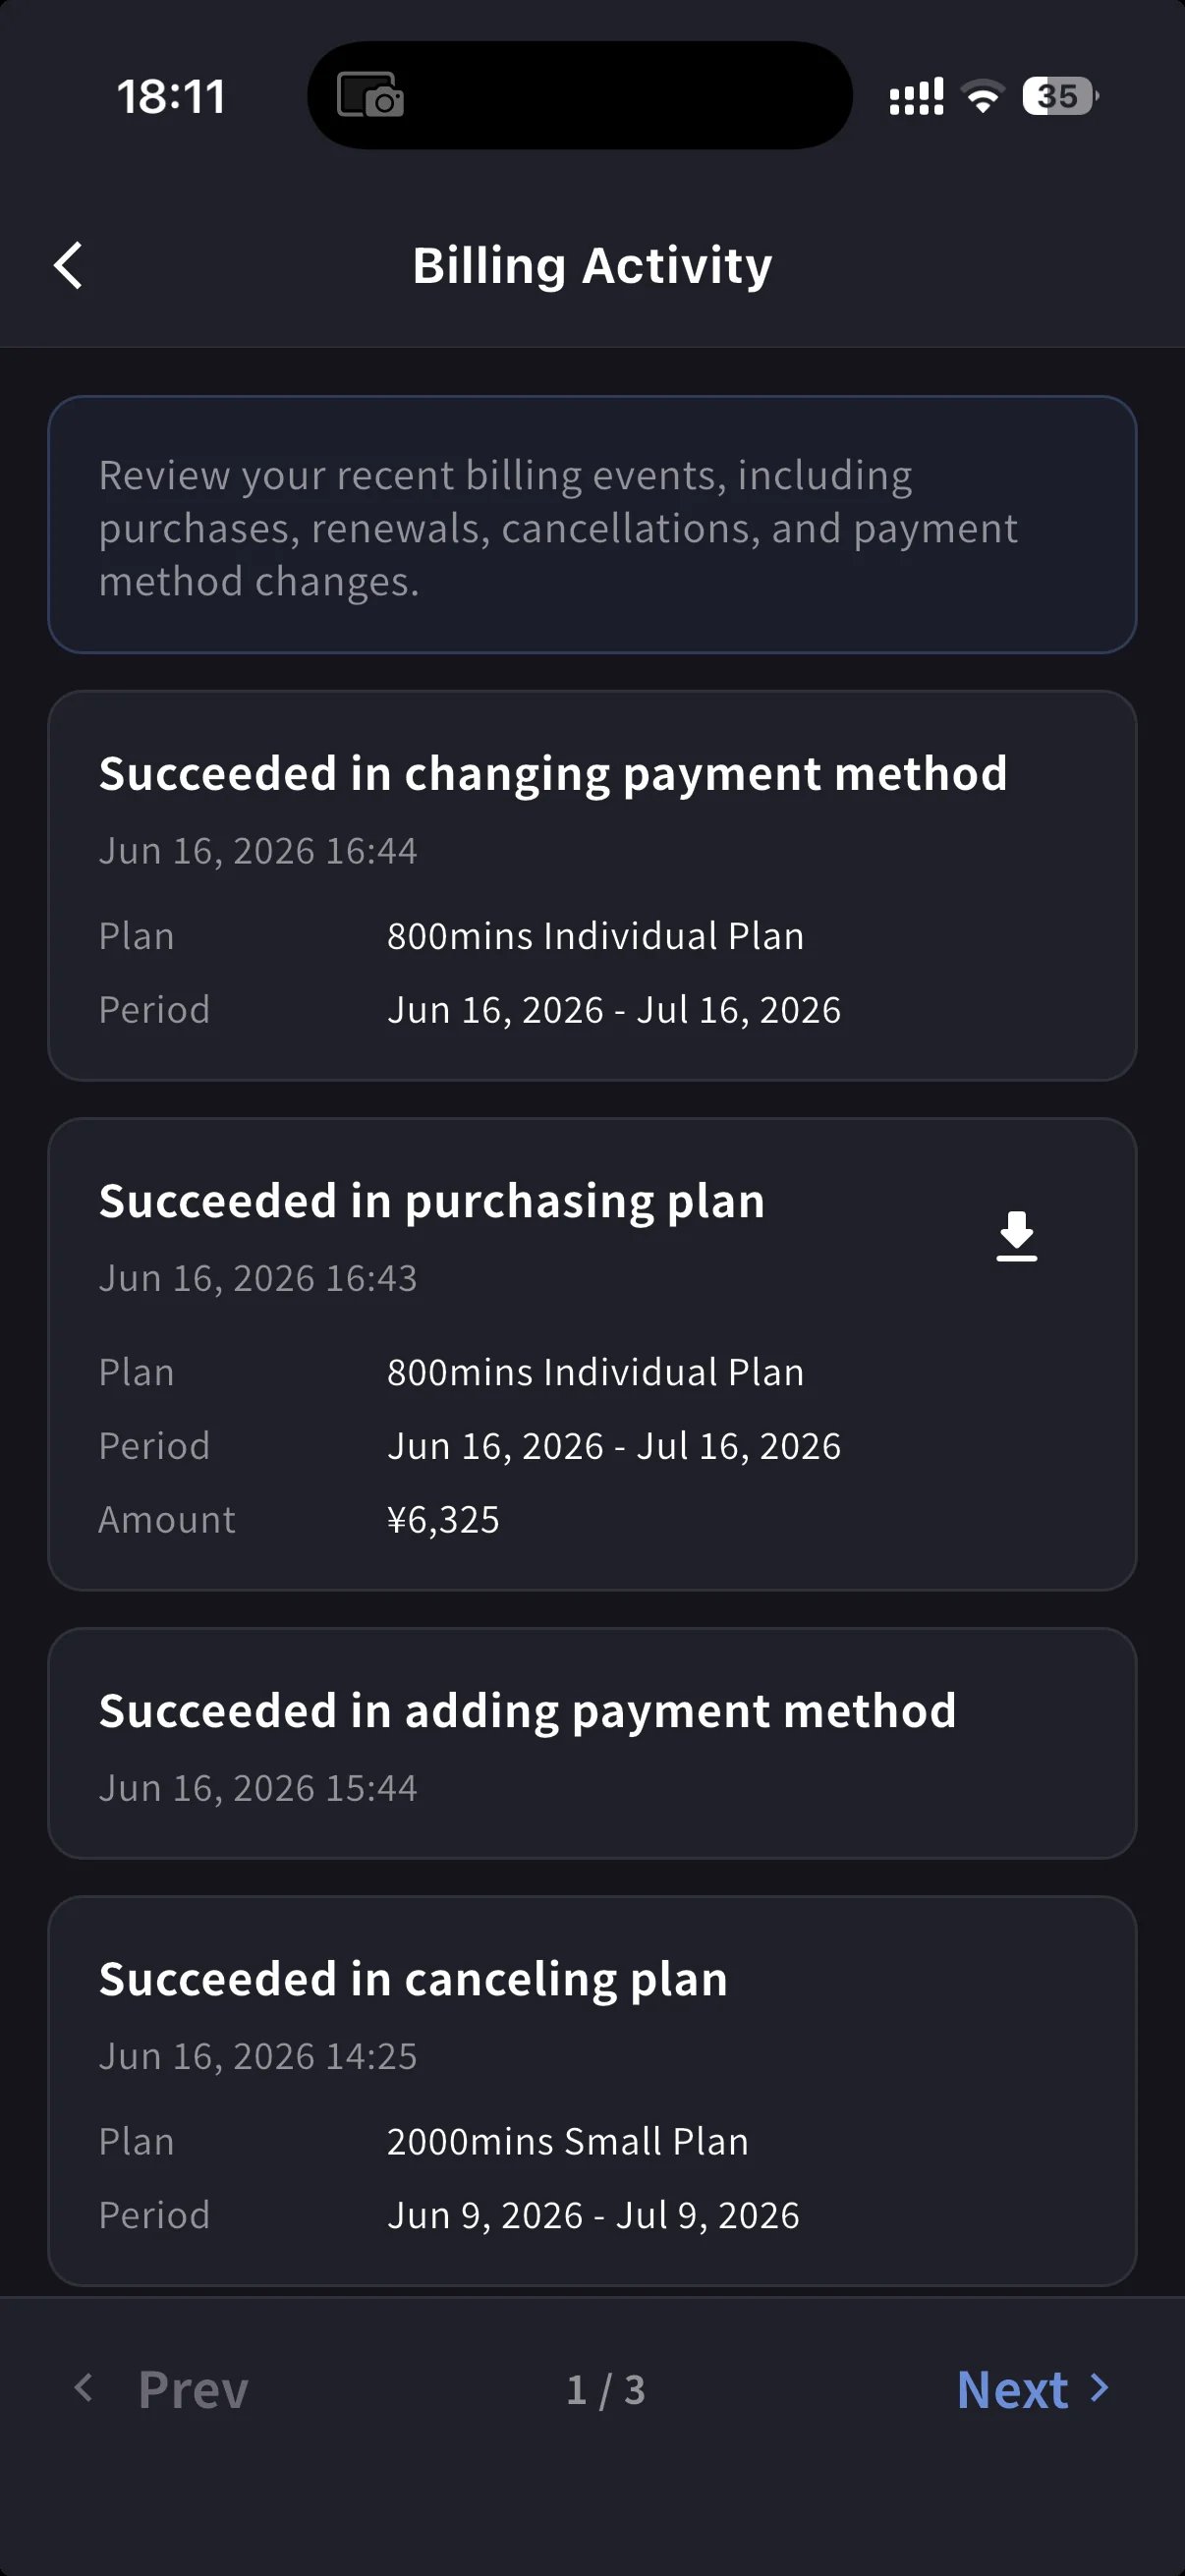
* **갱신 감사** — 모든 갱신, 취소, 복원, 카드 변경이 타임스탬프와 IP와 함께 기록됨.
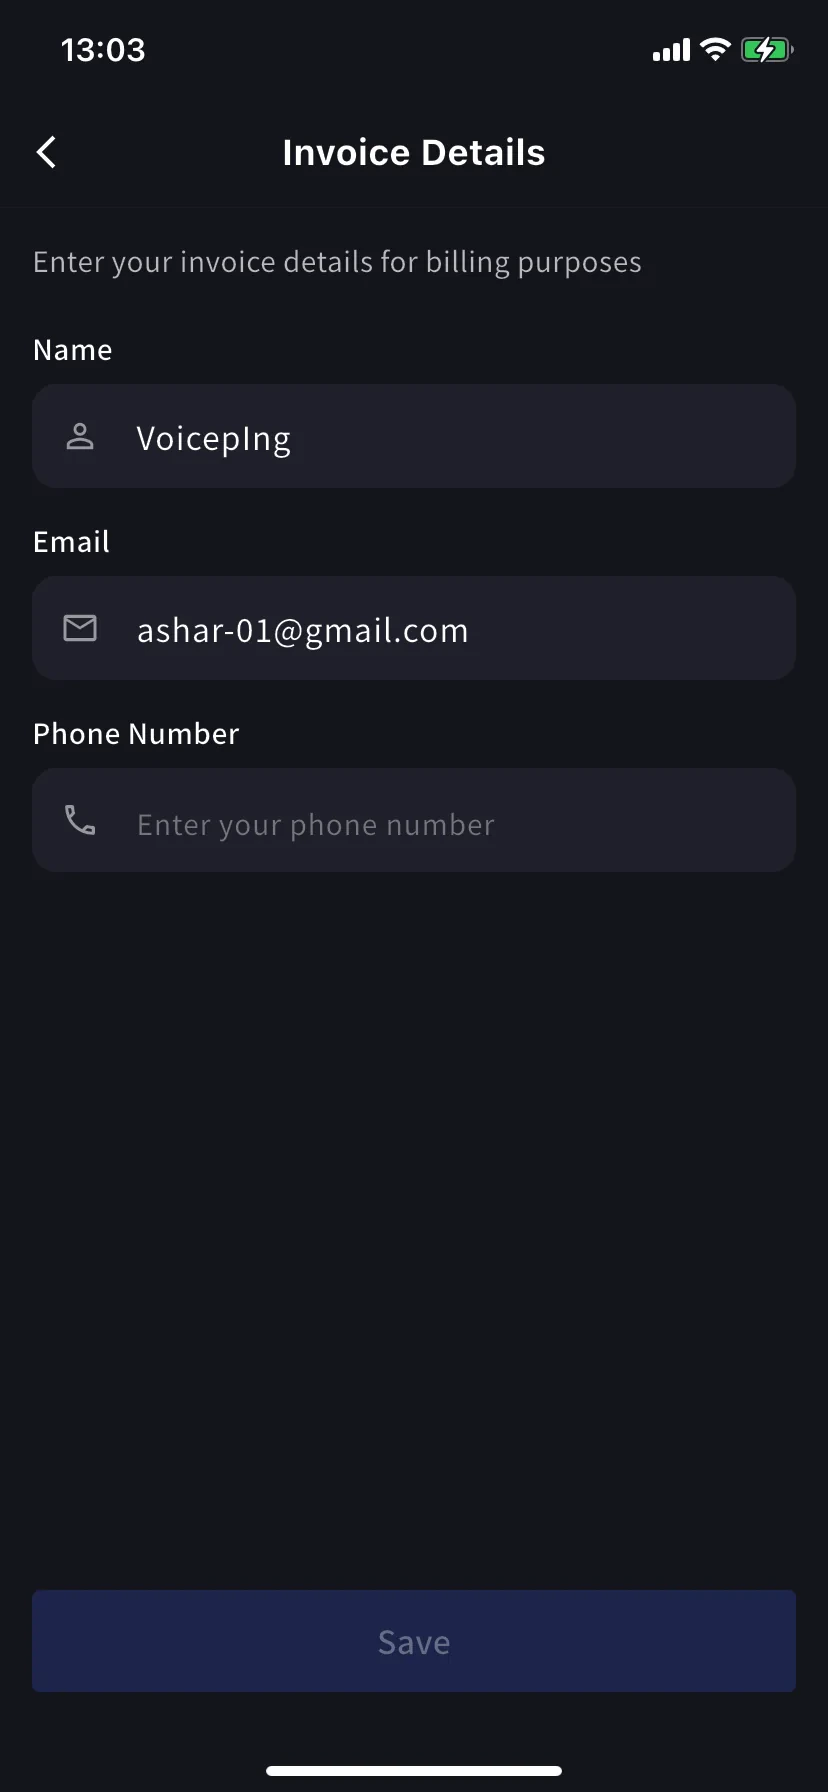
* **청구 정보 업데이트** — 다음 결제 전에 Invoice Details 화면에서 회사명 / 이메일 / 전화 수정.
## Billing 허브 열기
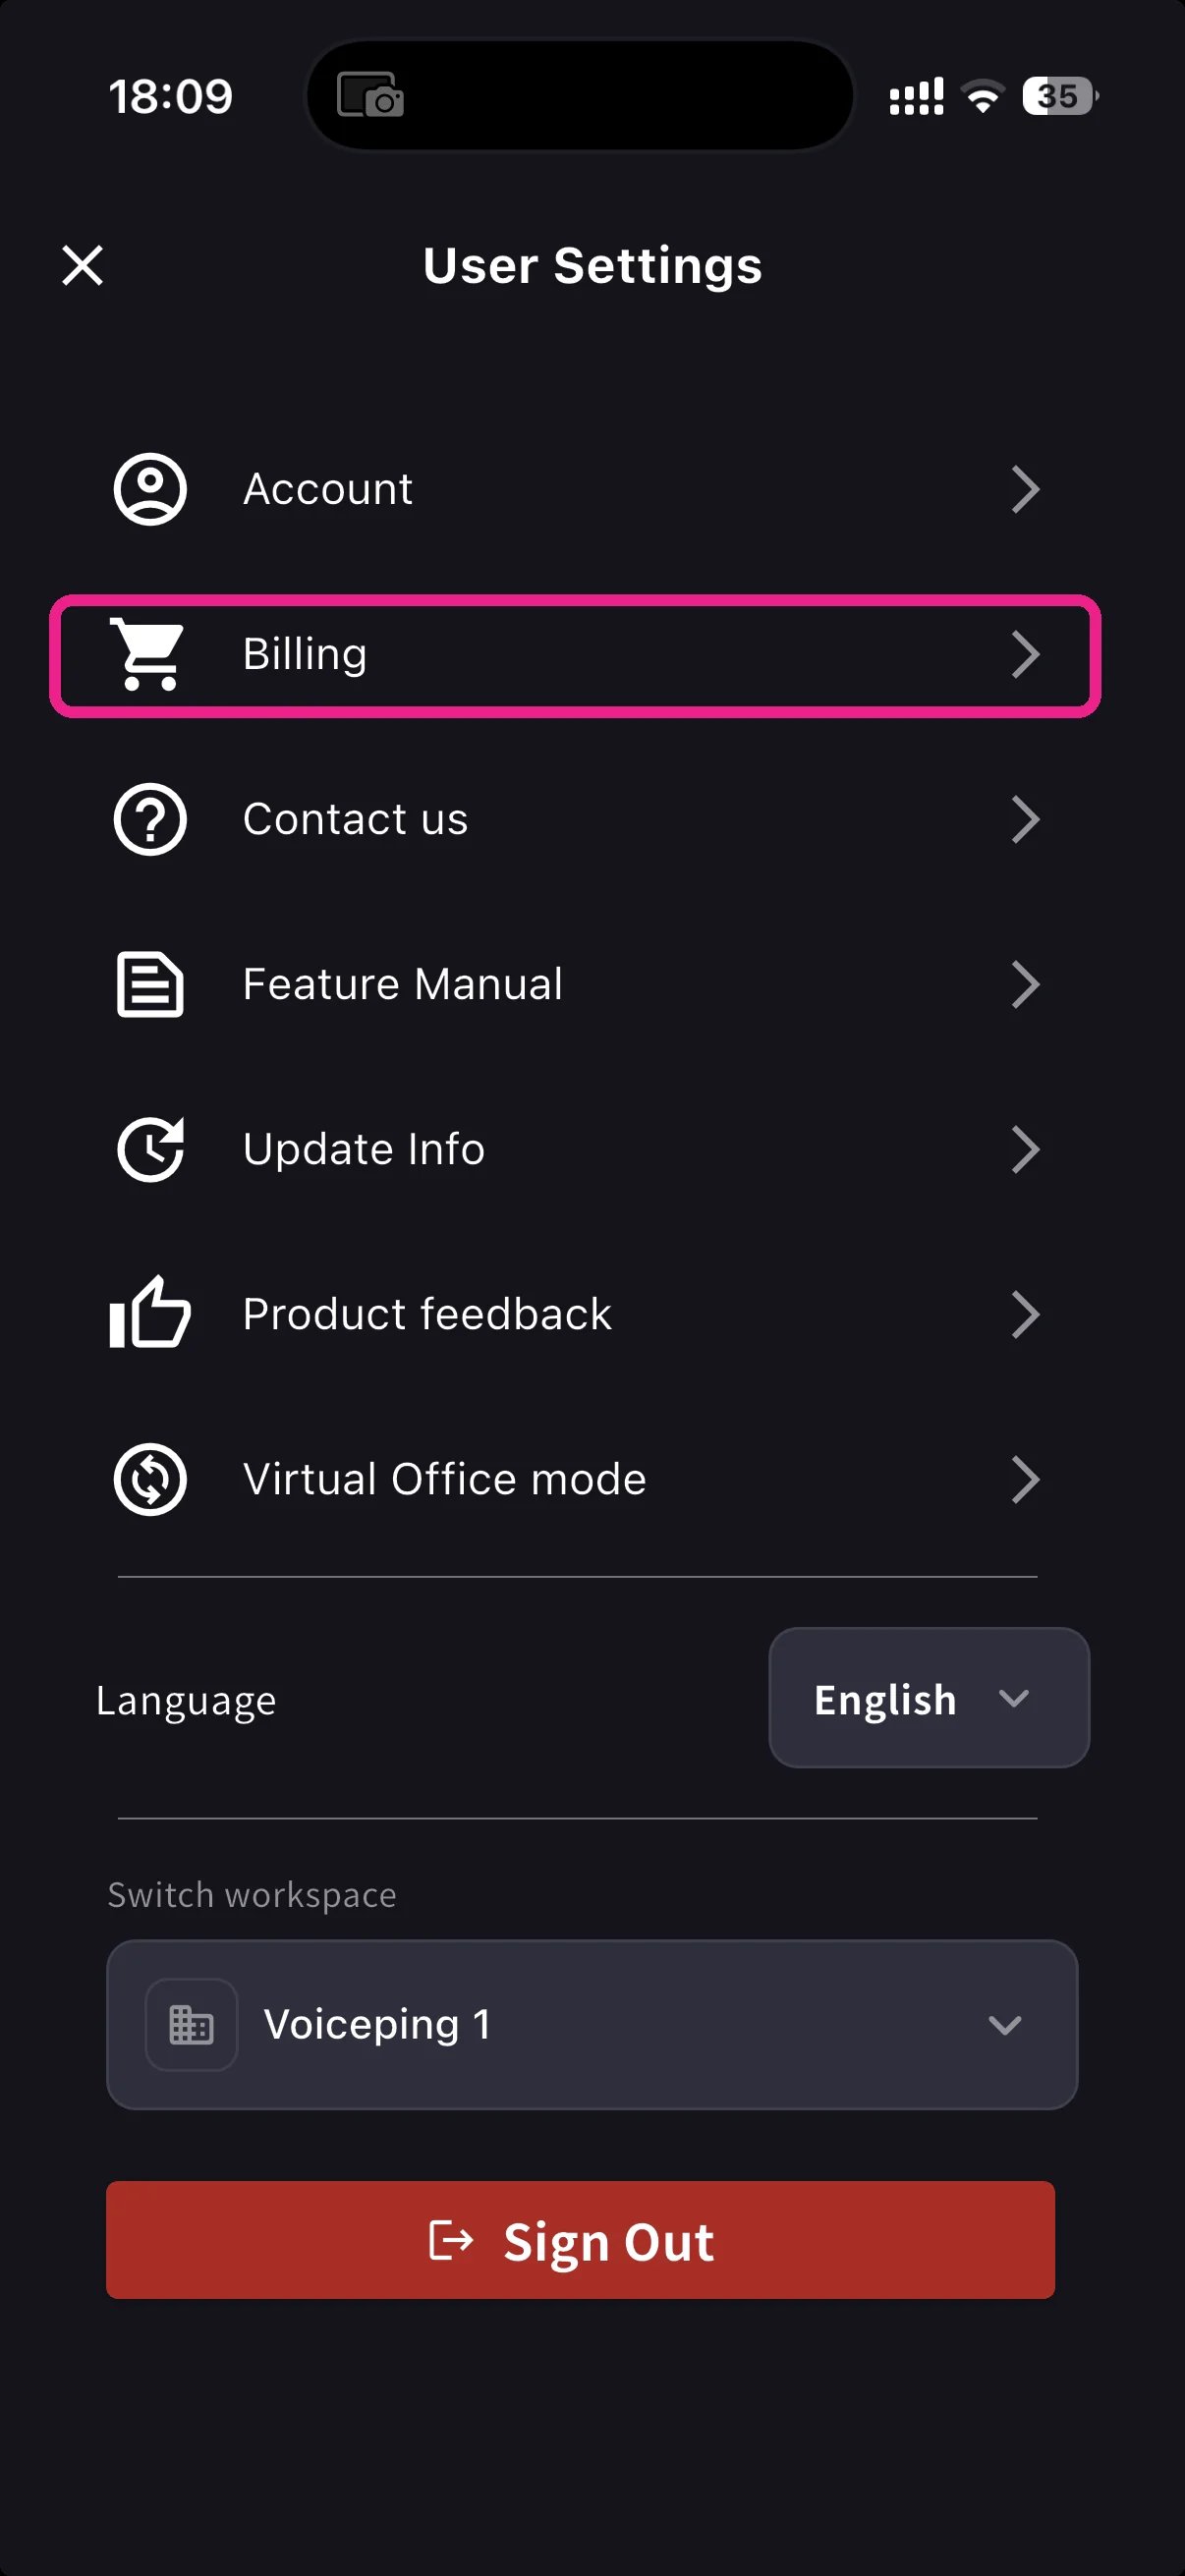
홈 화면에서 사이드 메뉴를 열고 **Billing** (카트 아이콘) 탭.
**Current Plan** 카드에 플랜 이름과 월 요금이 표시되고, 바로 **Manage Plan** 버튼이 있습니다. 아래에 4개의 바로가기:
| 바로가기 | 용도 |
| ----------------------- | ------------------------ |
| **Manage Cards** | 결제 수단 추가, 제거, 변경 |
| **Invoices & Receipts** | 인보이스 PDF 다운로드, 영수증 열기 |
| **Invoice Details** | 인보이스의 청구 대상 이름, 이메일, 전화 |
| **Billing Activity** | 구매, 갱신, 취소, 카드 변경 이벤트 로그 |
플랜 업그레이드 / 다운그레이드 / 취소는 **Manage Plan** 탭 → [모바일에서 업그레이드, 다운그레이드 & 취소](/ko/mobile-plan-change) 참조.
## Manage Cards
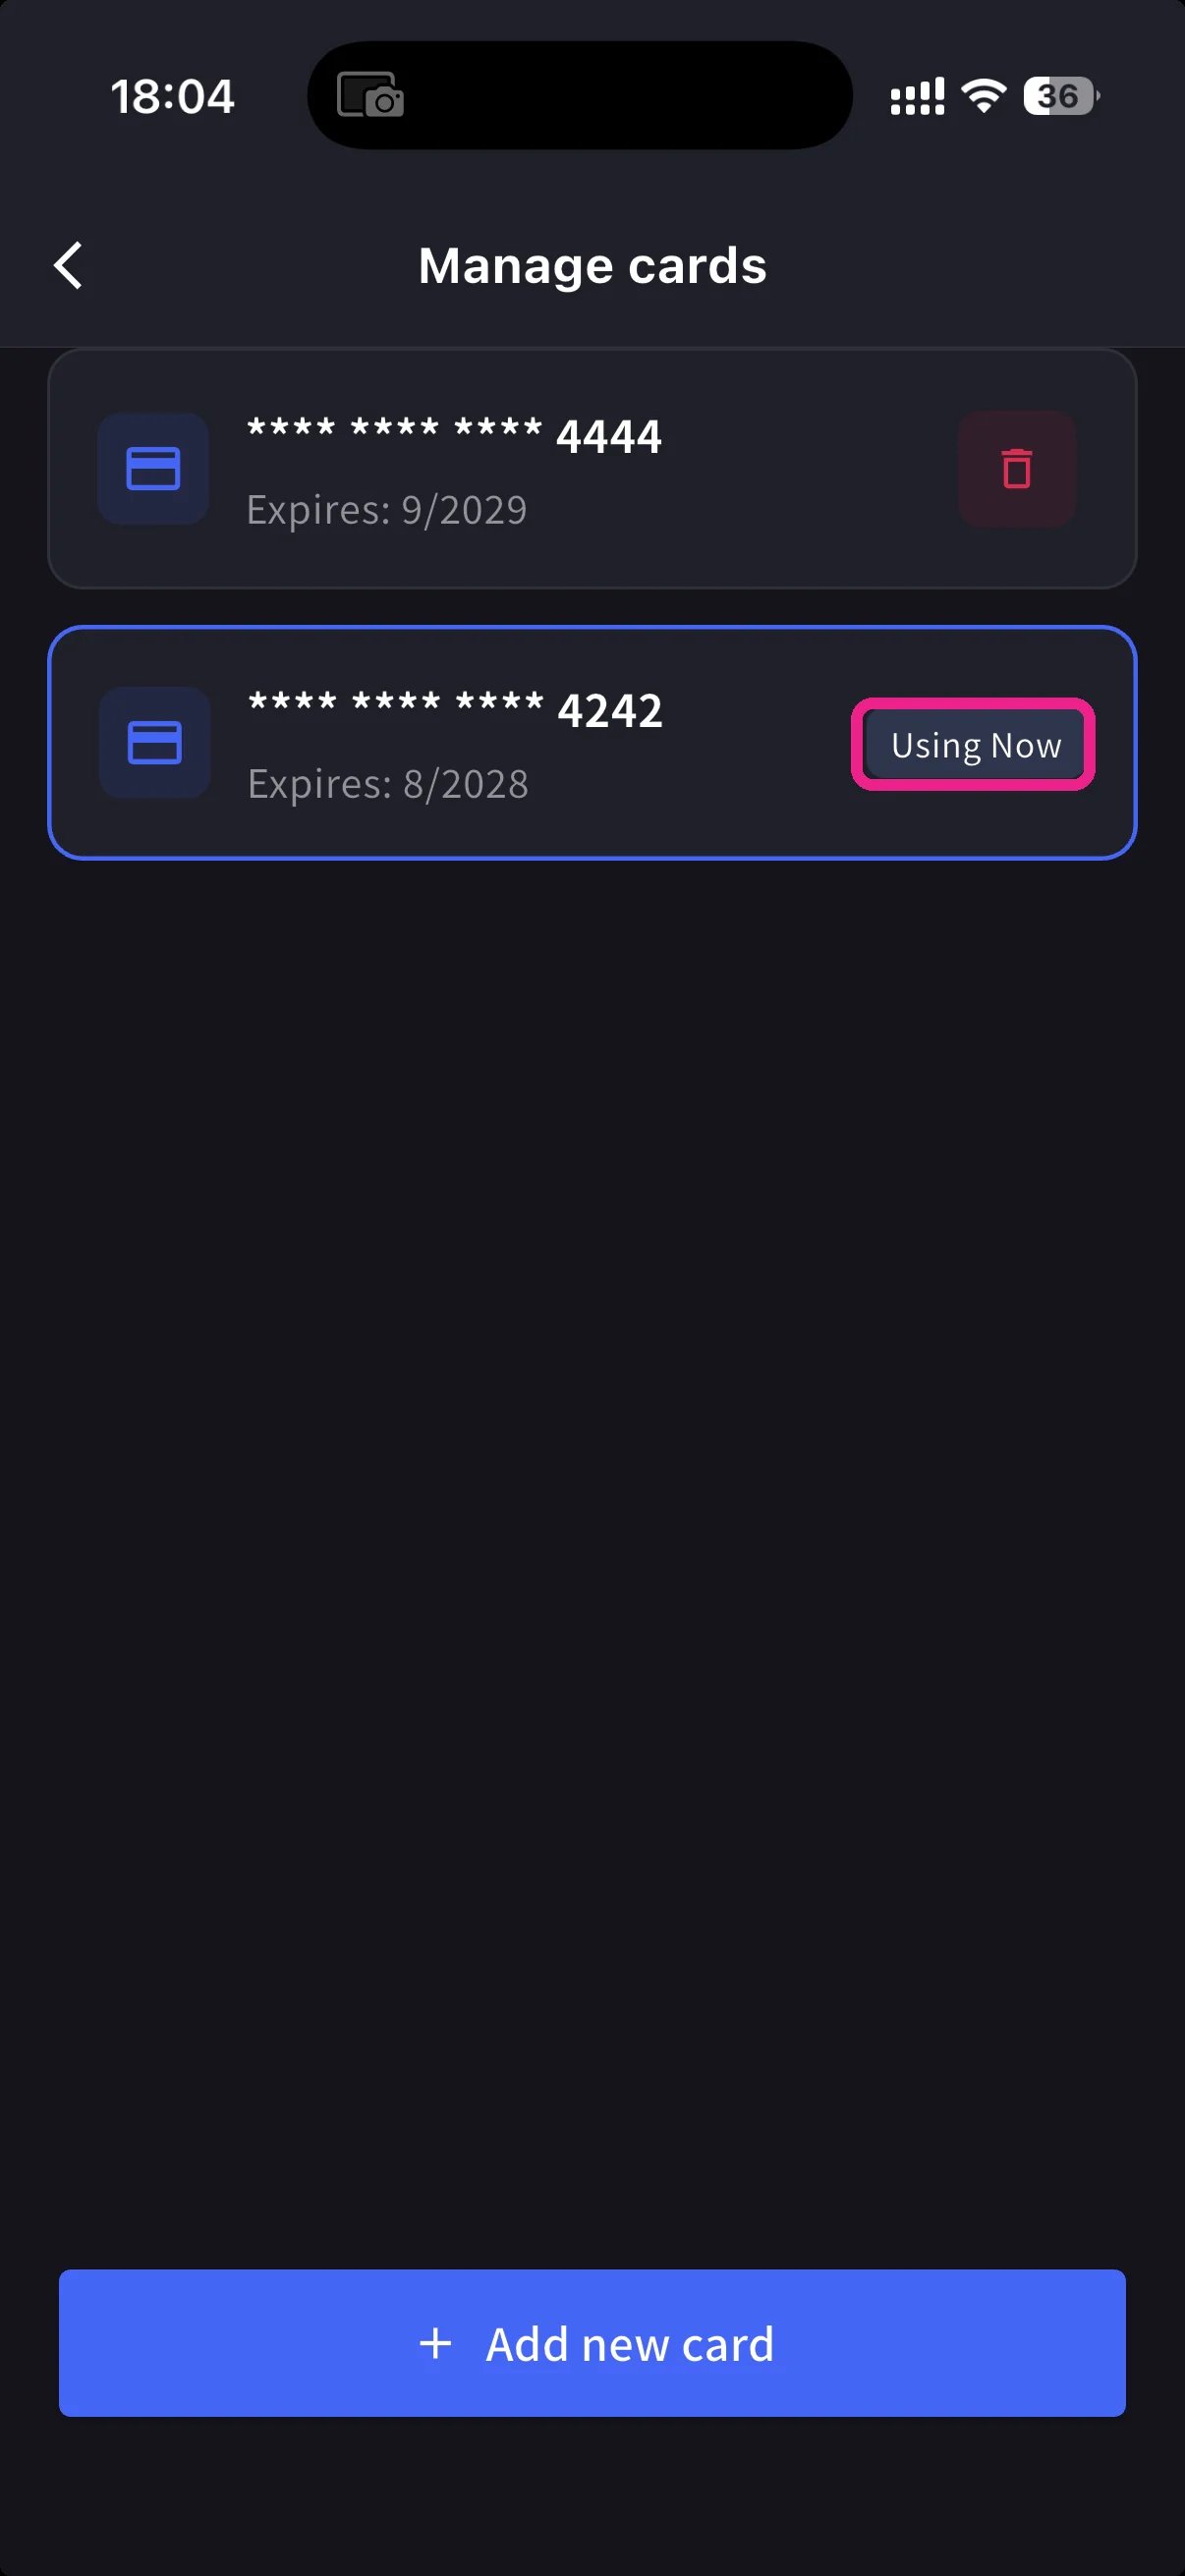
저장된 모든 카드를 표시합니다. 사용 중인 카드에는 **Using Now** 배지가 붙습니다. 하단의 파란색 **+ Add new card** 버튼으로 신규 추가.
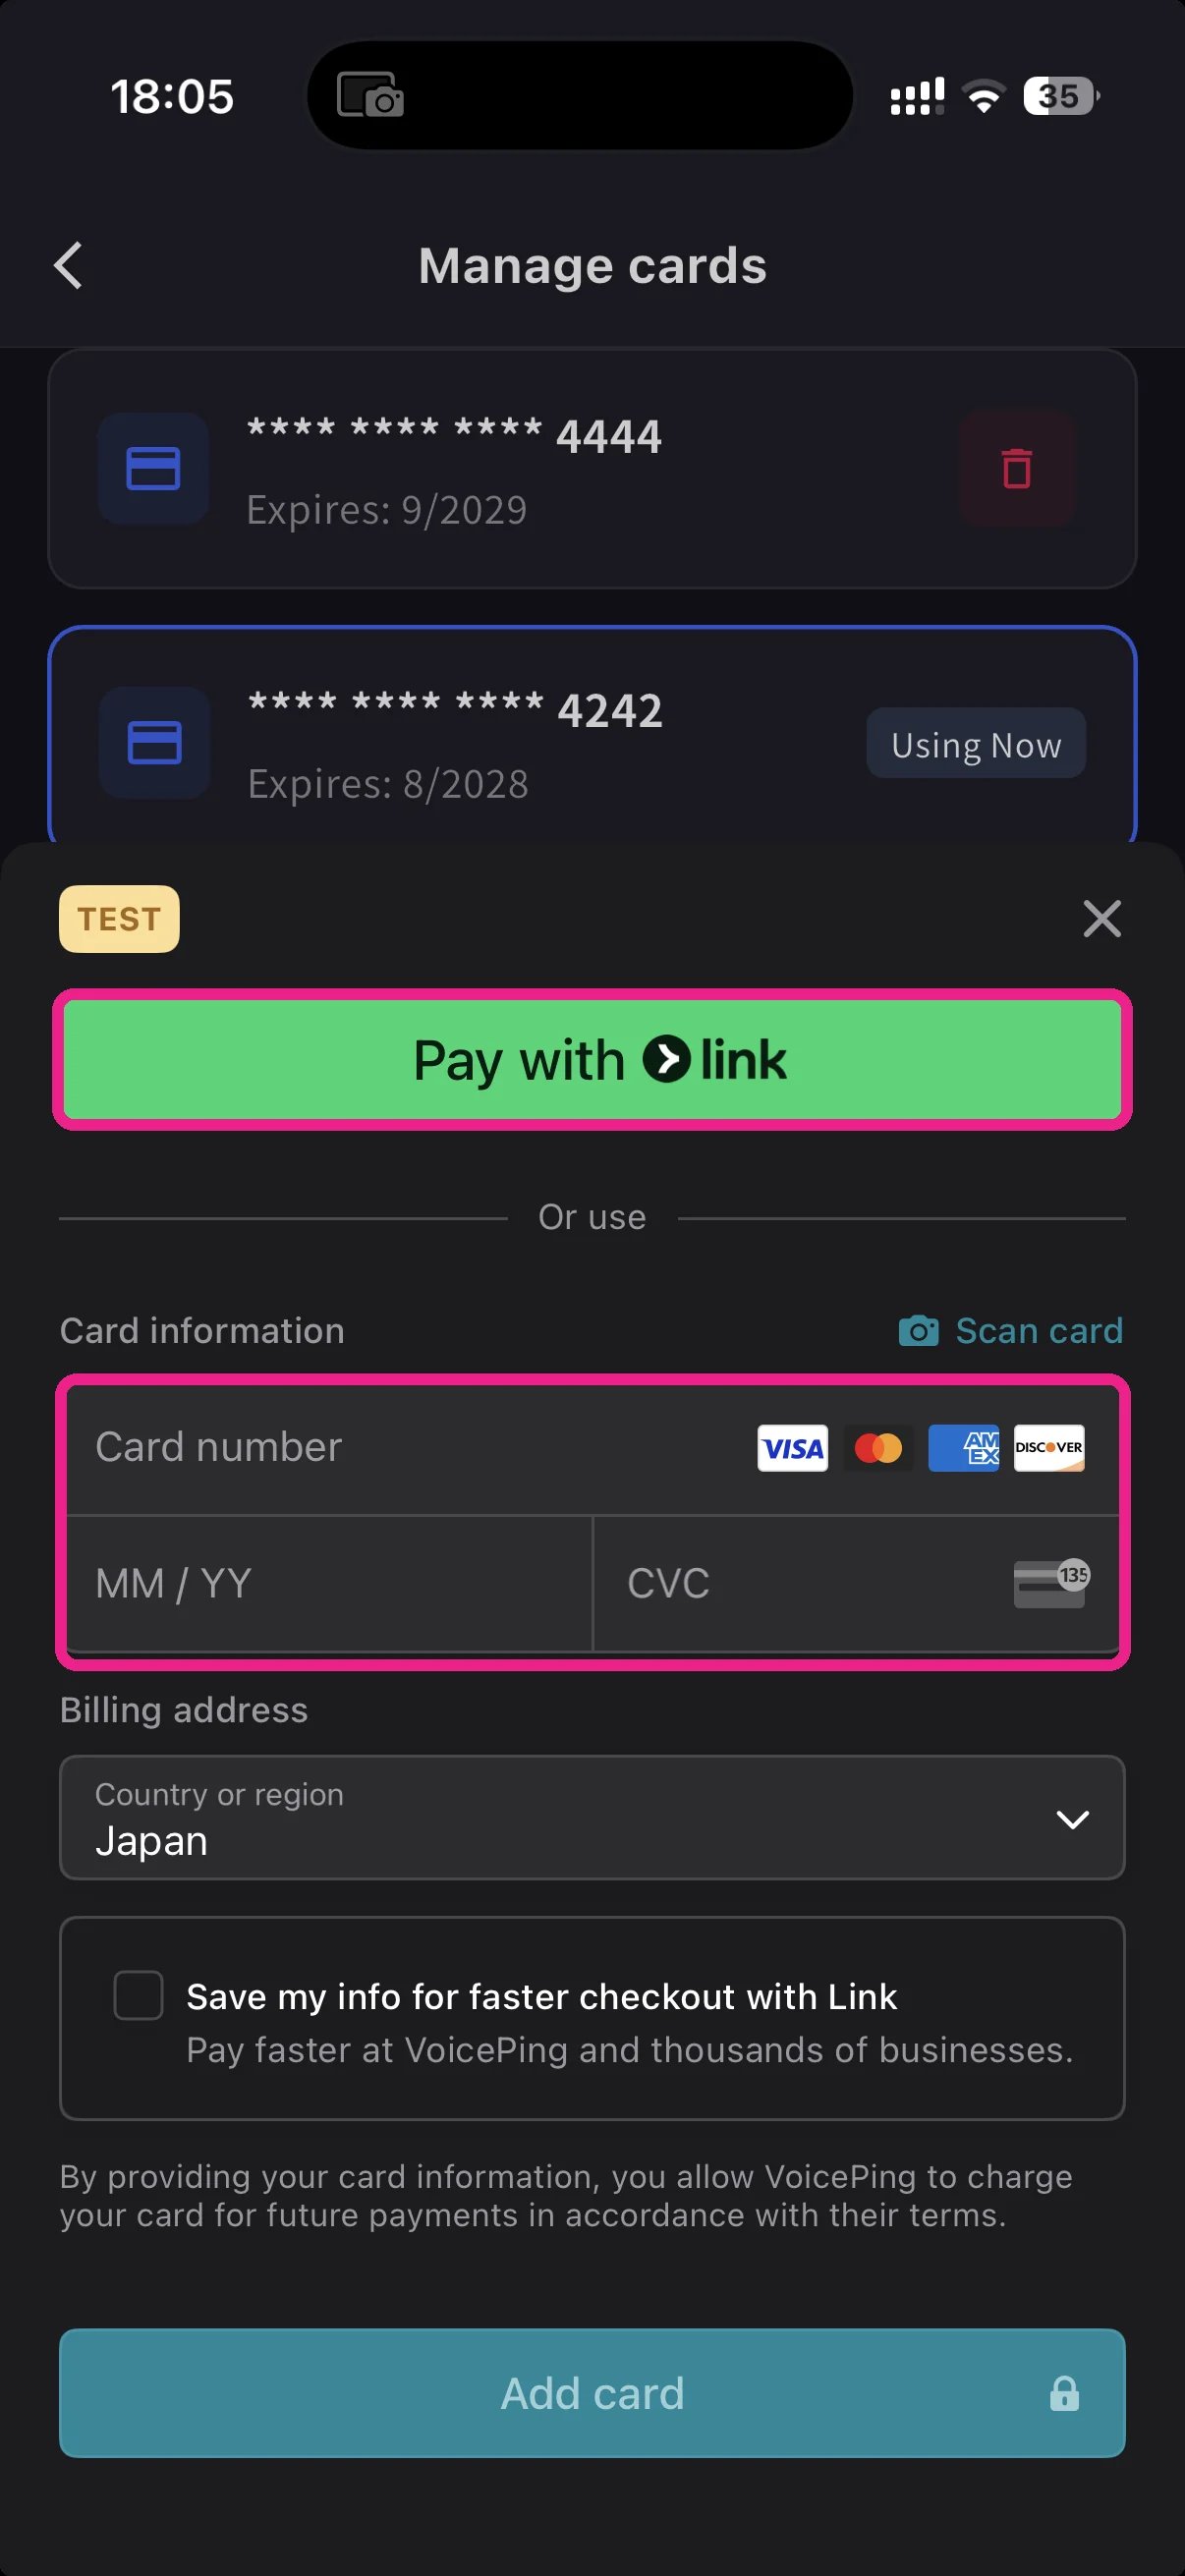
카드 추가 시트는 두 가지 방법을 제공합니다:
* **Pay with Link** — Stripe Link — 전화번호가 이미 연결되어 있으면 원탭.
* **Manual card** — 번호, MM/YY, CVC를 입력하거나 **📷 Scan card** 로 카메라에서 채움. 청구 국가를 선택하고 **Add card** 탭.
카드는 Stripe가 토큰화합니다. VoicePing은 원본 카드 번호를 저장하지 않습니다.
## Invoice Details (청구 대상)
인보이스 PDF에 표시되는 이름, 이메일, 전화를 설정합니다.
다음 결제일 **전에** 설정하세요. Stripe는 인보이스 생성 시점에 이 필드를 사용하므로, 나중에 편집해도 과거 PDF는 바뀌지 않습니다.
## Invoices & Receipts
과거 결제는 월별 카드로 표시됩니다. 각 카드에는 두 가지 액션:
| 버튼 | 여는 것 |
| ---------------- | -------------------------------- |
| **Invoice PDF** | 다운로드 가능한 인보이스 PDF (공유 / 저장 / 전달) |
| **Open receipt** | 전체 결제 내역을 포함한 Stripe 호스팅 영수증 페이지 |
완료된 결제만 여기 표시됩니다. 예약된 플랜 변경은 다음 결제일 이후 Stripe가 인보이스를 생성한 뒤 나타납니다. **Trial Started** 상태의 `¥0` 행도 기록됩니다 — 체험 시작 추적에 유용.
## Billing Activity
이벤트 로그 — 워크스페이스가 구독에 대해 한 모든 것.
각 행에는 다음이 포함됩니다:
* 이벤트 이름 — 예: *Succeeded in upgrading plan*, *Subscription will be canceled on the next payment date*, *Succeeded in restoring subscription*
* 타임스탬프 (`YYYY/MM/DD HH:MM`)
* 플랜, 결제 기간, 금액 (해당하는 경우)
* **IP Address** — 누가 어디서 작업했는지 — 감사 / 보안 검토용
* 완료된 결제에는 다운로드 아이콘 — 그 이벤트의 인보이스 PDF를 가져옴
"잠깐, 그게 언제였지?"를 이메일을 뒤지지 않고 답하는 데 사용하세요.
## 팁
* **Link**는 입력 수고를 덜어줍니다 — 다른 곳에서 Stripe Link를 사용했다면 전화번호 입력 후 카드가 자동으로 채워집니다.
* 허브의 **Current Plan 카드**가 Manage Plan으로 가는 가장 빠른 경로 — 매번 Settings를 거칠 필요 없음.
* 모바일에서 한 변경은 웹 앱과 즉시 동기화 — 폰에서 시작해서 PC에서 마칠 수 있음.
* PC 관리자는 **Admin Dashboard → Payment Information**에서 같은 일을 할 수 있습니다. 이 페이지는 책상을 떠나 있을 때를 위한 것.
## 관련 페이지
* [모바일에서 업그레이드, 다운그레이드 & 취소](/ko/mobile-plan-change) — 전체 Manage Plan 흐름
* [플랜 변경, 취소 & 체험 종료](/ko/plan-changes) — PC 관리자 대시보드 동등 기능
* [결제 신용카드 변경](/ko/credit-card-change) — PC 카드 변경 흐름
* [요금](/ko/pricing)
* **이동 중 카드 만료 임박** — 지하철에서도 새 카드로 전환. 노트북도, 월요일까지 기다릴 필요도 없음.
* **재무팀에 PDF 전송** — Invoices & Receipts 목록에서 Invoice PDF를 받아 메일로 전달.
* **갱신 감사** — 모든 갱신, 취소, 복원, 카드 변경이 타임스탬프와 IP와 함께 기록됨.
* **청구 정보 업데이트** — 다음 결제 전에 Invoice Details 화면에서 회사명 / 이메일 / 전화 수정.
## Billing 허브 열기
홈 화면에서 사이드 메뉴를 열고 **Billing** (카트 아이콘) 탭.
**Current Plan** 카드에 플랜 이름과 월 요금이 표시되고, 바로 **Manage Plan** 버튼이 있습니다. 아래에 4개의 바로가기:
| 바로가기 | 용도 |
| ----------------------- | ------------------------ |
| **Manage Cards** | 결제 수단 추가, 제거, 변경 |
| **Invoices & Receipts** | 인보이스 PDF 다운로드, 영수증 열기 |
| **Invoice Details** | 인보이스의 청구 대상 이름, 이메일, 전화 |
| **Billing Activity** | 구매, 갱신, 취소, 카드 변경 이벤트 로그 |
플랜 업그레이드 / 다운그레이드 / 취소는 **Manage Plan** 탭 → [모바일에서 업그레이드, 다운그레이드 & 취소](/ko/mobile-plan-change) 참조.
## Manage Cards
저장된 모든 카드를 표시합니다. 사용 중인 카드에는 **Using Now** 배지가 붙습니다. 하단의 파란색 **+ Add new card** 버튼으로 신규 추가.
카드 추가 시트는 두 가지 방법을 제공합니다:
* **Pay with Link** — Stripe Link — 전화번호가 이미 연결되어 있으면 원탭.
* **Manual card** — 번호, MM/YY, CVC를 입력하거나 **📷 Scan card** 로 카메라에서 채움. 청구 국가를 선택하고 **Add card** 탭.
카드는 Stripe가 토큰화합니다. VoicePing은 원본 카드 번호를 저장하지 않습니다.
## Invoice Details (청구 대상)
인보이스 PDF에 표시되는 이름, 이메일, 전화를 설정합니다.
다음 결제일 **전에** 설정하세요. Stripe는 인보이스 생성 시점에 이 필드를 사용하므로, 나중에 편집해도 과거 PDF는 바뀌지 않습니다.
## Invoices & Receipts
과거 결제는 월별 카드로 표시됩니다. 각 카드에는 두 가지 액션:
| 버튼 | 여는 것 |
| ---------------- | -------------------------------- |
| **Invoice PDF** | 다운로드 가능한 인보이스 PDF (공유 / 저장 / 전달) |
| **Open receipt** | 전체 결제 내역을 포함한 Stripe 호스팅 영수증 페이지 |
완료된 결제만 여기 표시됩니다. 예약된 플랜 변경은 다음 결제일 이후 Stripe가 인보이스를 생성한 뒤 나타납니다. **Trial Started** 상태의 `¥0` 행도 기록됩니다 — 체험 시작 추적에 유용.
## Billing Activity
이벤트 로그 — 워크스페이스가 구독에 대해 한 모든 것.
각 행에는 다음이 포함됩니다:
* 이벤트 이름 — 예: *Succeeded in upgrading plan*, *Subscription will be canceled on the next payment date*, *Succeeded in restoring subscription*
* 타임스탬프 (`YYYY/MM/DD HH:MM`)
* 플랜, 결제 기간, 금액 (해당하는 경우)
* **IP Address** — 누가 어디서 작업했는지 — 감사 / 보안 검토용
* 완료된 결제에는 다운로드 아이콘 — 그 이벤트의 인보이스 PDF를 가져옴
"잠깐, 그게 언제였지?"를 이메일을 뒤지지 않고 답하는 데 사용하세요.
## 팁
* **Link**는 입력 수고를 덜어줍니다 — 다른 곳에서 Stripe Link를 사용했다면 전화번호 입력 후 카드가 자동으로 채워집니다.
* 허브의 **Current Plan 카드**가 Manage Plan으로 가는 가장 빠른 경로 — 매번 Settings를 거칠 필요 없음.
* 모바일에서 한 변경은 웹 앱과 즉시 동기화 — 폰에서 시작해서 PC에서 마칠 수 있음.
* PC 관리자는 **Admin Dashboard → Payment Information**에서 같은 일을 할 수 있습니다. 이 페이지는 책상을 떠나 있을 때를 위한 것.
## 관련 페이지
* [모바일에서 업그레이드, 다운그레이드 & 취소](/ko/mobile-plan-change) — 전체 Manage Plan 흐름
* [플랜 변경, 취소 & 체험 종료](/ko/plan-changes) — PC 관리자 대시보드 동등 기능
* [결제 신용카드 변경](/ko/credit-card-change) — PC 카드 변경 흐름
* [요금](/ko/pricing)