> ## Documentation Index
> Fetch the complete documentation index at: https://manual.voiceping.net/llms.txt
> Use this file to discover all available pages before exploring further.
# MCP Access — การตั้งค่า
> เปิดใช้งาน VoicePing MCP Access และเชื่อมต่อไคลเอนต์ AI ใดก็ตามที่รองรับ MCP — ChatGPT, Claude, Claude Code, Codex CLI หรือ Gemini CLI พร้อมภาพหน้าจอทีละขั้นสำหรับ ChatGPT และ Claude
export const FeedbackTh = () => <>
มีไอเดียหรือคำขอเกี่ยวกับฟีเจอร์นี้ไหม? ส่งถึงทีมผ่าน Product Feedback
ลิงก์อย่างเป็นทางการ
เยี่ยมชมเว็บไซต์อย่างเป็นทางการของเรา
ติดตามเราบน X
ติดตามเราบน Facebook
เชื่อมต่อบน LinkedIn
;
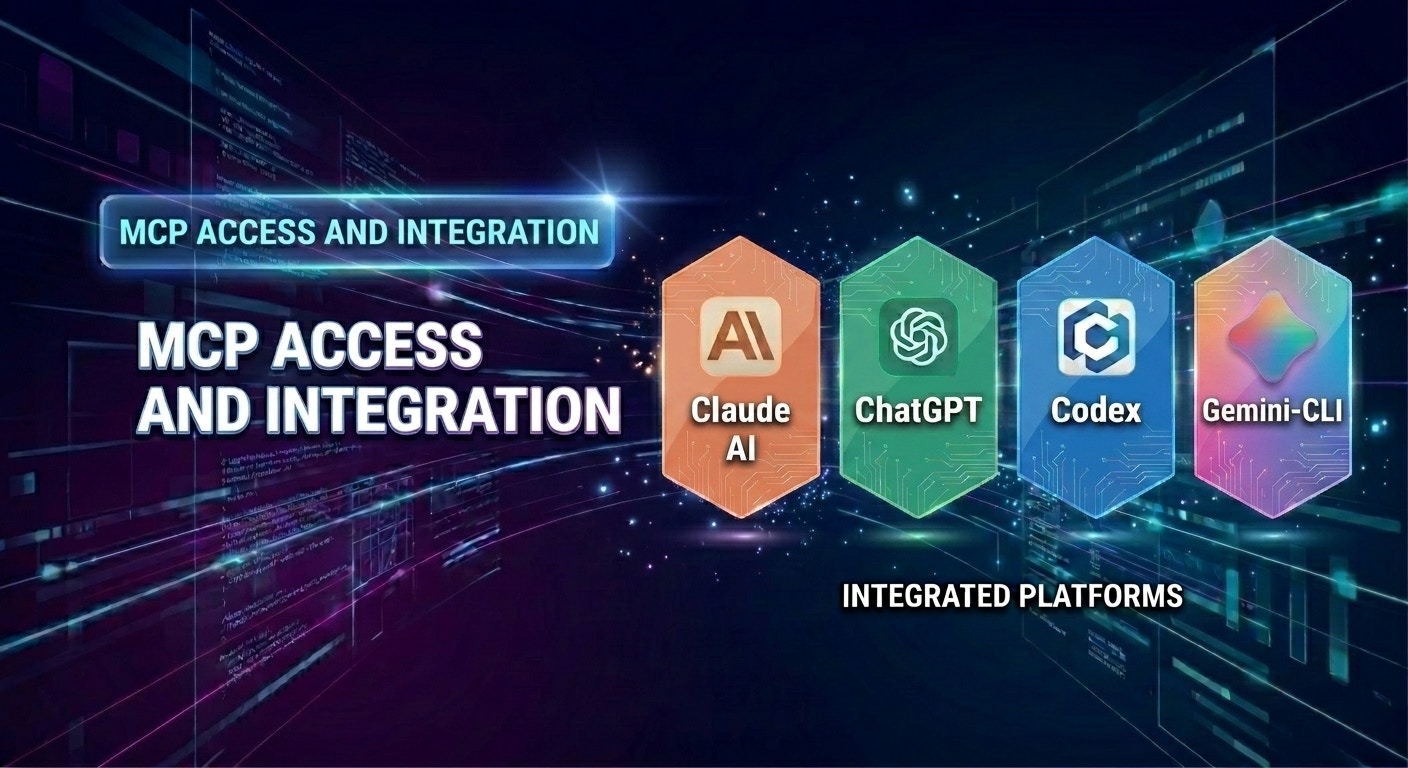 ## เชื่อมต่อไคลเอนต์ AI ของคุณกับบันทึกของ VoicePing
MCP Access เปลี่ยน workspace VoicePing ของคุณให้เป็นแหล่งข้อมูลที่ไคลเอนต์ AI ที่รองรับ MCP ใดก็ตามสามารถอ่านได้ เชื่อมต่อครั้งเดียว อนุมัติขอบเขต และคำถามใดๆ ที่คุณมักจะตอบโดยเปิดบันทึกเองด้วยมือ ตอนนี้ถามในแชทได้เลย
หน้านี้ครอบคลุมเฉพาะ **การตั้งค่า** เมื่อเชื่อมต่อแล้ว โปรดดูหน้าเวิร์กโฟลว์สำหรับขั้นตอนพรอมต์แบบคัดลอก-วาง:
เปลี่ยนการประชุม 3–4 ครั้งล่าสุดกับลูกค้าให้เป็นวาระที่กำหนดเวลาชัดเจน
สกัดเป้าหมาย ประเด็นปัญหา ไทม์ไลน์ — ผลิตข้อเสนอฉบับร่างพร้อมเสนอผู้บริหาร
สรุปการตัดสินใจ กำหนดผู้รับผิดชอบ ส่งอีเมลติดตามผลอย่างมืออาชีพ
ดึงการประชุมทุกครั้งที่สมาชิกทีมจัด และสร้างรายงาน KPI
เปิดเผยอุปสรรคที่เกิดซ้ำ และสร้างแผนปฏิบัติการที่จัดลำดับความสำคัญ
***
## วิธีเปิดใช้งาน MCP Access
คุณต้องเปิด MCP Access ครั้งเดียวใน workspace ของ VoicePing จากนั้นเชื่อมต่อกับไคลเอนต์ AI ที่คุณเลือก
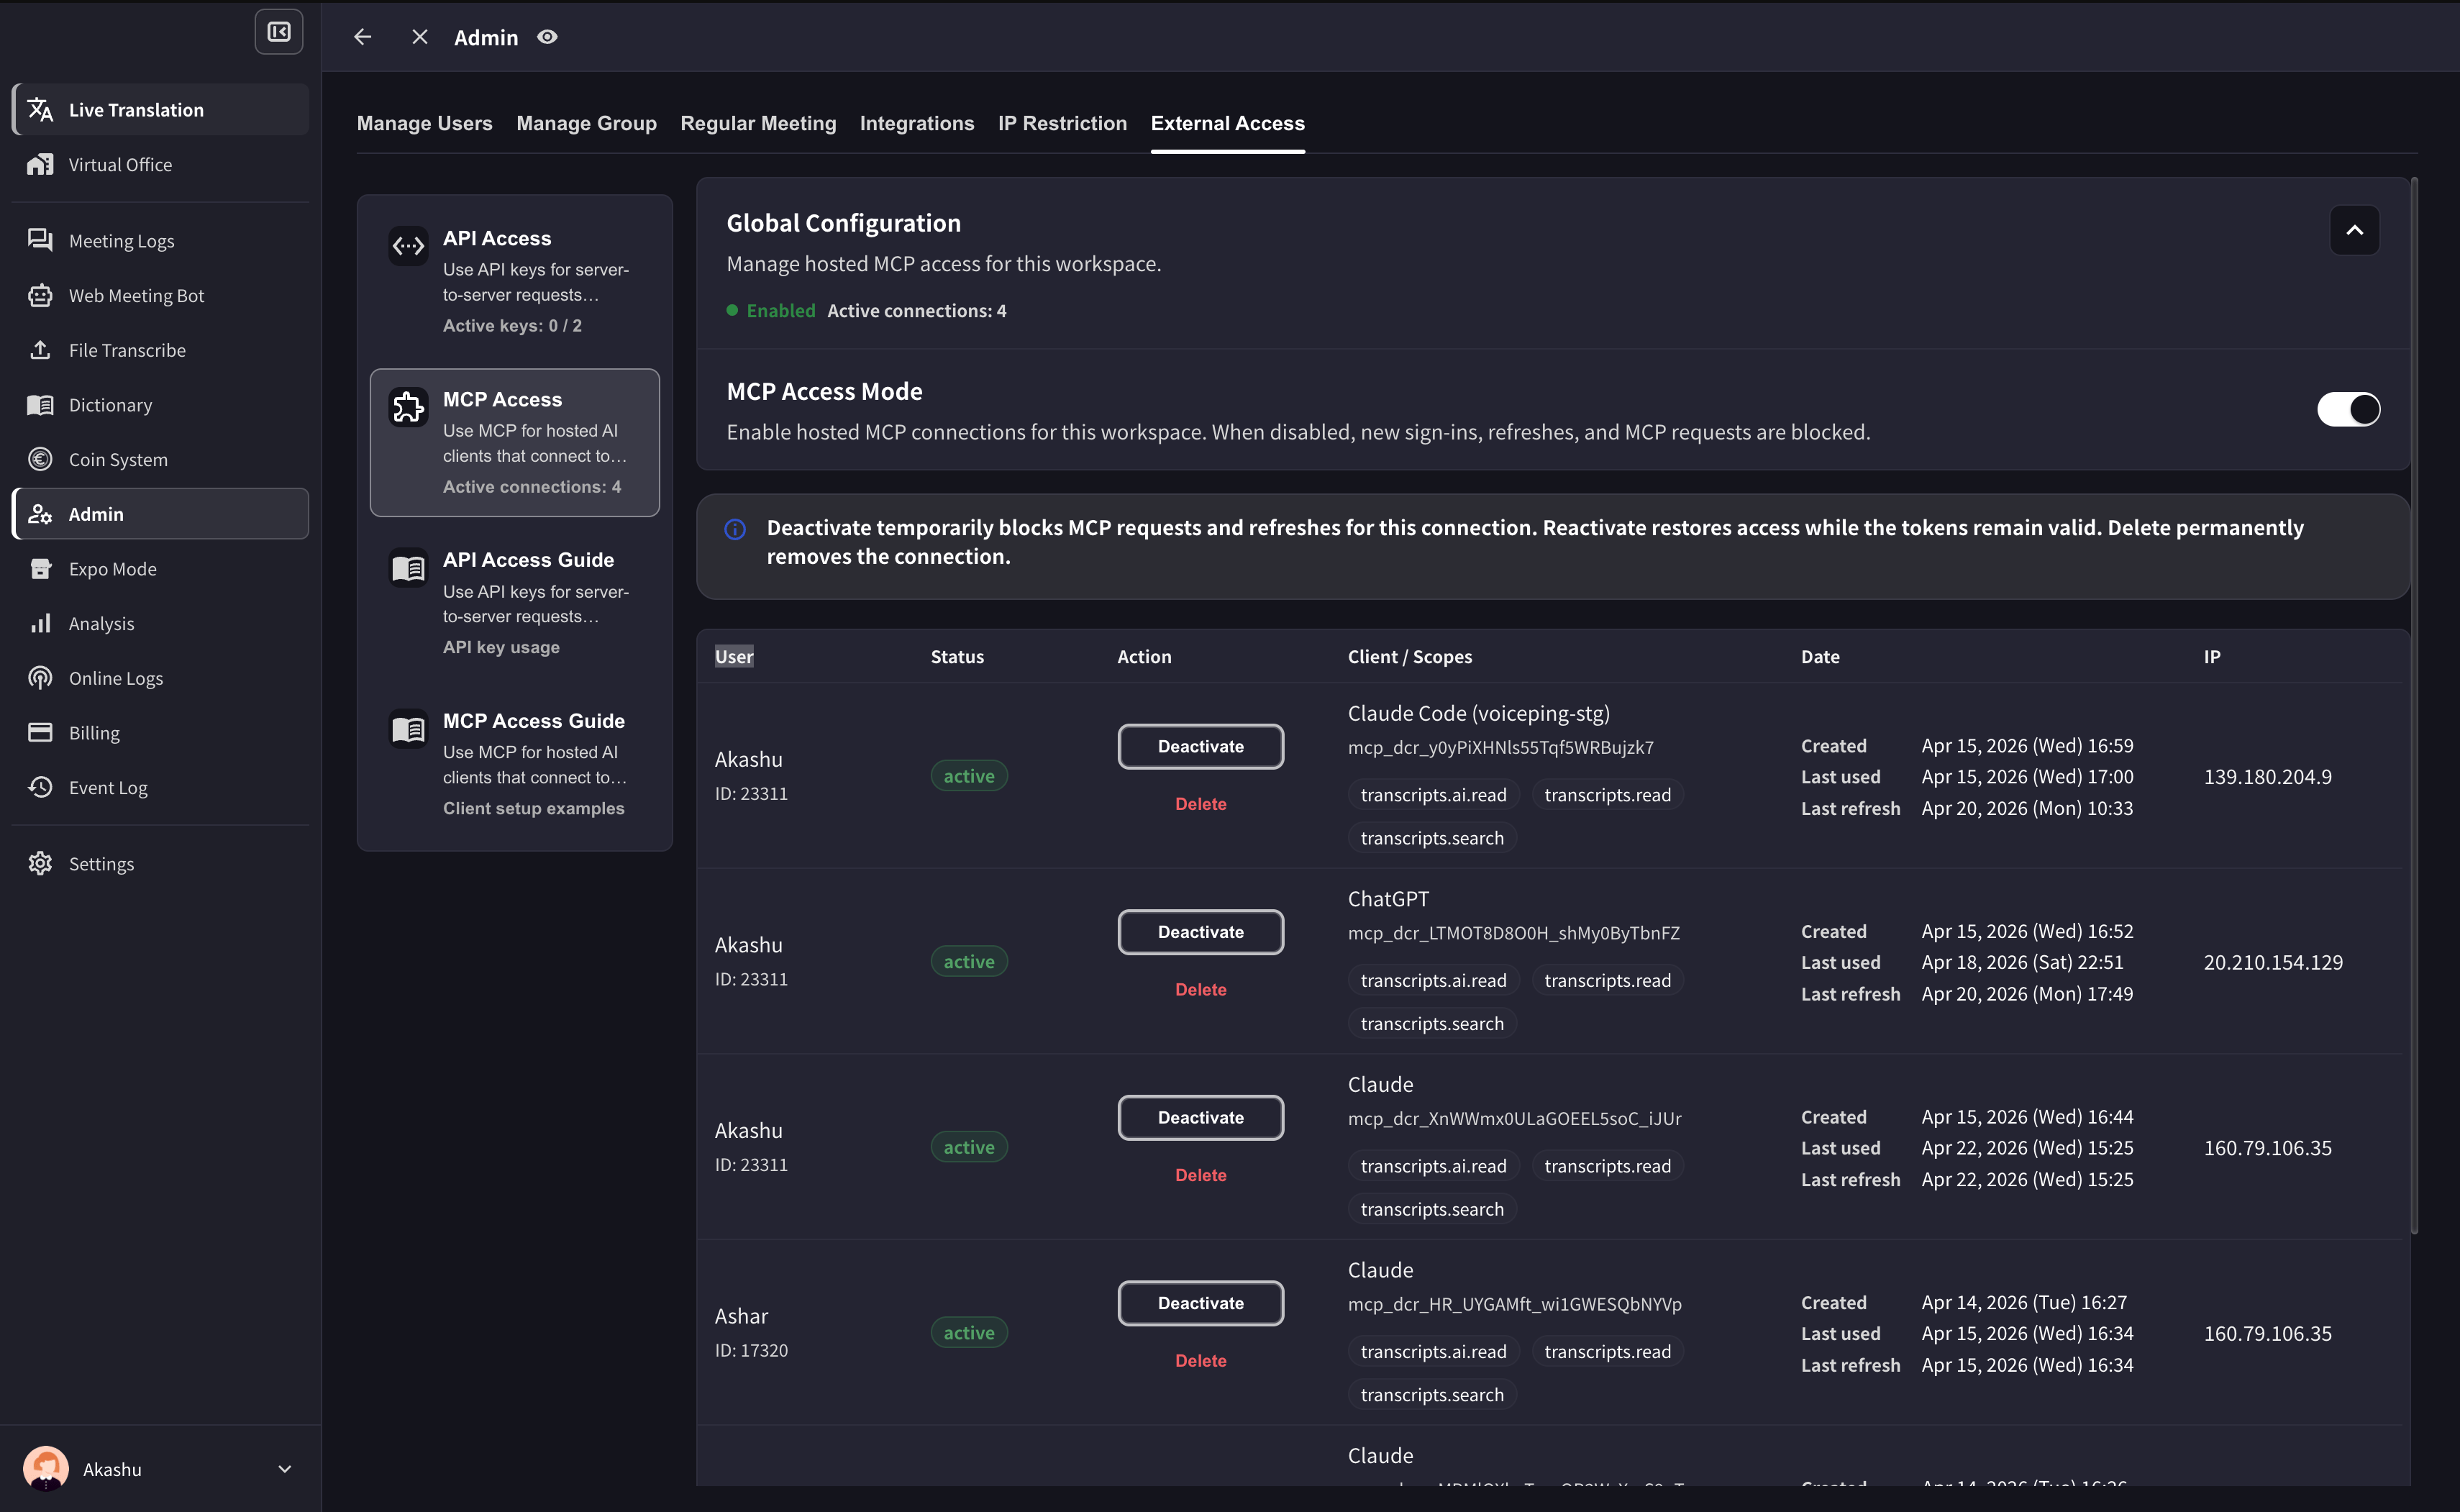
เปิด **workspace settings → External Access** และเปิด **MCP Access** คุณจะเห็นพื้นที่การเชื่อมต่อที่ใช้งานอยู่ ซึ่งไคลเอนต์ทุกตัวที่เชื่อมต่อจะปรากฏที่นี่
## เชื่อมต่อไคลเอนต์ AI ของคุณกับบันทึกของ VoicePing
MCP Access เปลี่ยน workspace VoicePing ของคุณให้เป็นแหล่งข้อมูลที่ไคลเอนต์ AI ที่รองรับ MCP ใดก็ตามสามารถอ่านได้ เชื่อมต่อครั้งเดียว อนุมัติขอบเขต และคำถามใดๆ ที่คุณมักจะตอบโดยเปิดบันทึกเองด้วยมือ ตอนนี้ถามในแชทได้เลย
หน้านี้ครอบคลุมเฉพาะ **การตั้งค่า** เมื่อเชื่อมต่อแล้ว โปรดดูหน้าเวิร์กโฟลว์สำหรับขั้นตอนพรอมต์แบบคัดลอก-วาง:
เปลี่ยนการประชุม 3–4 ครั้งล่าสุดกับลูกค้าให้เป็นวาระที่กำหนดเวลาชัดเจน
สกัดเป้าหมาย ประเด็นปัญหา ไทม์ไลน์ — ผลิตข้อเสนอฉบับร่างพร้อมเสนอผู้บริหาร
สรุปการตัดสินใจ กำหนดผู้รับผิดชอบ ส่งอีเมลติดตามผลอย่างมืออาชีพ
ดึงการประชุมทุกครั้งที่สมาชิกทีมจัด และสร้างรายงาน KPI
เปิดเผยอุปสรรคที่เกิดซ้ำ และสร้างแผนปฏิบัติการที่จัดลำดับความสำคัญ
***
## วิธีเปิดใช้งาน MCP Access
คุณต้องเปิด MCP Access ครั้งเดียวใน workspace ของ VoicePing จากนั้นเชื่อมต่อกับไคลเอนต์ AI ที่คุณเลือก
เปิด **workspace settings → External Access** และเปิด **MCP Access** คุณจะเห็นพื้นที่การเชื่อมต่อที่ใช้งานอยู่ ซึ่งไคลเอนต์ทุกตัวที่เชื่อมต่อจะปรากฏที่นี่
 เปิดไคลเอนต์ AI ที่รองรับ MCP ของคุณ (Claude, ChatGPT, Codex, Claude Code, Gemini CLI หรือเครื่องมือ MCP อื่น) แล้วเพิ่มเซิร์ฟเวอร์ MCP ของ VoicePing
URL ของเซิร์ฟเวอร์ MCP ของ VoicePing คือ:
```text theme={null}
https://api.voiceping.io/mcp
```
ขยายคู่มือสำหรับเครื่องมือของคุณ — ChatGPT และ Claude มีครบพร้อมภาพหน้าจอทีละขั้นตอน สำหรับไคลเอนต์อื่น ให้ใช้ตารางเอกสารทางการที่ตามมา
ข้อกำหนดเบื้องต้น: ChatGPT Pro หรือ Plus ที่เปิด **Developer Mode** (Settings → Connectors → Advanced → Developer Mode)
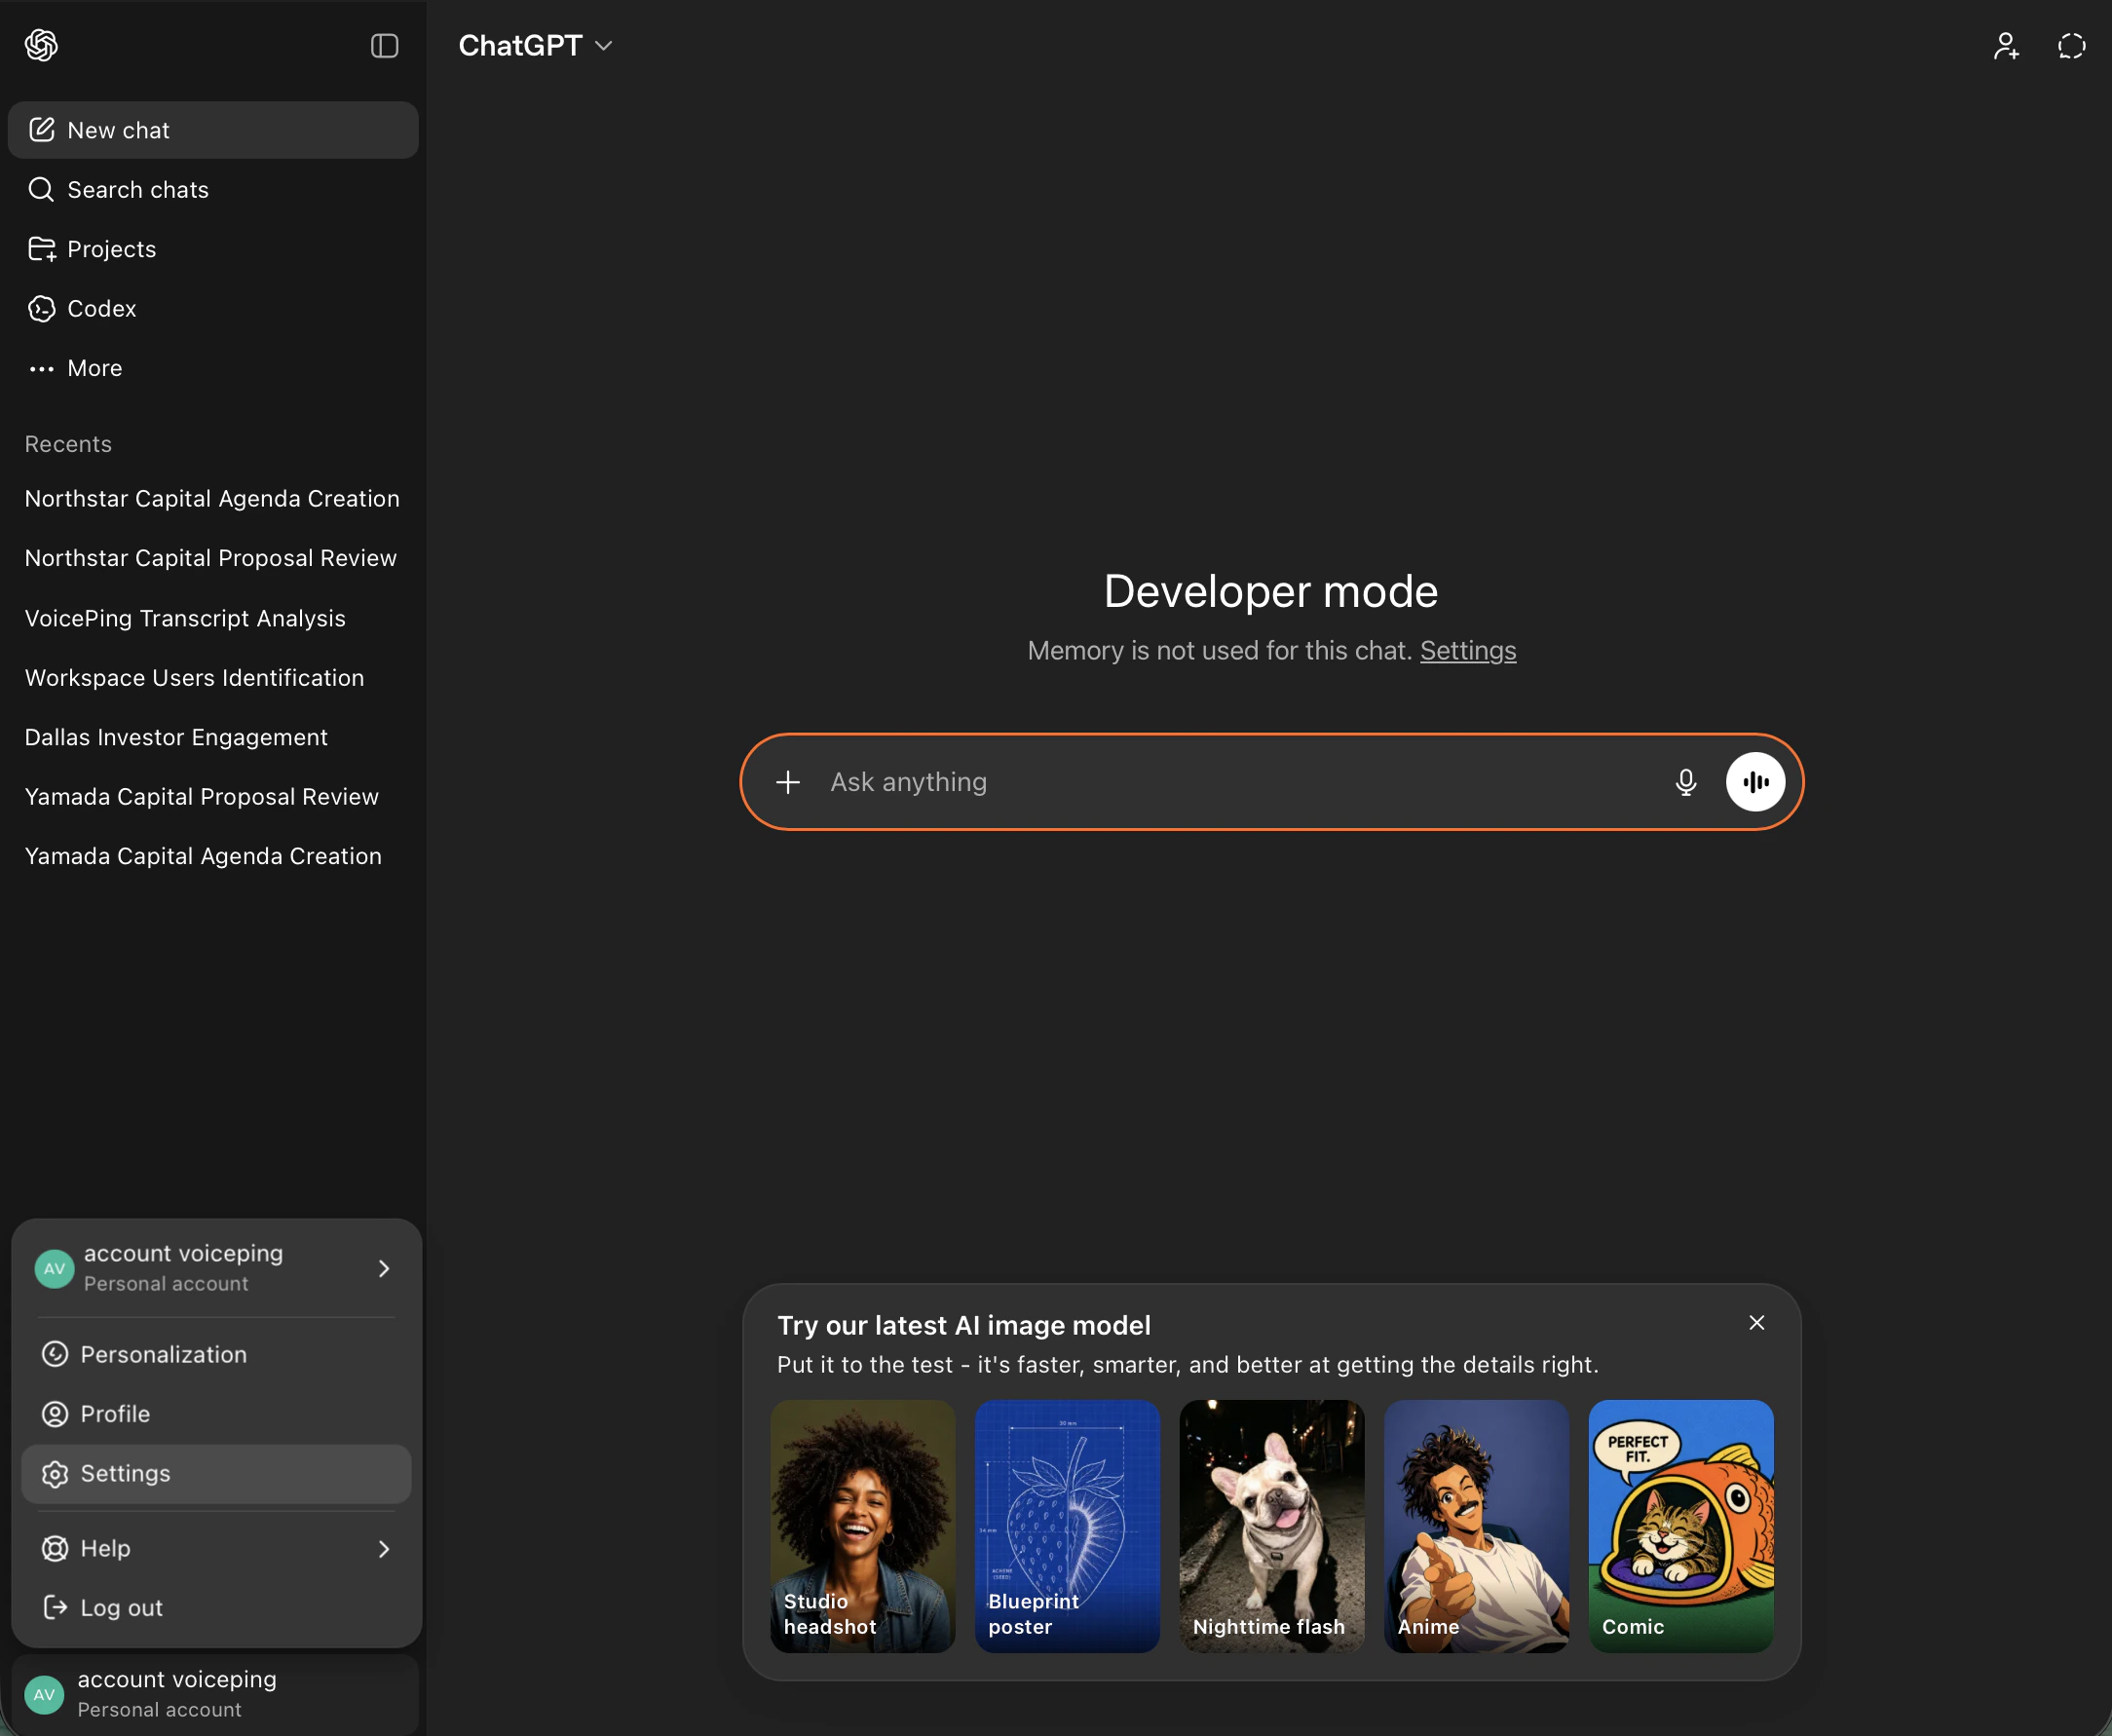
ใน ChatGPT (Developer Mode) คลิกที่อวาตาร์บัญชีด้านล่างซ้ายแล้วเลือก **Settings**
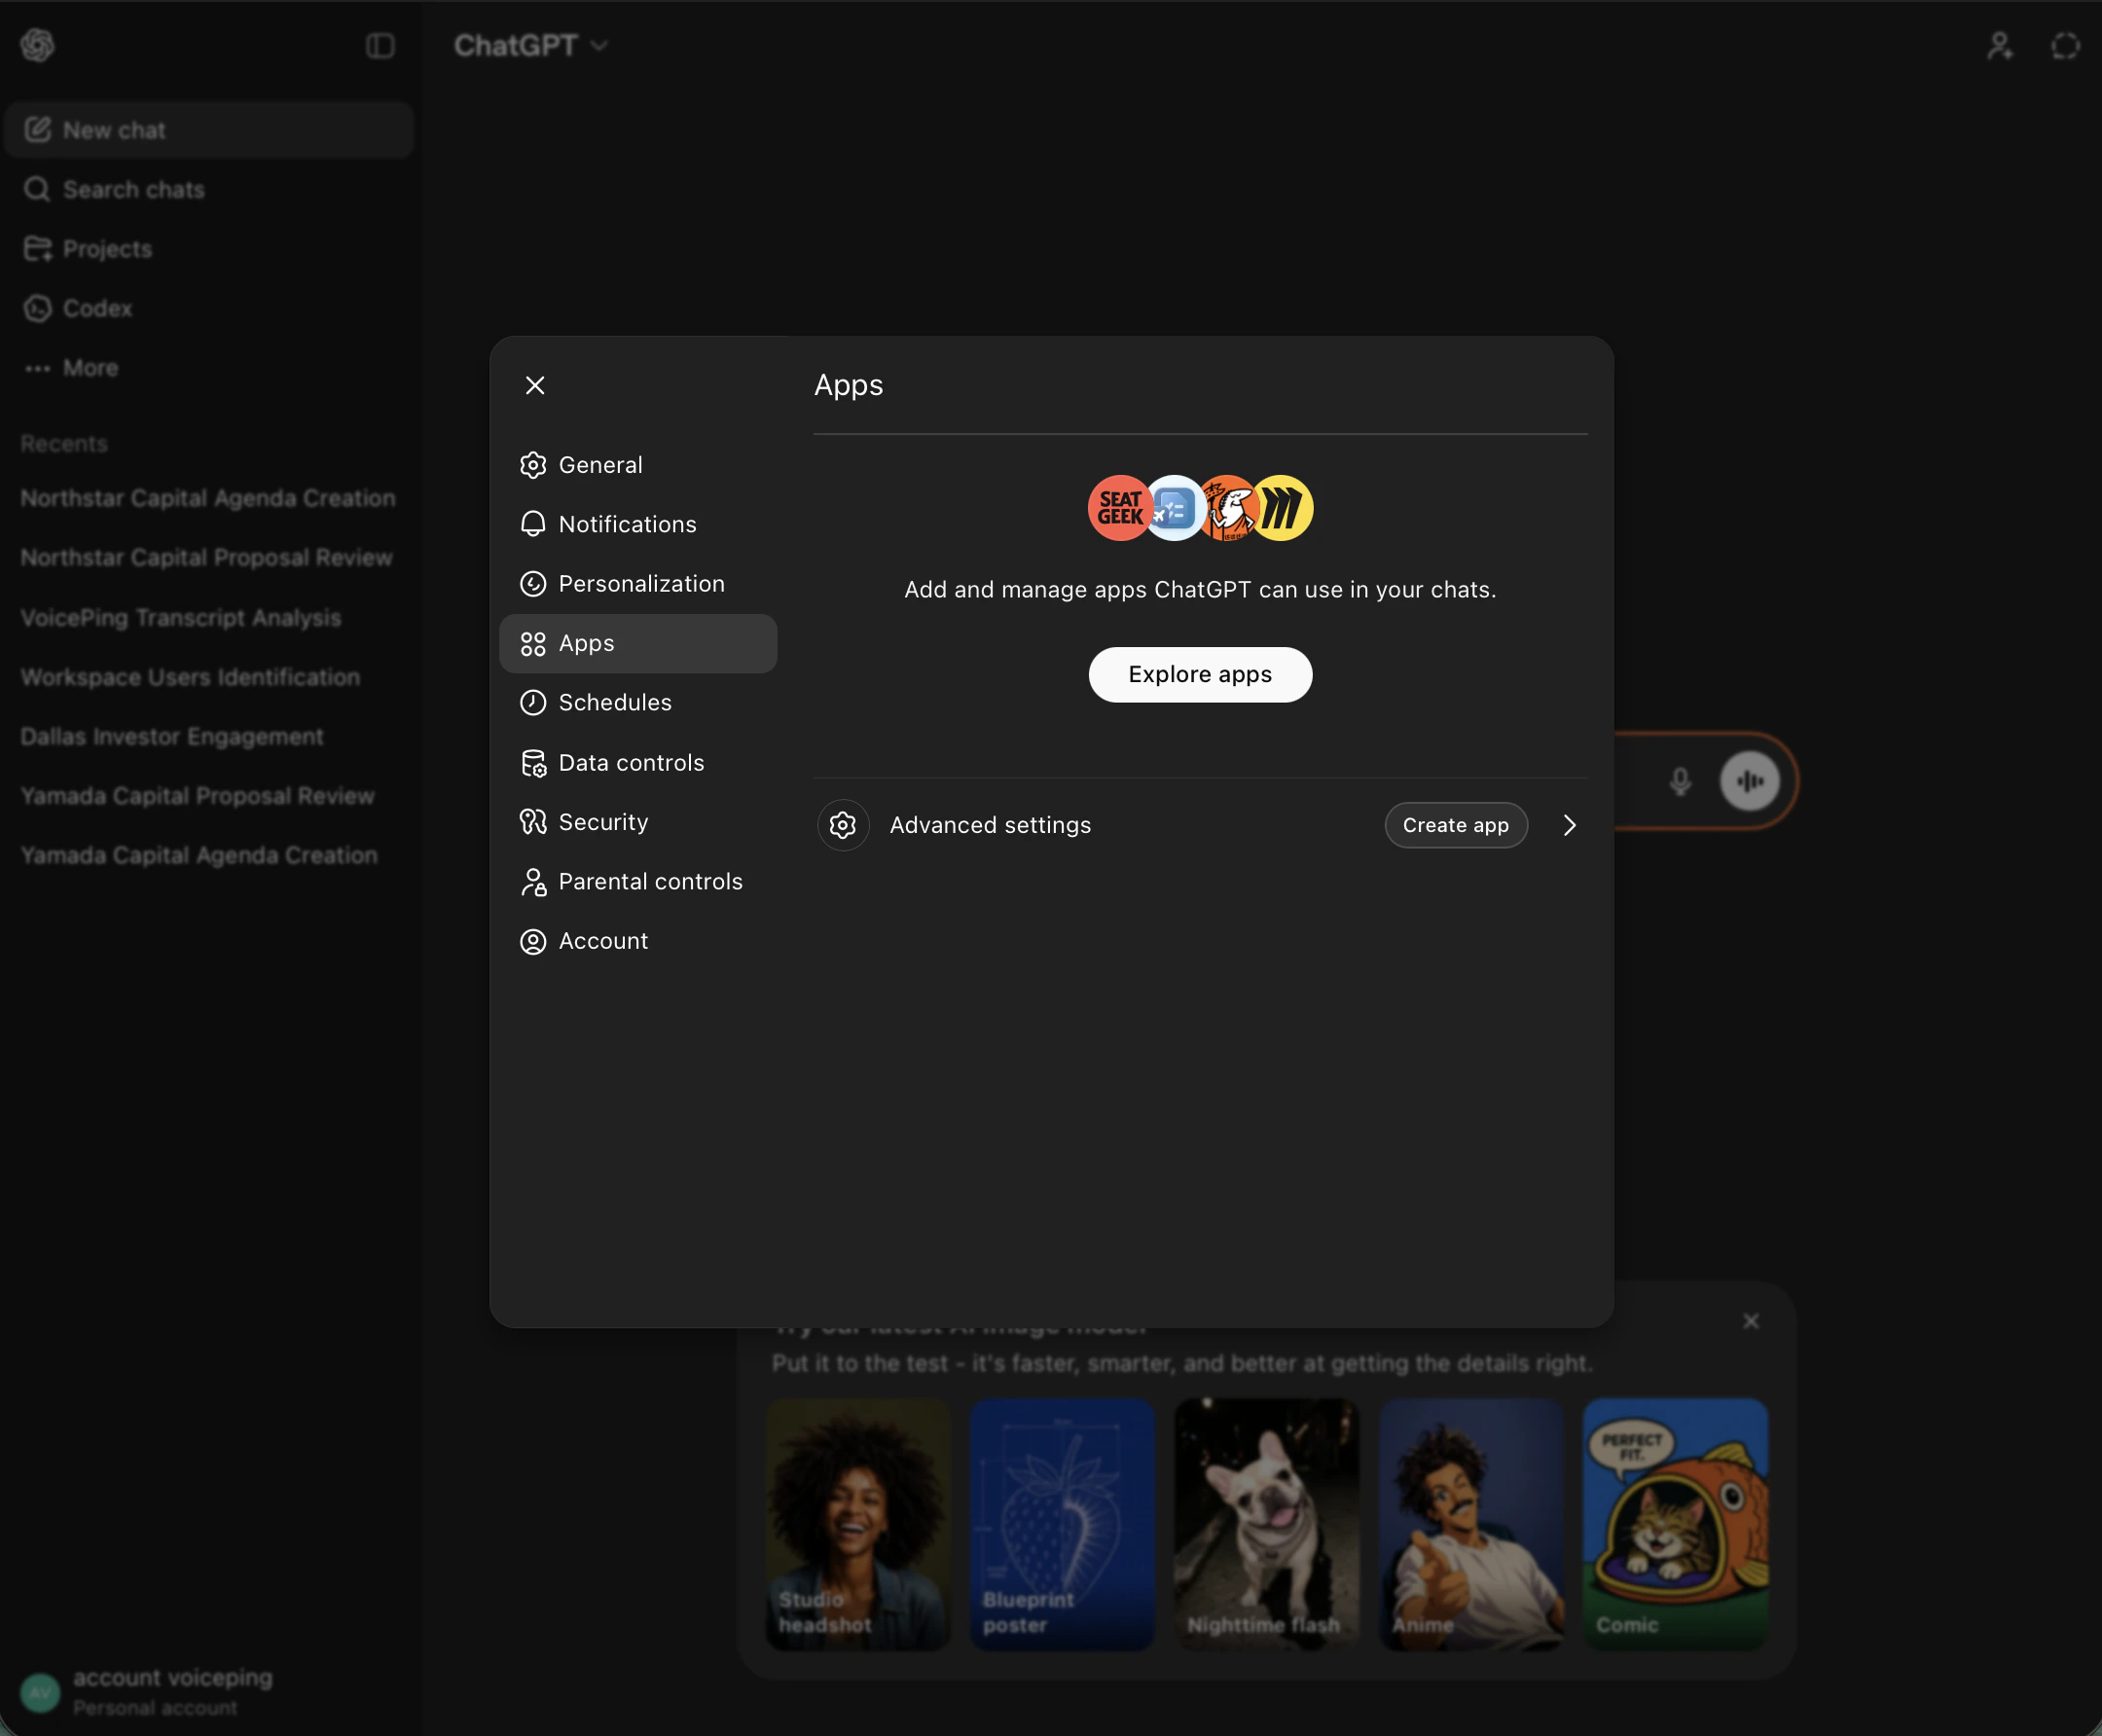
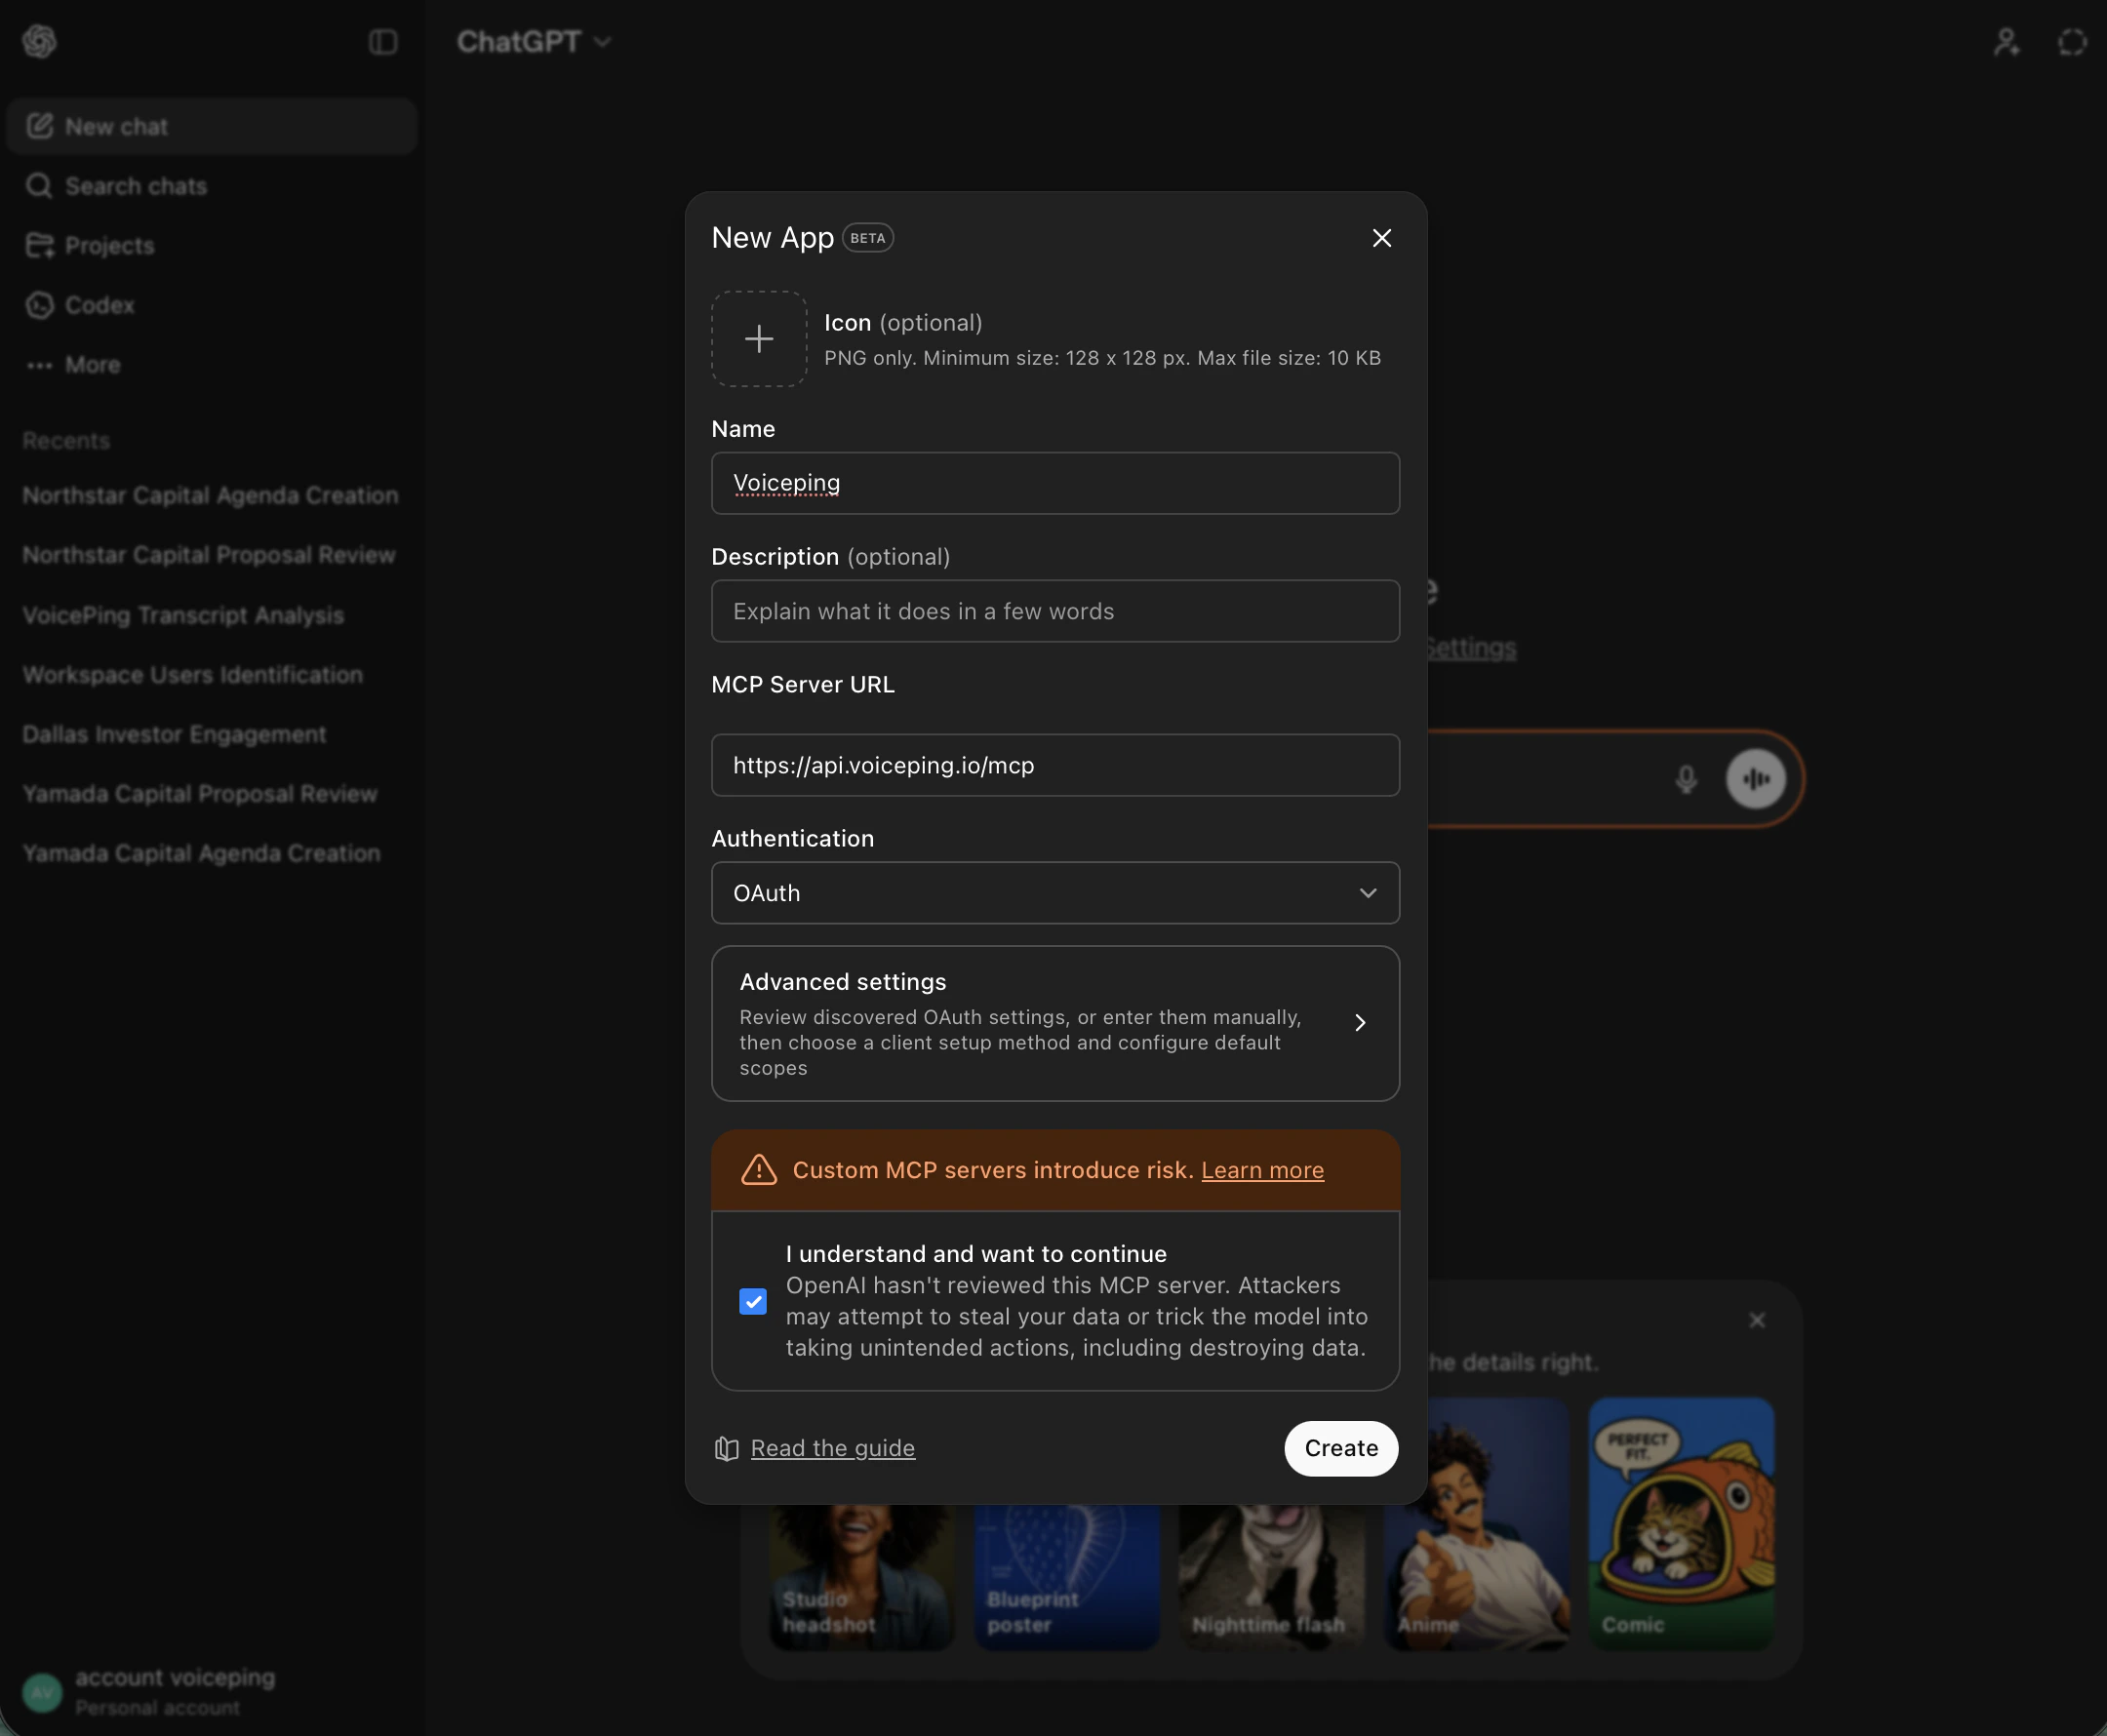
ใน Settings เปิดแท็บ **Apps** จากนั้นใต้ **Advanced settings** คลิก **Create app**
* **Name:** `Voiceping`
* **MCP Server URL:** `https://api.voiceping.io/mcp`
* **Authentication:** `OAuth`
* ติ๊กช่อง **"I understand and want to continue"**
* คลิก **Create**
ChatGPT จะเปิดกระแส OAuth ของ VoicePing ให้โดยอัตโนมัติ — อนุมัติขอบเขตบันทึกการประชุมเพื่อเสร็จสิ้นการเชื่อมต่อ
ใช้งานได้ใน Claude Desktop และ Claude บนเว็บ
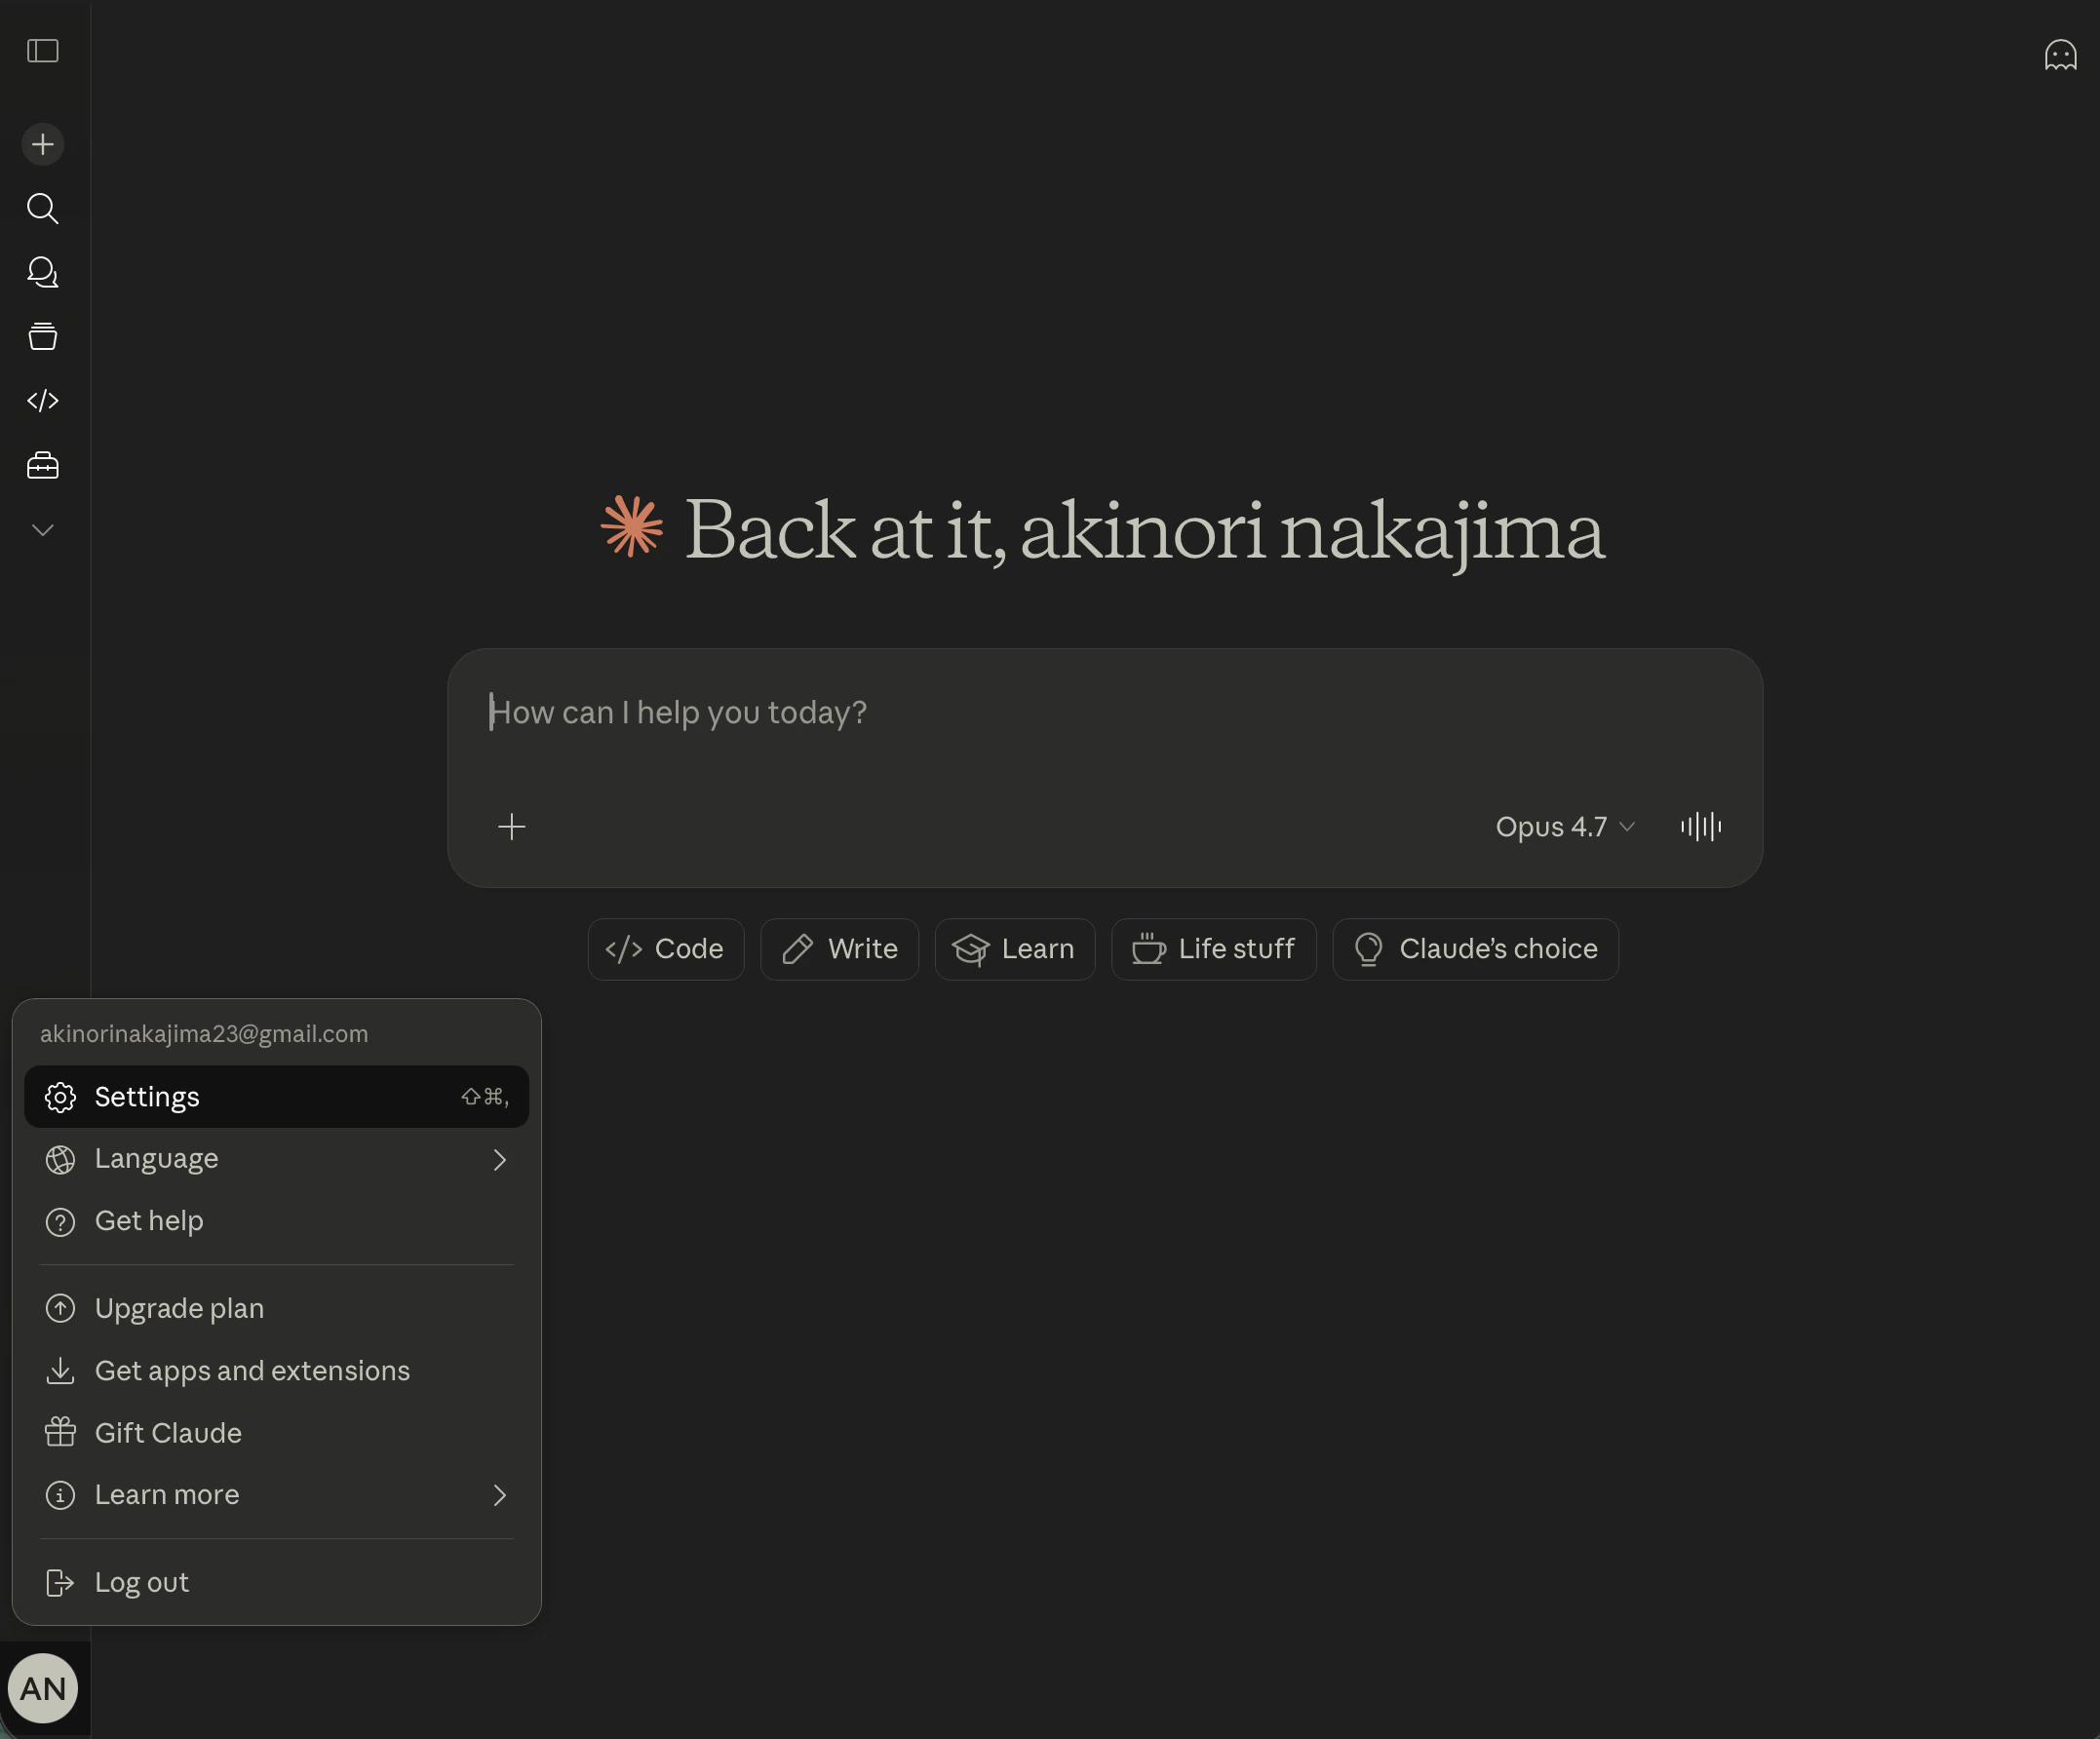
คลิกที่อวาตาร์บัญชีด้านล่างซ้ายแล้วเลือก **Settings**
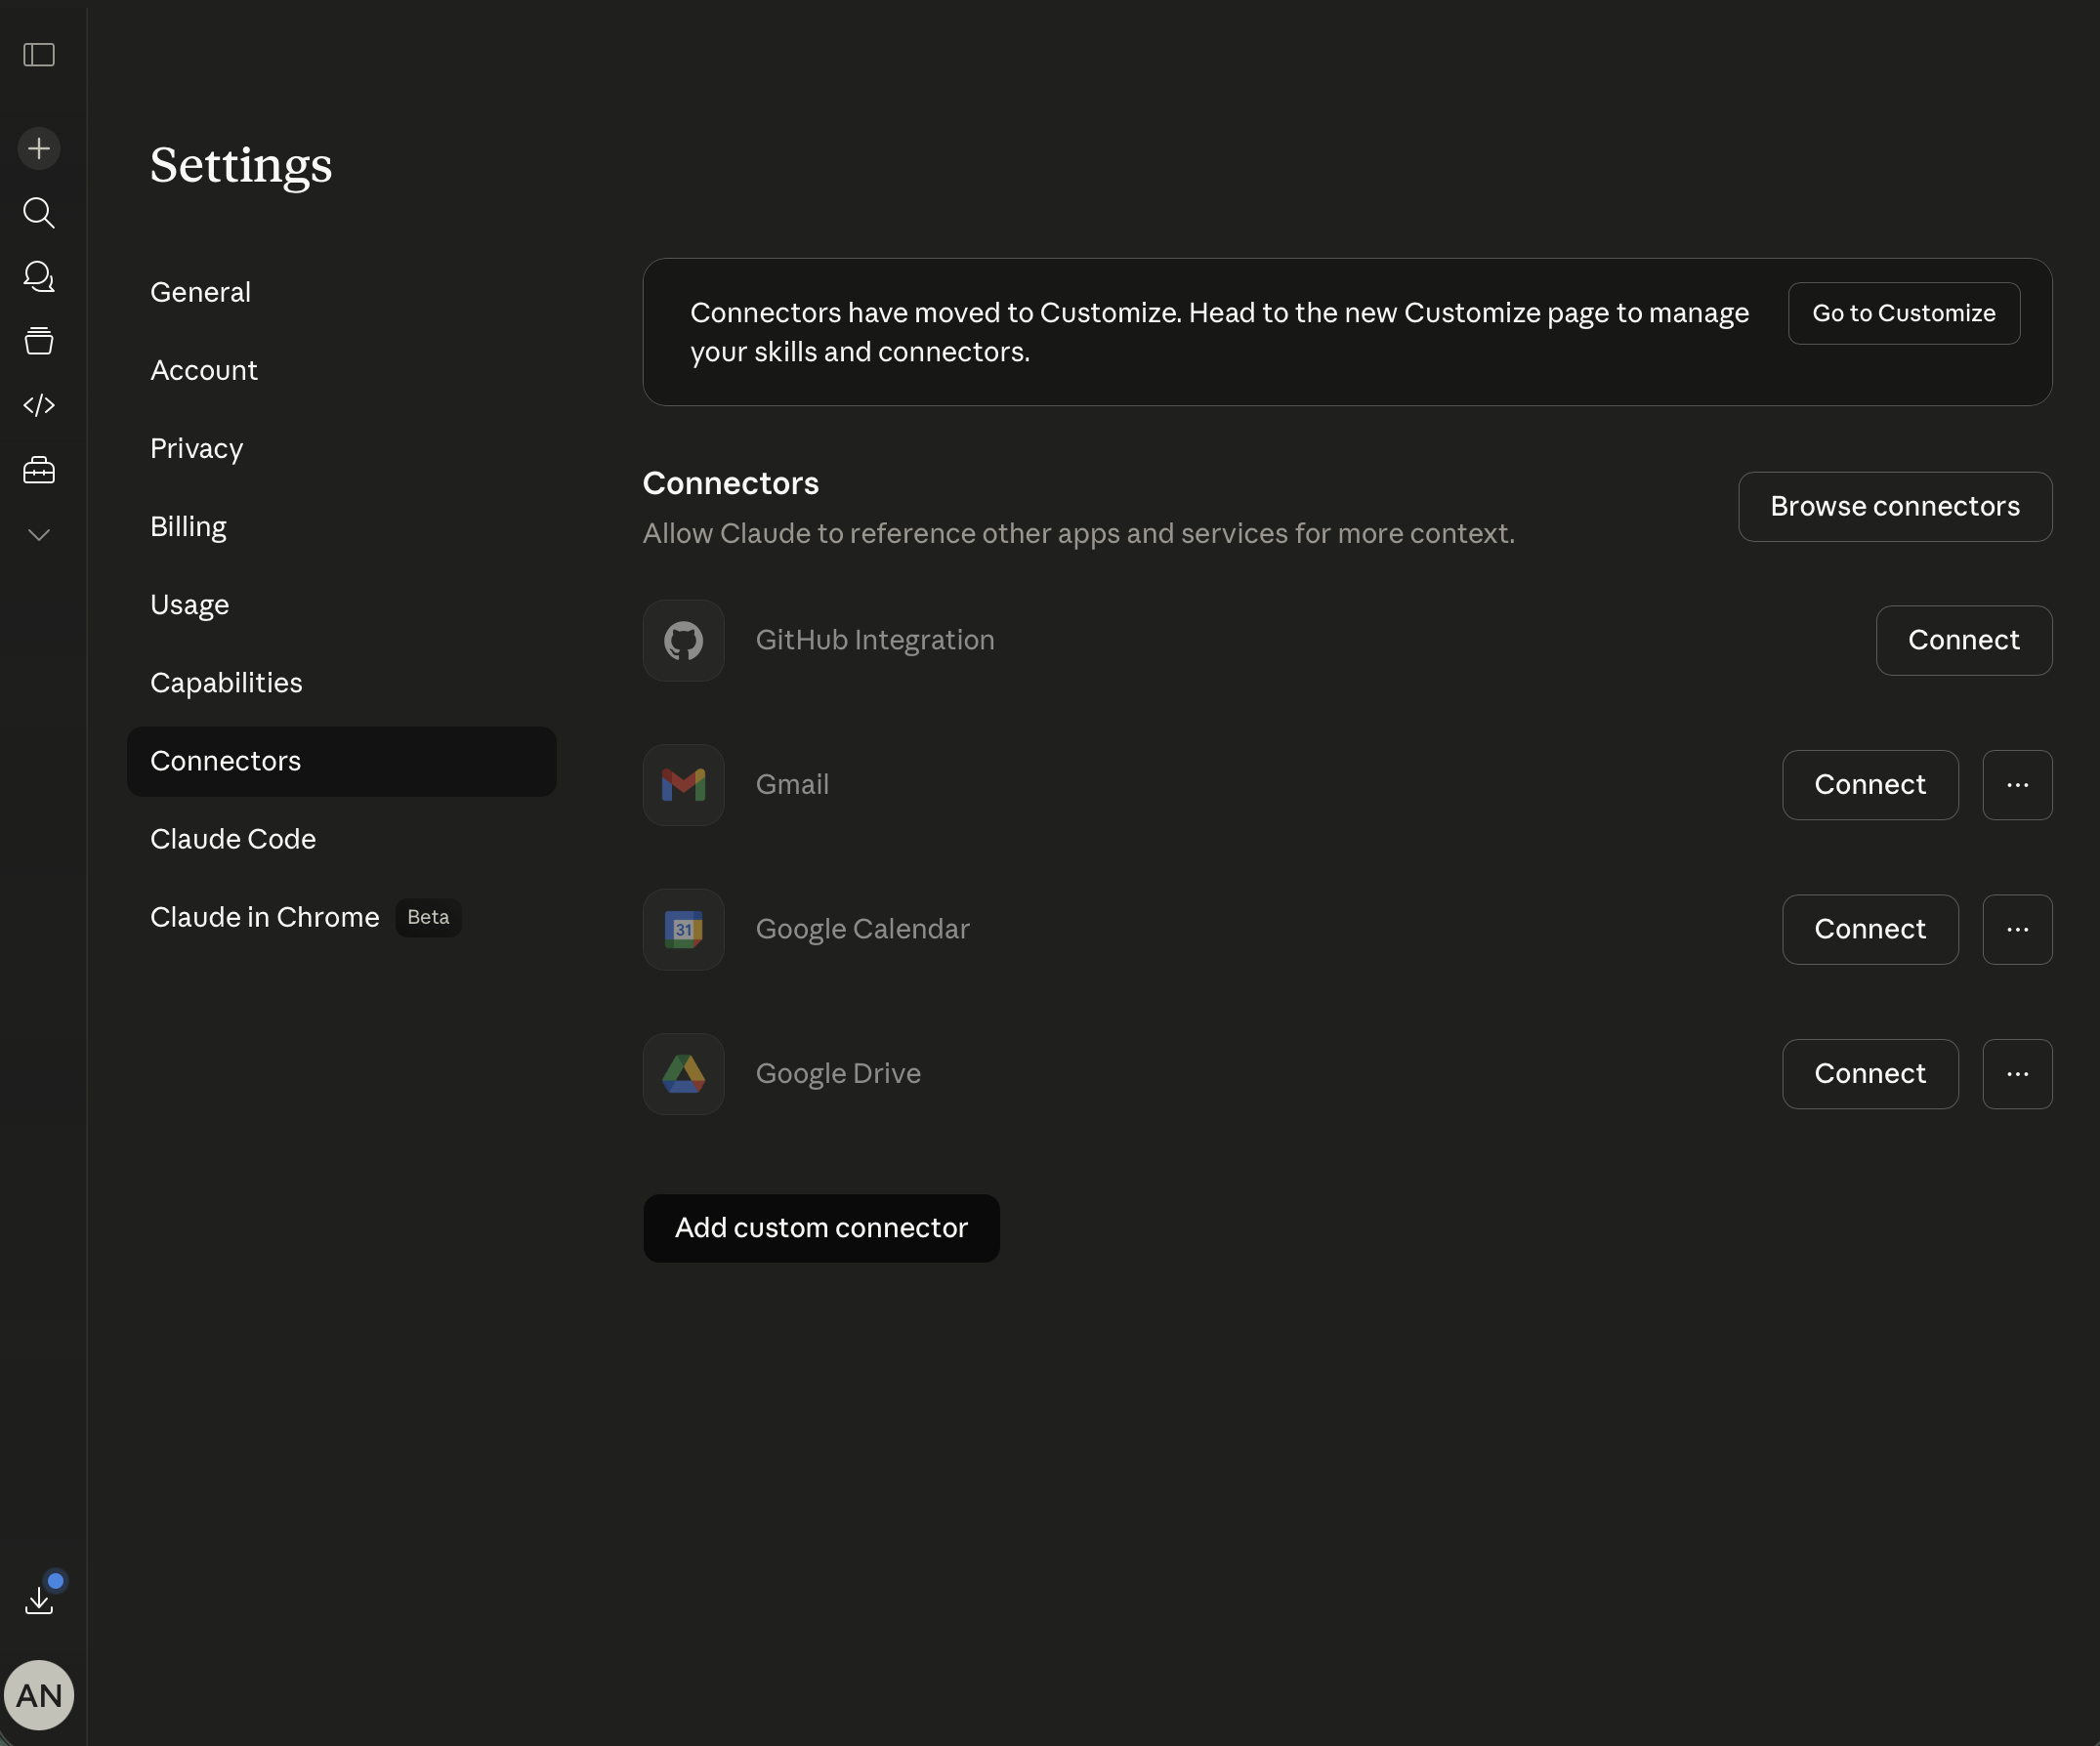
ใน Settings เปิดแท็บ **Connectors** เลื่อนลงล่างสุดแล้วคลิก **Add custom connector**
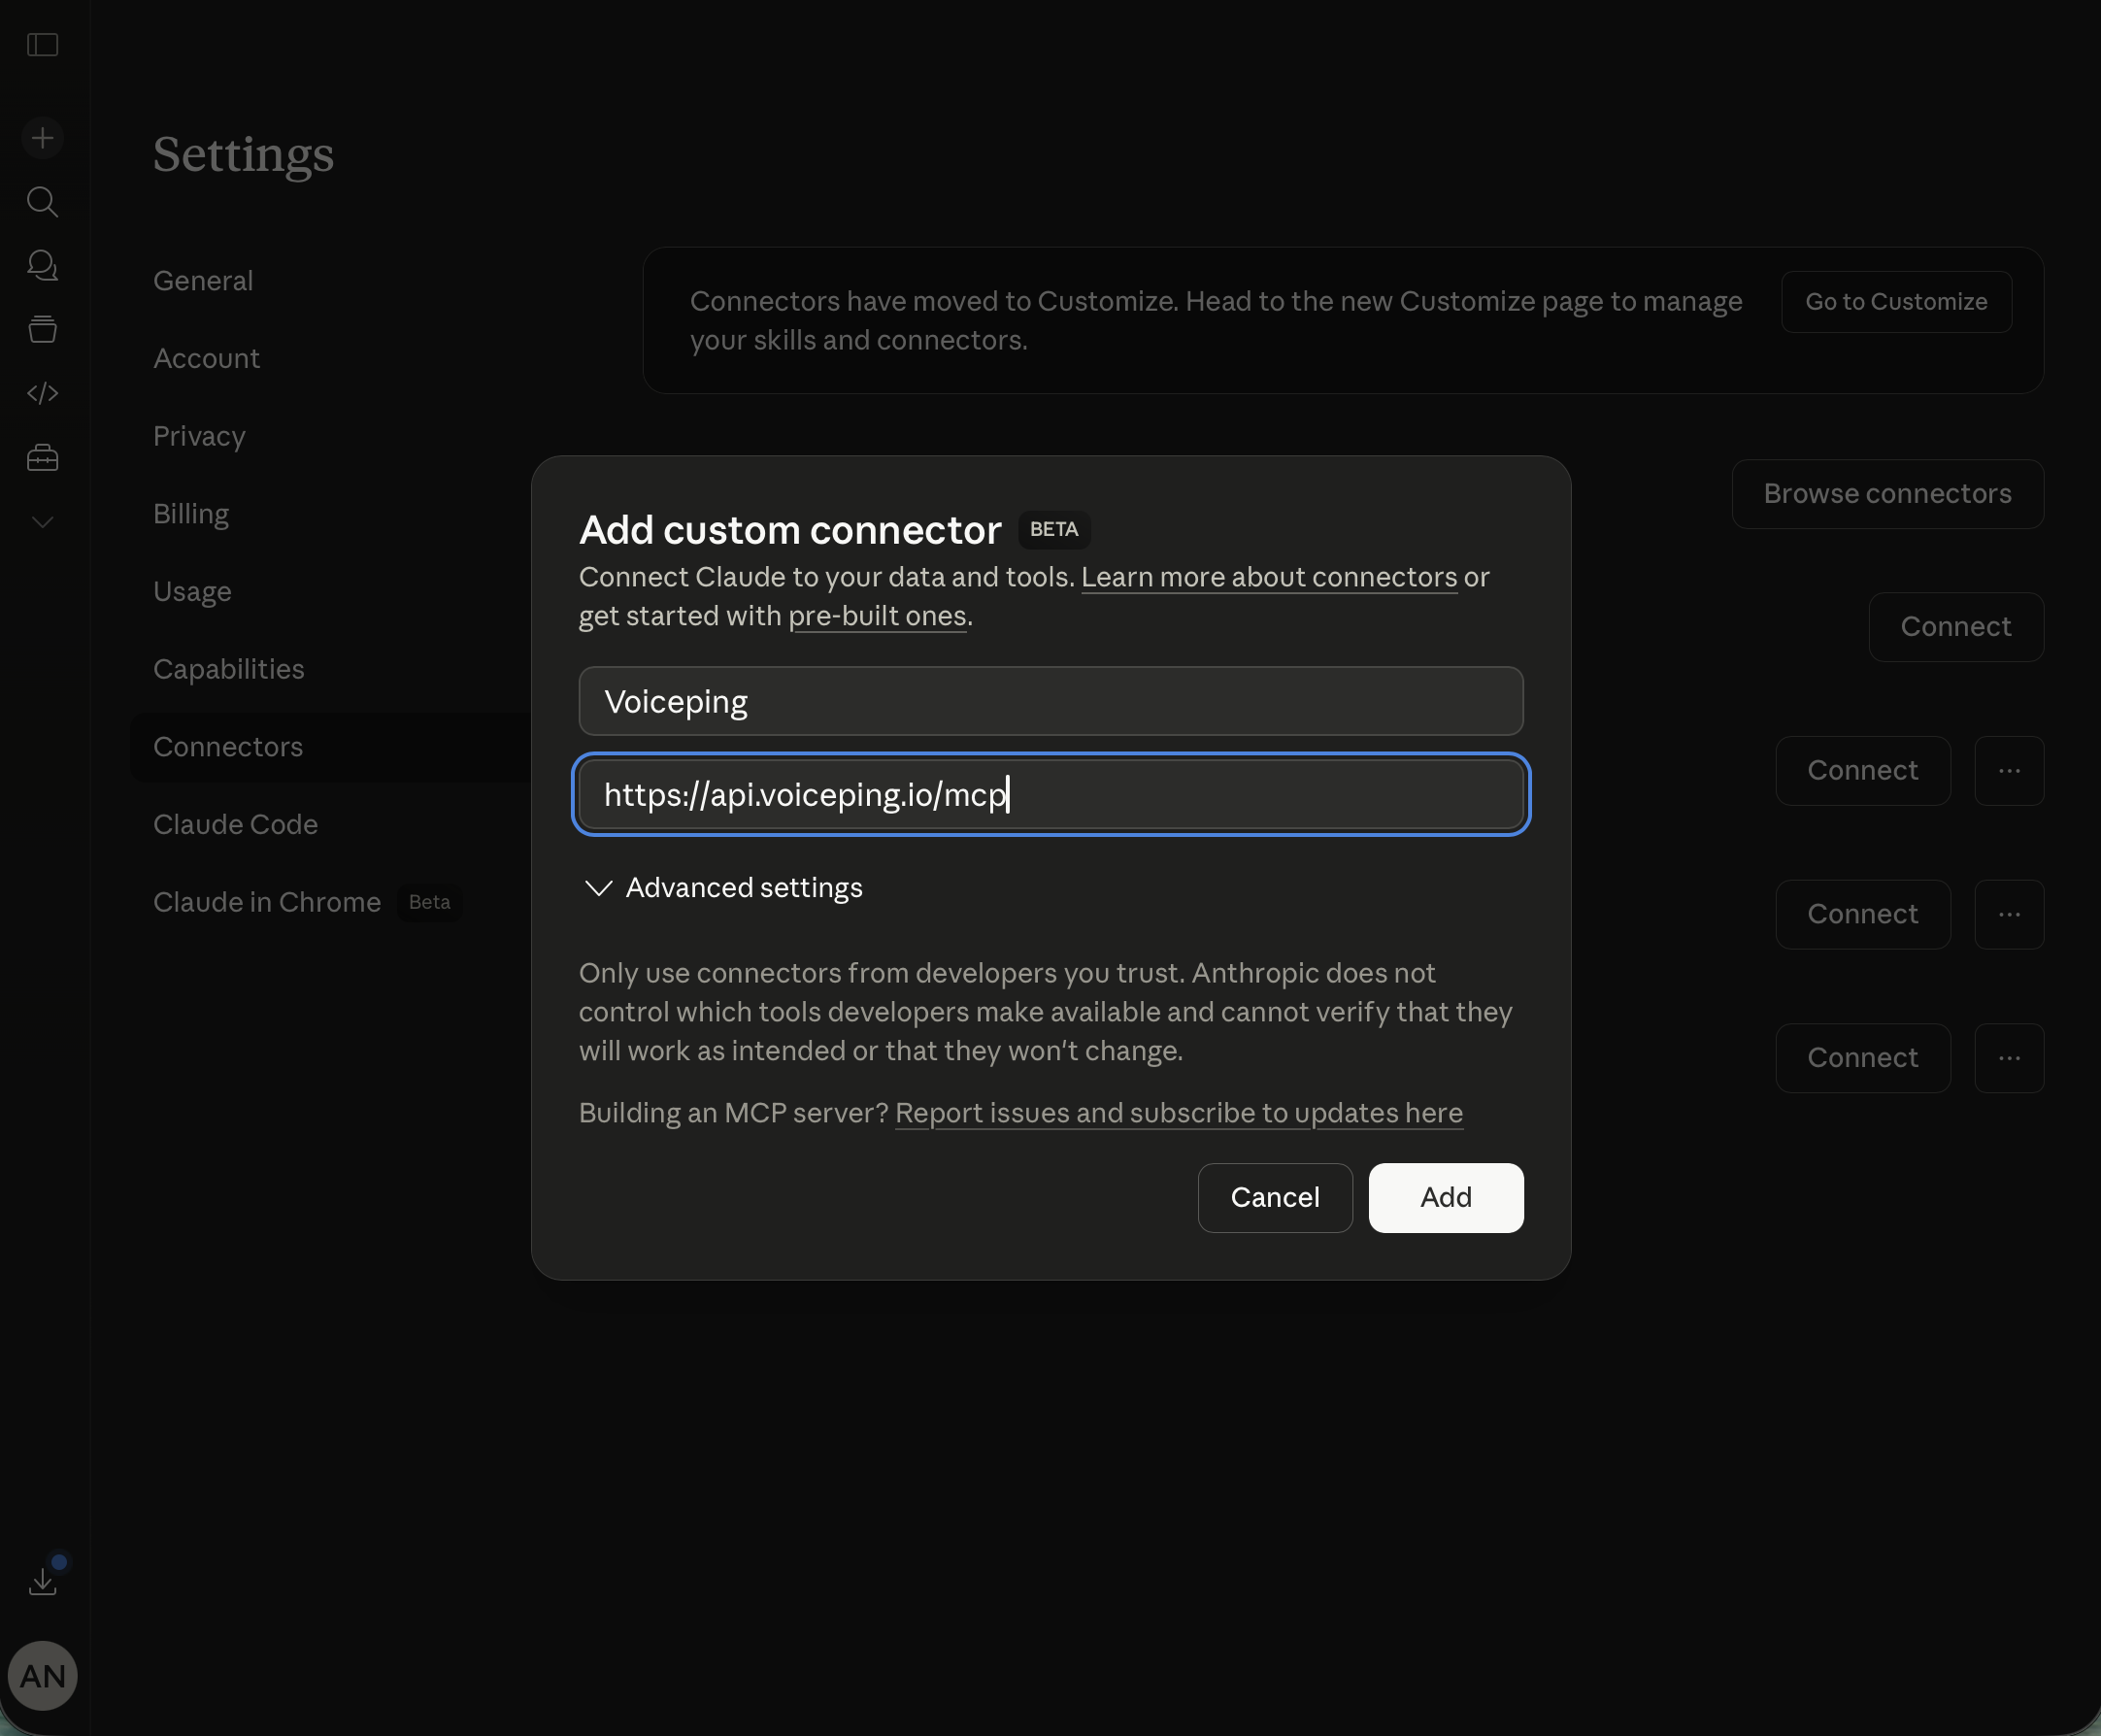
* **Name:** `Voiceping`
* **URL:** `https://api.voiceping.io/mcp`
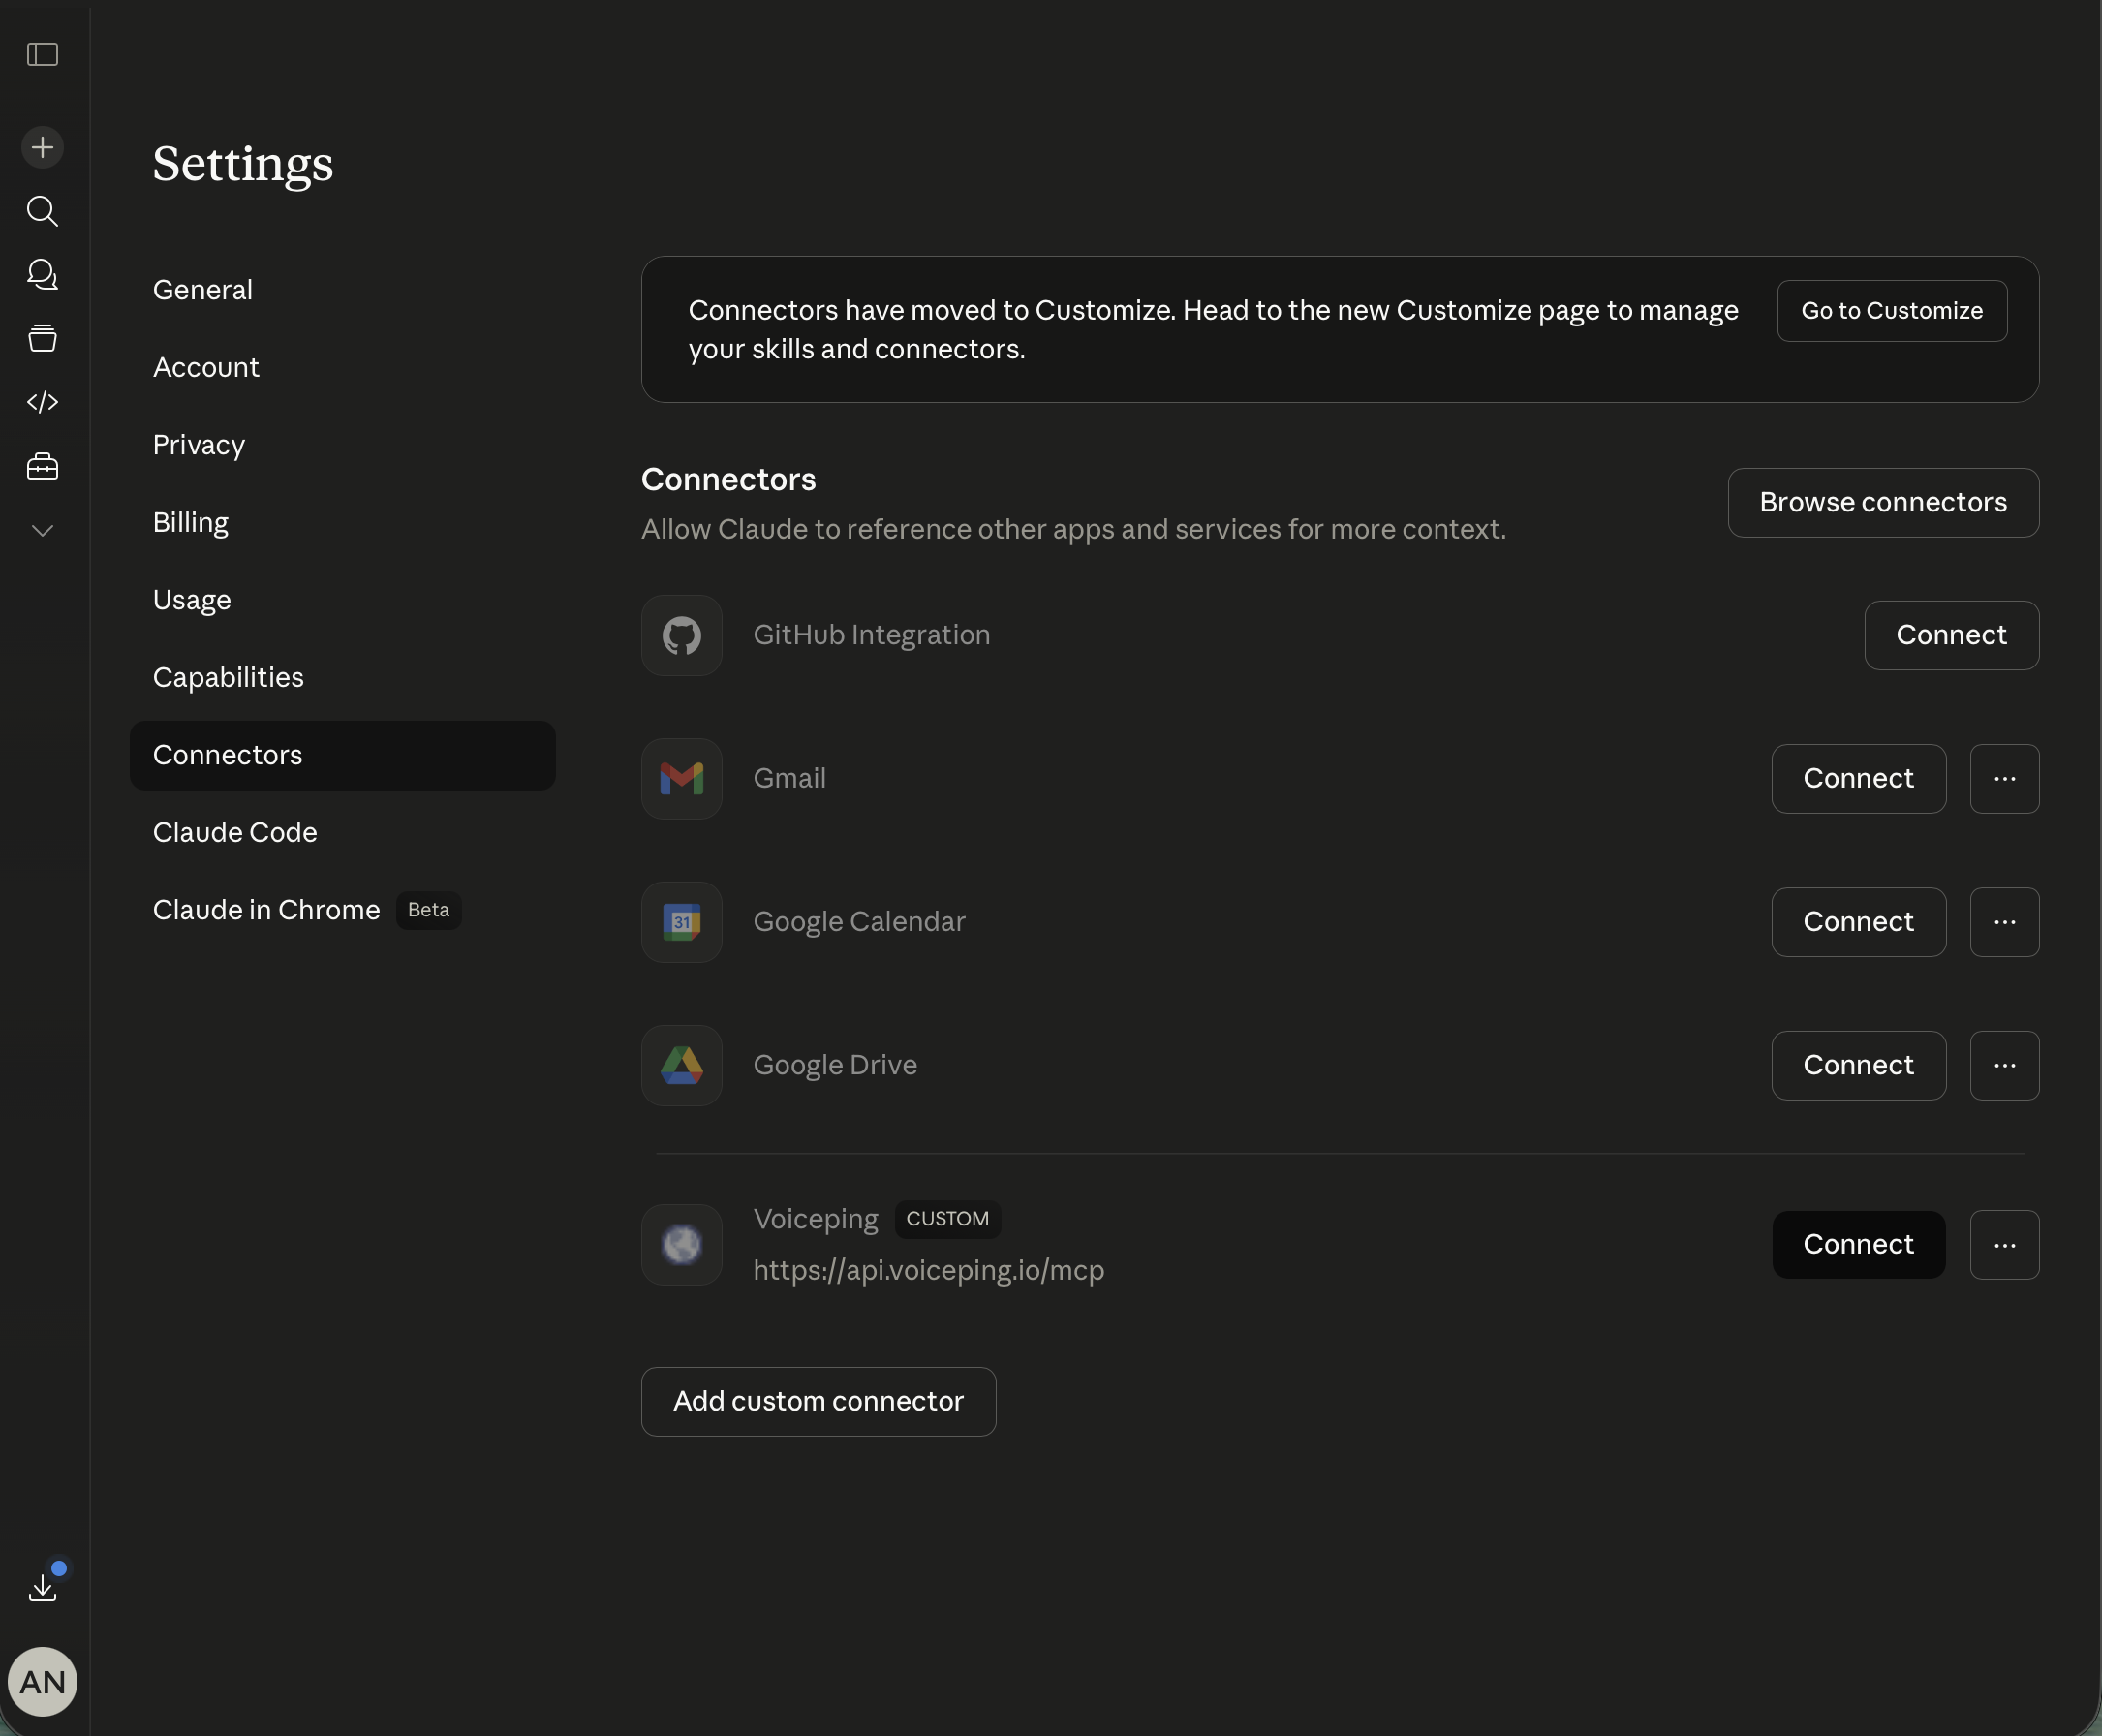
คลิก **Add** Claude จะลงทะเบียน connector แต่ยังไม่เชื่อมต่อ
ไม่เหมือน ChatGPT Claude ต้องการคลิกเพิ่มอีกหนึ่งครั้ง: หารายการ **Voiceping** ที่เพิ่งเพิ่มในรายการ connector แล้วคลิก **Connect** เพื่อเริ่มกระแส OAuth อนุมัติขอบเขตบันทึกการประชุมใน workspace ของ VoicePing เพื่อเสร็จสิ้น
สำหรับไคลเอนต์ที่รองรับอื่นๆ ใช้คู่มือทางการของไคลเอนต์นั้นๆ:
| ไคลเอนต์ | เอกสารตั้งค่า MCP ทางการ |
| -------------------------- | ---------------------------------------------------------------------------------------------------------------------------------------------------------------------------------------------------------------------------------------------------------------- |
| **Claude (Desktop / Web)** | [Getting started with MCP servers on Claude](https://support.claude.com/en/articles/10949351-getting-started-with-local-mcp-servers-on-claude-desktop) · [Remote MCP servers](https://platform.claude.com/docs/en/agents-and-tools/remote-mcp-servers) |
| **ChatGPT** | [Developer Mode and full MCP connectors in ChatGPT](https://help.openai.com/en/articles/12584461-developer-mode-apps-and-full-mcp-connectors-in-chatgpt-beta) · [Connect from ChatGPT — Apps SDK](https://developers.openai.com/apps-sdk/deploy/connect-chatgpt) |
| **Claude Code** | [Connect Claude Code to tools via MCP](https://code.claude.com/docs/en/mcp) |
| **Codex CLI** | [Model Context Protocol — Codex](https://developers.openai.com/codex/mcp) |
| **Gemini CLI** | [MCP servers with Gemini CLI](https://github.com/google-gemini/gemini-cli/blob/main/docs/tools/mcp-server.md) |
| **ไคลเอนต์อื่น** | [modelcontextprotocol.io — Connect to servers](https://modelcontextprotocol.io/docs/develop/connect-local-servers) |
ลงชื่อเข้าใช้ เลือก workspace ของ VoicePing และอนุมัติขอบเขตบันทึกการประชุมที่ไคลเอนต์ขอ มีเฉพาะขอบเขตที่คุณอนุมัติเท่านั้นที่จะได้รับ
เปิดไคลเอนต์ AI ที่รองรับ MCP ของคุณ (Claude, ChatGPT, Codex, Claude Code, Gemini CLI หรือเครื่องมือ MCP อื่น) แล้วเพิ่มเซิร์ฟเวอร์ MCP ของ VoicePing
URL ของเซิร์ฟเวอร์ MCP ของ VoicePing คือ:
```text theme={null}
https://api.voiceping.io/mcp
```
ขยายคู่มือสำหรับเครื่องมือของคุณ — ChatGPT และ Claude มีครบพร้อมภาพหน้าจอทีละขั้นตอน สำหรับไคลเอนต์อื่น ให้ใช้ตารางเอกสารทางการที่ตามมา
ข้อกำหนดเบื้องต้น: ChatGPT Pro หรือ Plus ที่เปิด **Developer Mode** (Settings → Connectors → Advanced → Developer Mode)
ใน ChatGPT (Developer Mode) คลิกที่อวาตาร์บัญชีด้านล่างซ้ายแล้วเลือก **Settings**
ใน Settings เปิดแท็บ **Apps** จากนั้นใต้ **Advanced settings** คลิก **Create app**
* **Name:** `Voiceping`
* **MCP Server URL:** `https://api.voiceping.io/mcp`
* **Authentication:** `OAuth`
* ติ๊กช่อง **"I understand and want to continue"**
* คลิก **Create**
ChatGPT จะเปิดกระแส OAuth ของ VoicePing ให้โดยอัตโนมัติ — อนุมัติขอบเขตบันทึกการประชุมเพื่อเสร็จสิ้นการเชื่อมต่อ
ใช้งานได้ใน Claude Desktop และ Claude บนเว็บ
คลิกที่อวาตาร์บัญชีด้านล่างซ้ายแล้วเลือก **Settings**
ใน Settings เปิดแท็บ **Connectors** เลื่อนลงล่างสุดแล้วคลิก **Add custom connector**
* **Name:** `Voiceping`
* **URL:** `https://api.voiceping.io/mcp`
คลิก **Add** Claude จะลงทะเบียน connector แต่ยังไม่เชื่อมต่อ
ไม่เหมือน ChatGPT Claude ต้องการคลิกเพิ่มอีกหนึ่งครั้ง: หารายการ **Voiceping** ที่เพิ่งเพิ่มในรายการ connector แล้วคลิก **Connect** เพื่อเริ่มกระแส OAuth อนุมัติขอบเขตบันทึกการประชุมใน workspace ของ VoicePing เพื่อเสร็จสิ้น
สำหรับไคลเอนต์ที่รองรับอื่นๆ ใช้คู่มือทางการของไคลเอนต์นั้นๆ:
| ไคลเอนต์ | เอกสารตั้งค่า MCP ทางการ |
| -------------------------- | ---------------------------------------------------------------------------------------------------------------------------------------------------------------------------------------------------------------------------------------------------------------- |
| **Claude (Desktop / Web)** | [Getting started with MCP servers on Claude](https://support.claude.com/en/articles/10949351-getting-started-with-local-mcp-servers-on-claude-desktop) · [Remote MCP servers](https://platform.claude.com/docs/en/agents-and-tools/remote-mcp-servers) |
| **ChatGPT** | [Developer Mode and full MCP connectors in ChatGPT](https://help.openai.com/en/articles/12584461-developer-mode-apps-and-full-mcp-connectors-in-chatgpt-beta) · [Connect from ChatGPT — Apps SDK](https://developers.openai.com/apps-sdk/deploy/connect-chatgpt) |
| **Claude Code** | [Connect Claude Code to tools via MCP](https://code.claude.com/docs/en/mcp) |
| **Codex CLI** | [Model Context Protocol — Codex](https://developers.openai.com/codex/mcp) |
| **Gemini CLI** | [MCP servers with Gemini CLI](https://github.com/google-gemini/gemini-cli/blob/main/docs/tools/mcp-server.md) |
| **ไคลเอนต์อื่น** | [modelcontextprotocol.io — Connect to servers](https://modelcontextprotocol.io/docs/develop/connect-local-servers) |
ลงชื่อเข้าใช้ เลือก workspace ของ VoicePing และอนุมัติขอบเขตบันทึกการประชุมที่ไคลเอนต์ขอ มีเฉพาะขอบเขตที่คุณอนุมัติเท่านั้นที่จะได้รับ
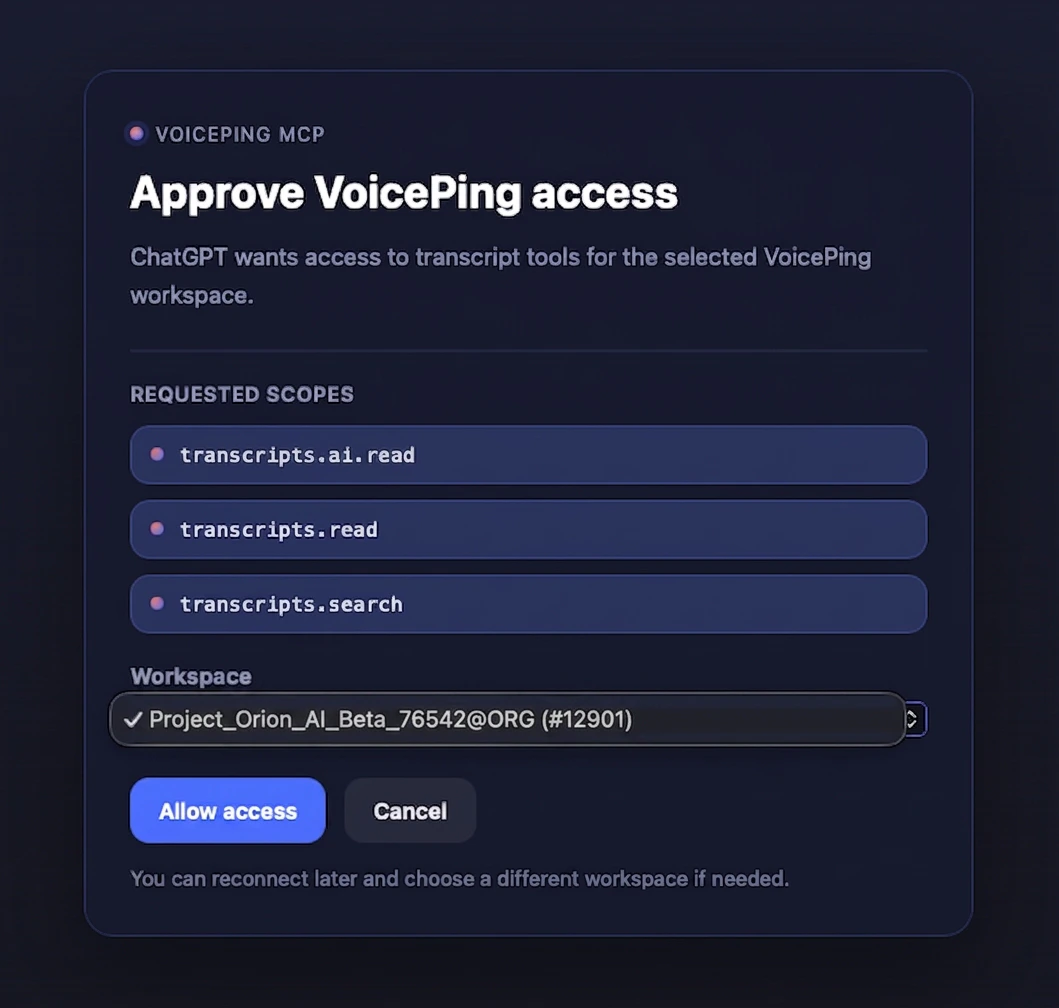 คุณเชื่อมต่อแล้ว เปิดหน้าเวิร์กโฟลว์ใดก็ได้จาก 5 หน้าที่ลิงก์ด้านบน และคัดลอก-วางพรอมต์แรก
***
## ขั้นตอนถัดไป
กลับไปดูขอบเขต การควบคุมวงจรชีวิต และบันทึกเหตุการณ์ที่ใช้กับทั้ง MCP และ API
หากเซิร์ฟเวอร์ (ไม่ใช่คน) กำลังดึงบันทึก ใช้ API Access ด้วย bearer token แทน
คุณเชื่อมต่อแล้ว เปิดหน้าเวิร์กโฟลว์ใดก็ได้จาก 5 หน้าที่ลิงก์ด้านบน และคัดลอก-วางพรอมต์แรก
***
## ขั้นตอนถัดไป
กลับไปดูขอบเขต การควบคุมวงจรชีวิต และบันทึกเหตุการณ์ที่ใช้กับทั้ง MCP และ API
หากเซิร์ฟเวอร์ (ไม่ใช่คน) กำลังดึงบันทึก ใช้ API Access ด้วย bearer token แทน