> ## Documentation Index
> Fetch the complete documentation index at: https://manual.voiceping.net/llms.txt
> Use this file to discover all available pages before exploring further.

# คู่มือการตั้งค่า SSO (Microsoft Entra ID)

> คู่มือการตั้งค่า Single Sign-On โดยใช้ Microsoft Entra ID (เดิมชื่อ Azure AD)

export const ContactTh = () => <>
    <Tip>
      หากคุณมีคำถามใดๆ กรุณาติดต่อเราผ่าน <a href="https://forms.gle/6AUho7oj3zBr79e96">แบบฟอร์มนี้</a>
    </Tip>

    <h2>ลิงก์อย่างเป็นทางการ</h2>

    <CardGroup cols={2}>
      <Card title="เว็บไซต์อย่างเป็นทางการ" icon="globe" href="https://voiceping.net/en/">
        เยี่ยมชมเว็บไซต์อย่างเป็นทางการของเรา
      </Card>
      <Card title="X (Twitter)" icon="x-twitter" href="https://x.com/VoicePingMedia">
        ติดตามเราบน X
      </Card>
      <Card title="Facebook" icon="facebook" href="https://www.facebook.com/voiceping.inc">
        ติดตามเราบน Facebook
      </Card>
      <Card title="LinkedIn" icon="linkedin" href="https://www.linkedin.com/company/28684130/">
        เชื่อมต่อบน LinkedIn
      </Card>
    </CardGroup>
  </>;

## ฟีเจอร์ Single Sign-On

ลูกค้าแผน Enterprise สามารถเปิดใช้งาน Single Sign-On (SSO) ในเวิร์กสเปซของตน ทำให้ผู้ใช้สามารถลงชื่อเข้าใช้ VoicePing ด้วย Microsoft Entra ID

คู่มือนี้อธิบายวิธีเปิดใช้งาน SSO ในเวิร์กสเปซและวิธีกำหนดค่า Microsoft Entra ID เป็น IdP (Identity Provider)

## ข้อกำหนดเบื้องต้น

<Check>มีบัญชีผู้ใช้แผน VoicePing Enterprise</Check>
<Check>มีบัญชี Microsoft Azure</Check>

***

## ลงทะเบียน Identity Provider

### กำหนดค่า Microsoft Entra ID

<Steps>
  <Step title="เพิ่ม VoicePing ใน Enterprise Applications">
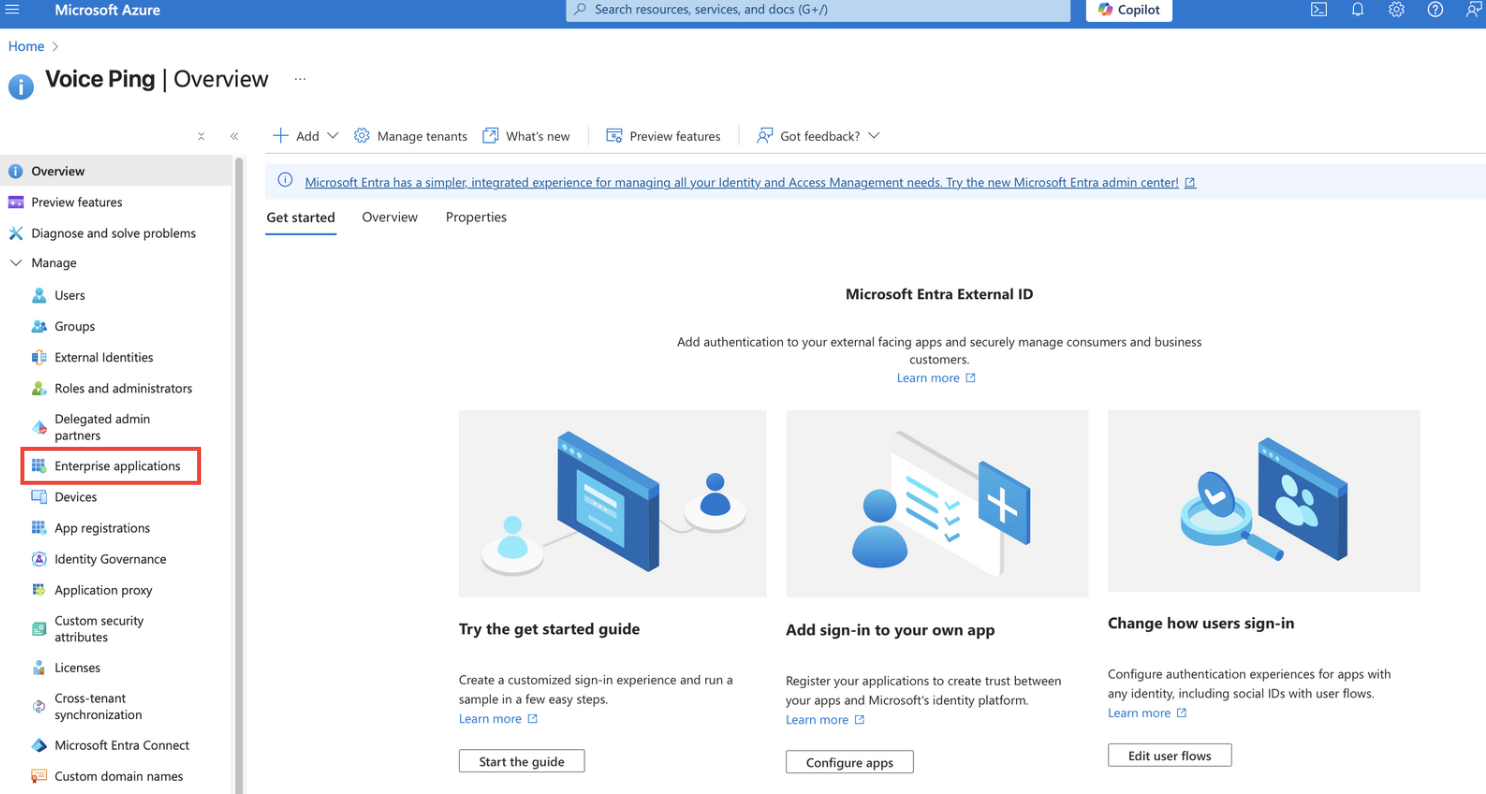
    เปิด Microsoft Entra ID จากพอร์ทัล Azure และเปิดหน้า Enterprise Applications
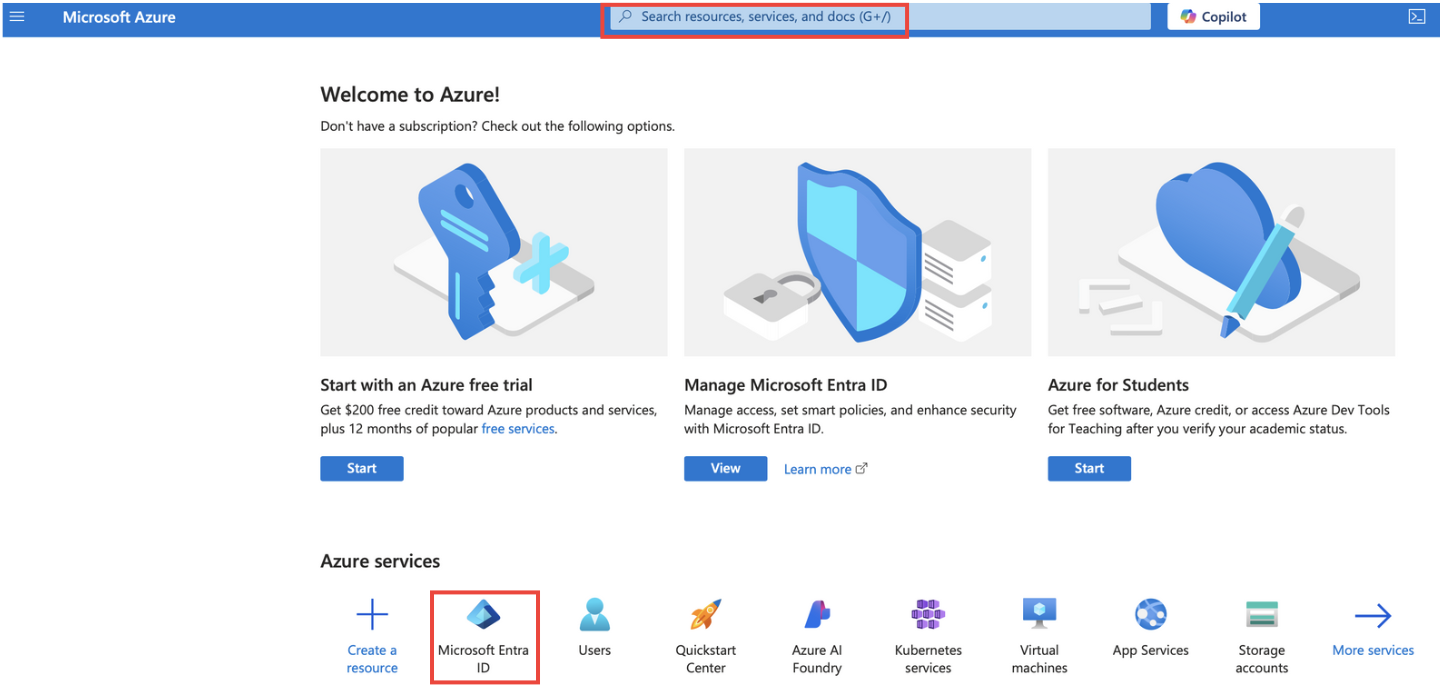
    <Frame>
      <img src="https://mintcdn.com/test-cf63e467/UDonPy9U4TF-4rTr/ja/images/sso-entra/01-azure-entra-id.png?fit=max&auto=format&n=UDonPy9U4TF-4rTr&q=85&s=b02e79d9bff931861b8146854d8716bf" alt="Azure Entra ID" width="1440" height="700" data-path="ja/images/sso-entra/01-azure-entra-id.png" />
    </Frame>

    กด "New application" และเพิ่ม VoicePing
    <Frame>
      <img src="https://mintcdn.com/test-cf63e467/UDonPy9U4TF-4rTr/ja/images/sso-entra/02-enterprise-apps.png?fit=max&auto=format&n=UDonPy9U4TF-4rTr&q=85&s=d15a2f004f309344646ec9a9cec6d924" alt="Enterprise applications" width="1486" height="794" data-path="ja/images/sso-entra/02-enterprise-apps.png" />
    </Frame>
  </Step>

  <Step title="กำหนดค่าโปรโตคอล SAML 2.0">
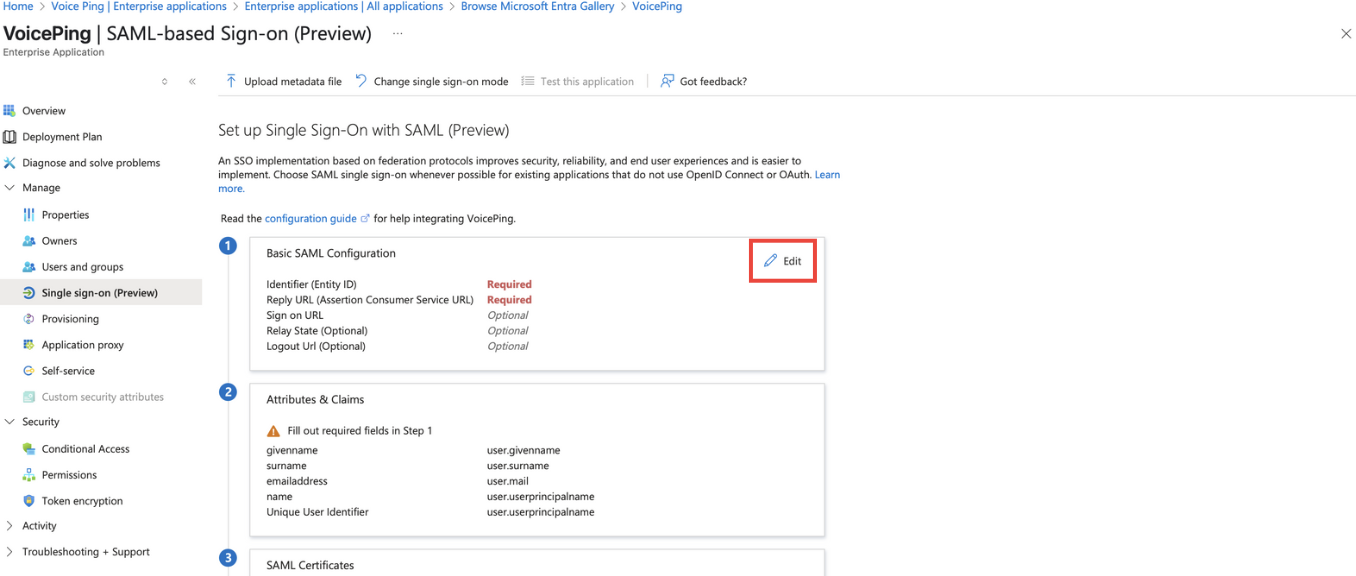
    กำหนดค่าแอปพลิเคชัน VoicePing บน IdP เพื่อใช้โปรโตคอล SAML 2.0 สำหรับ SSO

    <Frame>
      <img src="https://mintcdn.com/test-cf63e467/UDonPy9U4TF-4rTr/ja/images/sso-entra/03-saml-setup.png?fit=max&auto=format&n=UDonPy9U4TF-4rTr&q=85&s=d1ee7ef387296219c8e00eb18e29544f" alt="ตั้งค่า SAML" width="1420" height="688" data-path="ja/images/sso-entra/03-saml-setup.png" />
    </Frame>
  </Step>

  <Step title="กำหนดค่าข้อมูล Service Provider (SP)">
    คุณสามารถตรวจสอบฟิลด์ที่จำเป็นในแท็บ "Team Management > SSO Settings" ของแดชบอร์ดการจัดการเวิร์กสเปซในแอป VoicePing

    <Info>
      สามารถเข้าถึงได้เฉพาะเจ้าของหรือผู้จัดการของเวิร์กสเปซที่เปิดใช้งาน SSO
    </Info>

    | รายการ    | ค่า                                        |
    | --------- | ------------------------------------------ |
    | ACS URL   | `https://api.voiceping.io/api/v1/user/acs` |
    | Entity ID | `voice-ping`                               |
    <Frame>
      <img src="https://mintcdn.com/test-cf63e467/UDonPy9U4TF-4rTr/ja/images/sso-entra/04-sp-config.png?fit=max&auto=format&n=UDonPy9U4TF-4rTr&q=85&s=d37efd4c234fecf241e8a29ee119a637" alt="กำหนดค่า SP" width="1356" height="576" data-path="ja/images/sso-entra/04-sp-config.png" />
    </Frame>
  </Step>

  <Step title="รวมอีเมลใน SAML Claim">
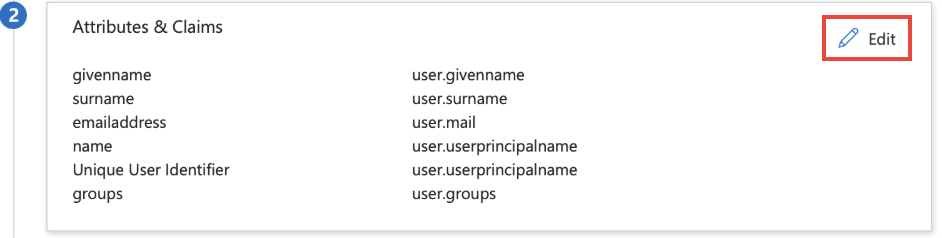
    รวมที่อยู่อีเมลของผู้ใช้ใน SAML claim นี่จำเป็นสำหรับการยืนยันตัวตนในแพลตฟอร์ม VoicePing

    <Warning>
      ที่อยู่อีเมลที่กำหนดใน IdP ต้องตรงกับที่อยู่ที่ใช้เมื่อลงทะเบียนผู้ใช้ใน VoicePing
    </Warning>

    สิ่งนี้ควรถูกตั้งค่าเป็นค่าเริ่มต้นใน Microsoft Entra ID แต่ให้เพิ่มหากยังไม่ได้กำหนดค่า
    <Frame>
      <img src="https://mintcdn.com/test-cf63e467/UDonPy9U4TF-4rTr/ja/images/sso-entra/05-claims.png?fit=max&auto=format&n=UDonPy9U4TF-4rTr&q=85&s=88af2ee3cc1463233ab55b5a9b46852e" alt="กำหนดค่า claims" width="942" height="238" data-path="ja/images/sso-entra/05-claims.png" />
    </Frame>

    <Frame>
      <img src="https://mintcdn.com/test-cf63e467/LU3oFsc_lcA5rDjy/ja/images/sso-entra/14-configuration-step.png?fit=max&auto=format&n=LU3oFsc_lcA5rDjy&q=85&s=0d361d1f642bbad50d2bb306a5c519de" alt="ขั้นตอนการกำหนดค่า" width="1132" height="942" data-path="ja/images/sso-entra/14-configuration-step.png" />
    </Frame>

    <Frame>
      <img src="https://mintcdn.com/test-cf63e467/LU3oFsc_lcA5rDjy/ja/images/sso-entra/15-attributes-mapping.png?fit=max&auto=format&n=LU3oFsc_lcA5rDjy&q=85&s=62b9ba6c8f3b5013a59763be13ca4541" alt="การแมป attributes" width="1126" height="422" data-path="ja/images/sso-entra/15-attributes-mapping.png" />
    </Frame>

    <Frame>
      <img src="https://mintcdn.com/test-cf63e467/LU3oFsc_lcA5rDjy/ja/images/sso-entra/16-claim-configuration.png?fit=max&auto=format&n=LU3oFsc_lcA5rDjy&q=85&s=6b55f0de6c87852a3de9e50ea708f5d6" alt="กำหนดค่า claim" width="1324" height="514" data-path="ja/images/sso-entra/16-claim-configuration.png" />
    </Frame>
  </Step>

  <Step title="เพิ่มผู้ใช้">
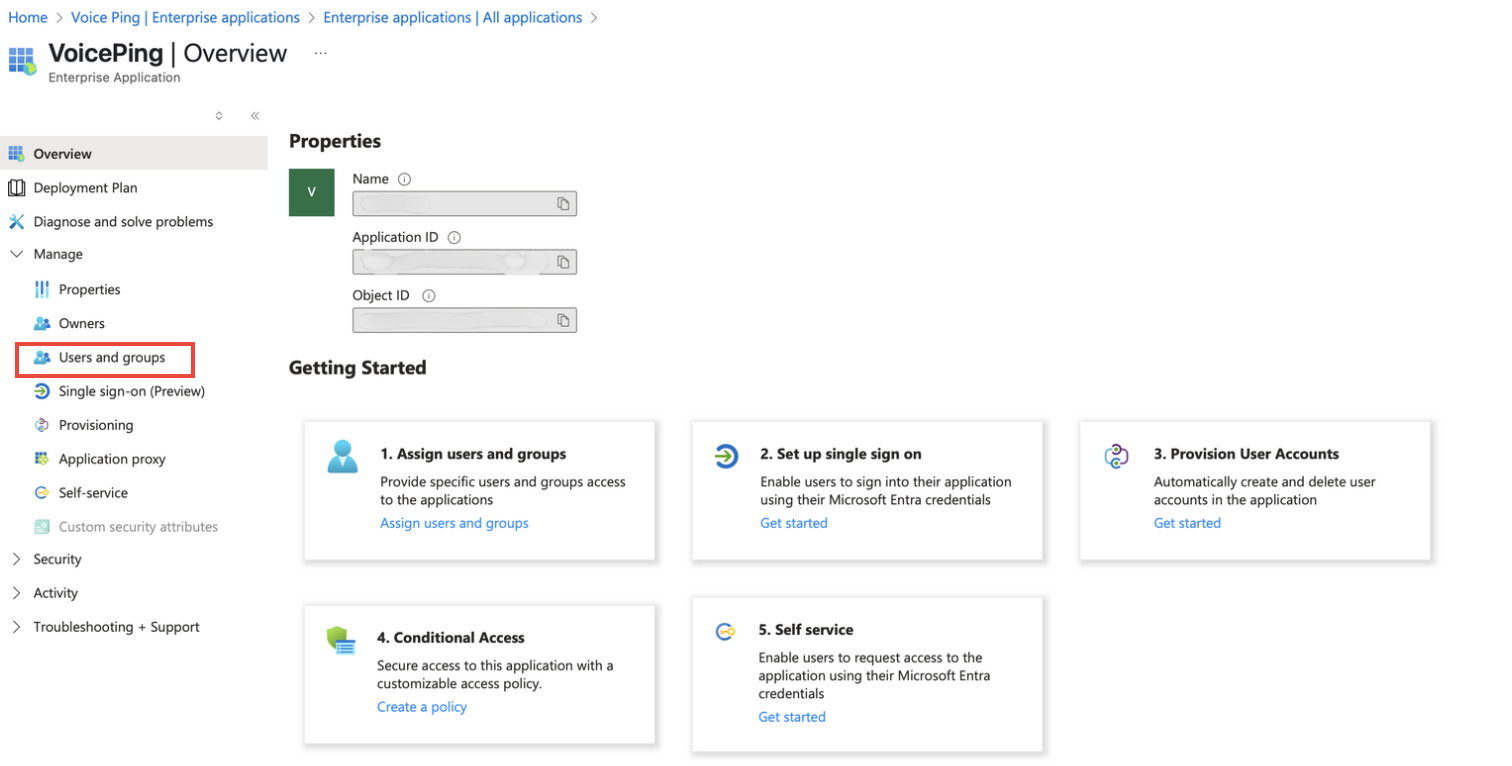
    เพิ่มผู้ใช้ในแอปพลิเคชัน VoicePing ที่สร้างขึ้น

    1. เปิดหน้า "Users and groups" จากแอปพลิเคชัน VoicePing ใน Microsoft Entra ID
    2. กด "Add user/group"
    3. เลือกผู้ใช้หรือกลุ่มที่คุณต้องการให้สิทธิ์เข้าถึง
    4. กด "Select" และ "Assign"
    <Frame>
      <img src="https://mintcdn.com/test-cf63e467/UDonPy9U4TF-4rTr/ja/images/sso-entra/06-add-users.png?fit=max&auto=format&n=UDonPy9U4TF-4rTr&q=85&s=669c43583e467126f06e9ad0db5c4024" alt="เพิ่มผู้ใช้" width="1512" height="766" data-path="ja/images/sso-entra/06-add-users.png" />
    </Frame>
  </Step>

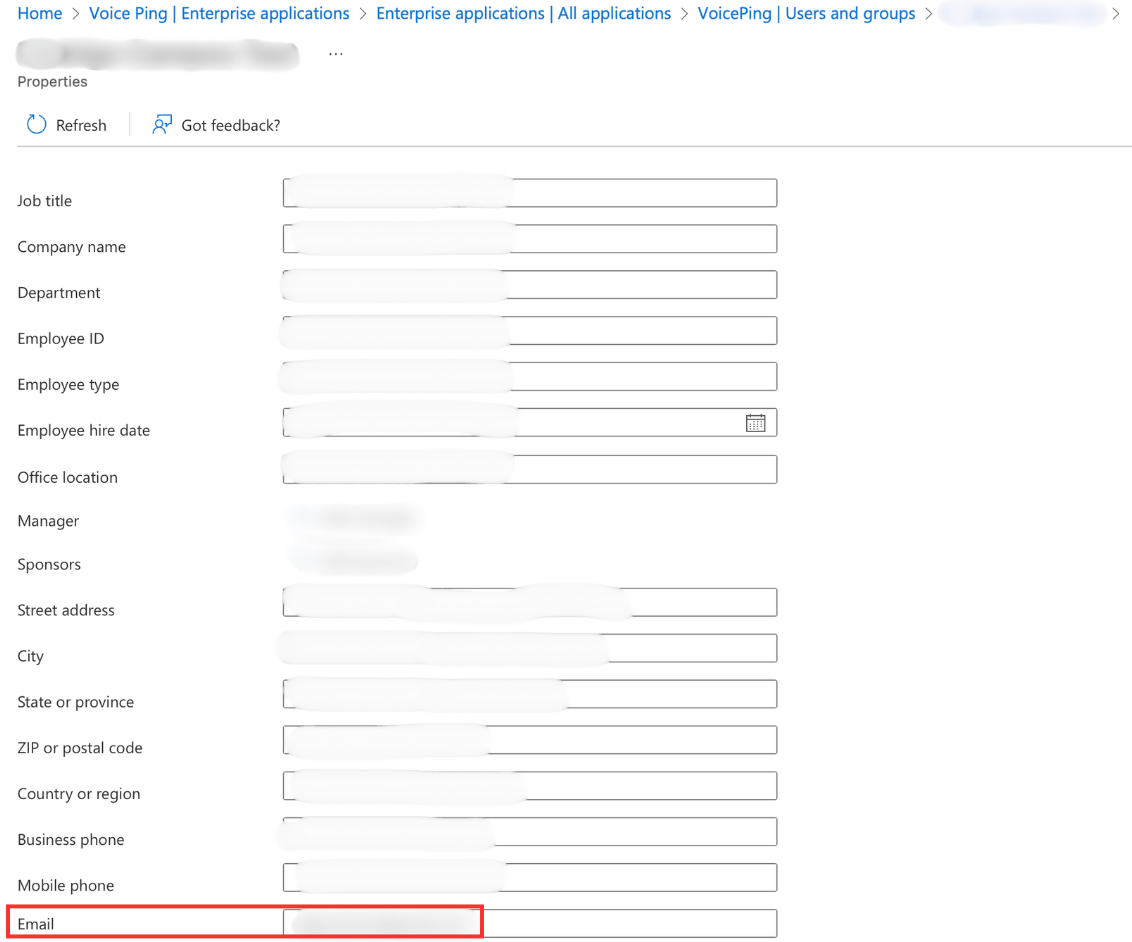
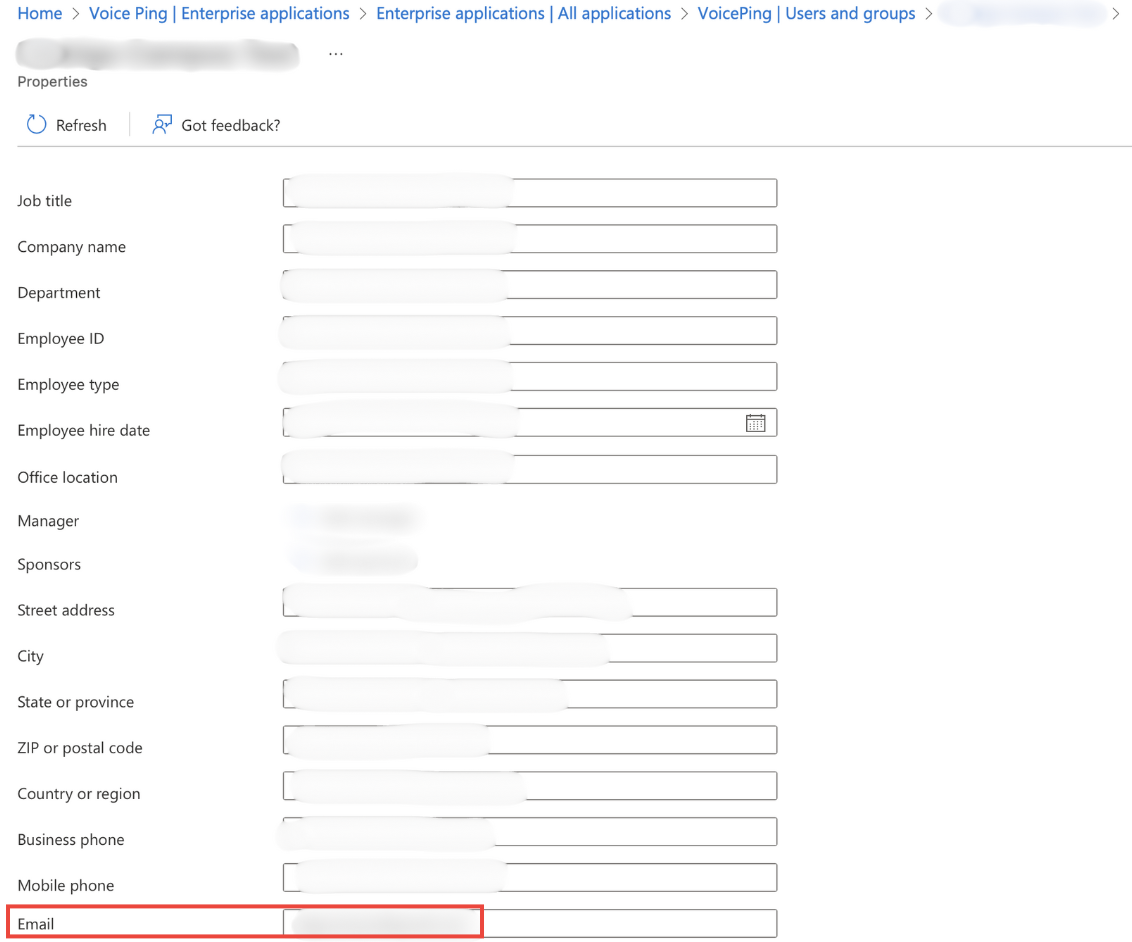
  <Step title="ตรวจสอบที่อยู่อีเมล">
    ตรวจสอบให้แน่ใจว่าผู้ใช้ที่เพิ่มได้ตั้งค่าที่อยู่อีเมลใน Microsoft Azure แล้ว
    <Frame>
      <img src="https://mintcdn.com/test-cf63e467/LU3oFsc_lcA5rDjy/ja/images/sso-entra/07-verify-email.png?fit=max&auto=format&n=LU3oFsc_lcA5rDjy&q=85&s=4a4424d581be8ffc3db16bd508527283" alt="ตรวจสอบที่อยู่อีเมล" width="1132" height="942" data-path="ja/images/sso-entra/07-verify-email.png" />
    </Frame>
  </Step>

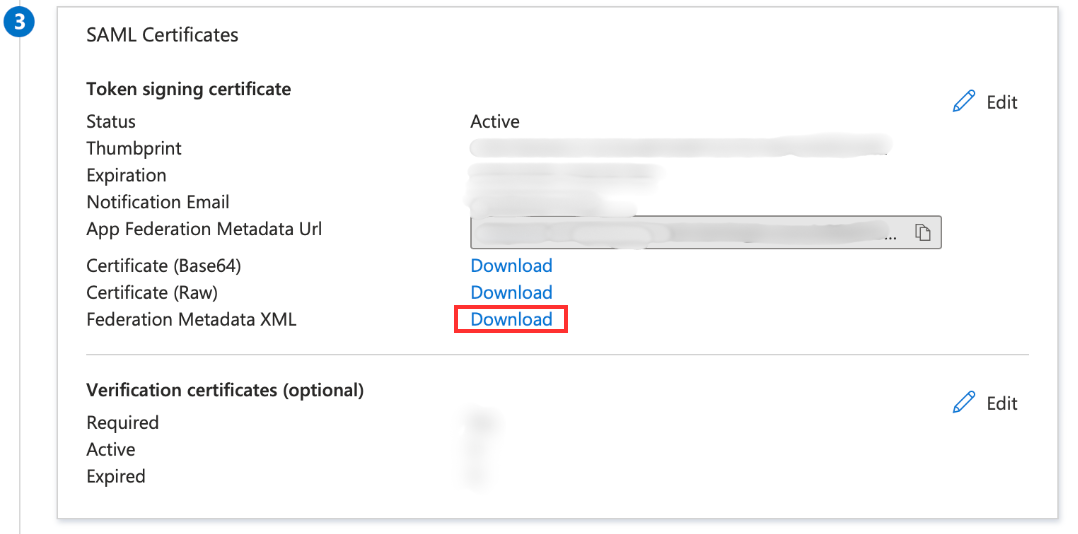
  <Step title="ดาวน์โหลดไฟล์ Metadata">
    ดาวน์โหลดไฟล์ metadata จาก IdP (Microsoft Entra ID) ไฟล์นี้จะใช้ในภายหลังที่ฝั่ง VoicePing
    <Frame>
      <img src="https://mintcdn.com/test-cf63e467/LU3oFsc_lcA5rDjy/ja/images/sso-entra/17-download-metadata.png?fit=max&auto=format&n=LU3oFsc_lcA5rDjy&q=85&s=eebd136808932f4a3df27ff401669a08" alt="ดาวน์โหลด metadata" width="1078" height="534" data-path="ja/images/sso-entra/17-download-metadata.png" />
    </Frame>
  </Step>
</Steps>

***

## กำหนดค่า VoicePing

<Steps>
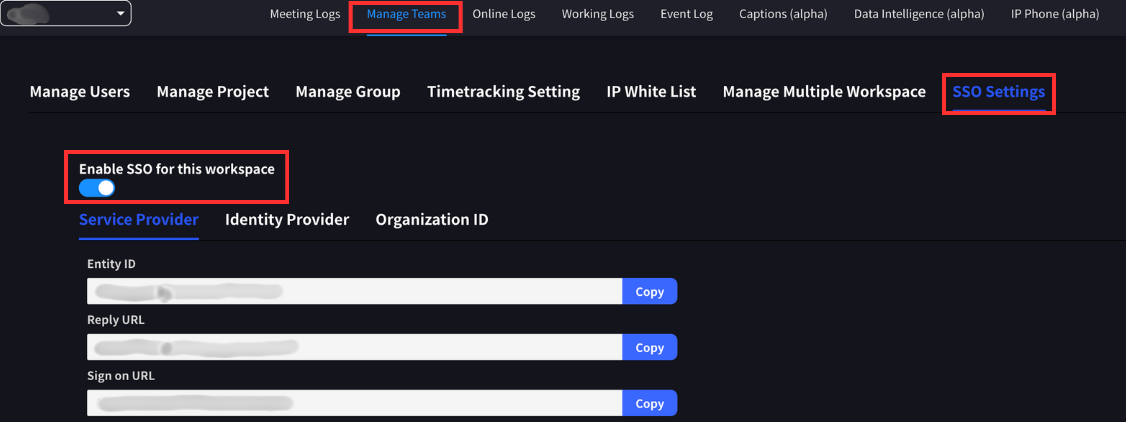
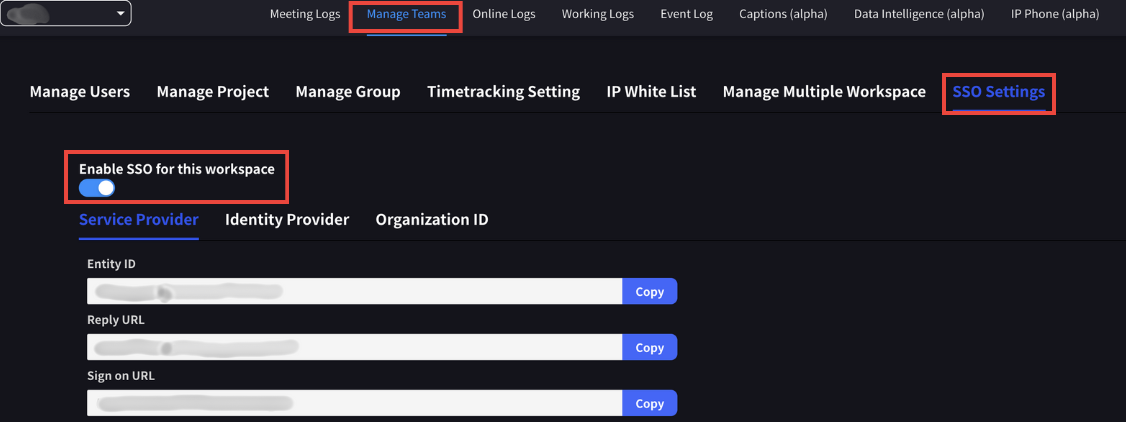
  <Step title="เปิดใช้งาน SSO">
    ไปที่แดชบอร์ดการจัดการเวิร์กสเปซ เปิดแท็บ "Team Management > SSO Settings" และเปิดใช้งาน SSO
    <Frame>
      <img src="https://mintcdn.com/test-cf63e467/LU3oFsc_lcA5rDjy/ja/images/sso-entra/08-enable-sso.png?fit=max&auto=format&n=LU3oFsc_lcA5rDjy&q=85&s=455be44d72a3955447f0438c5ee0e50f" alt="เปิดใช้งาน SSO" width="1126" height="422" data-path="ja/images/sso-entra/08-enable-sso.png" />
    </Frame>
  </Step>

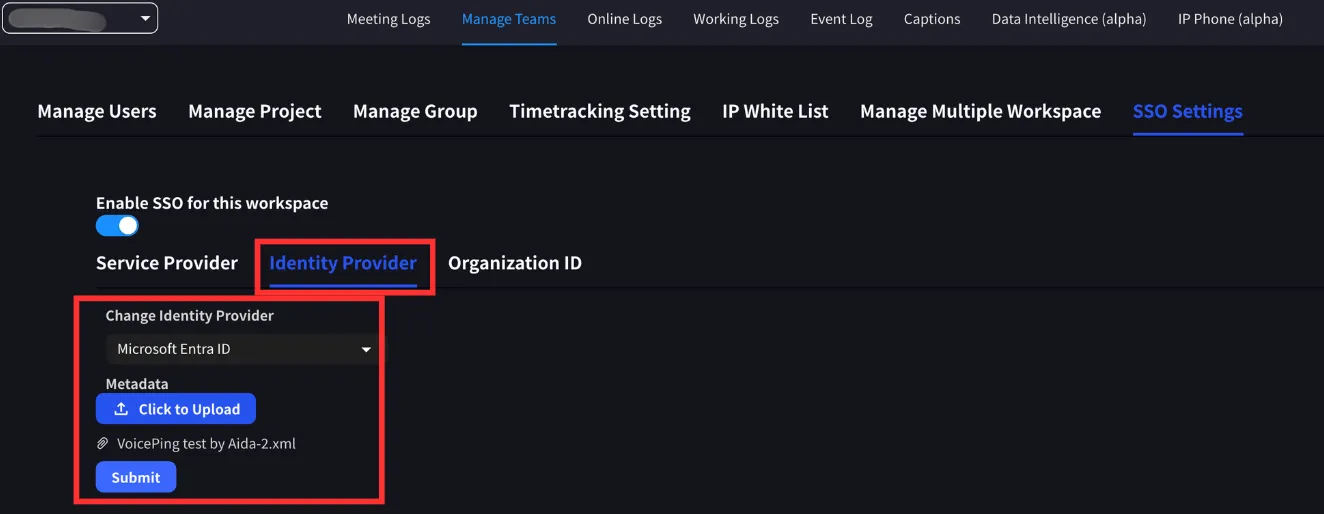
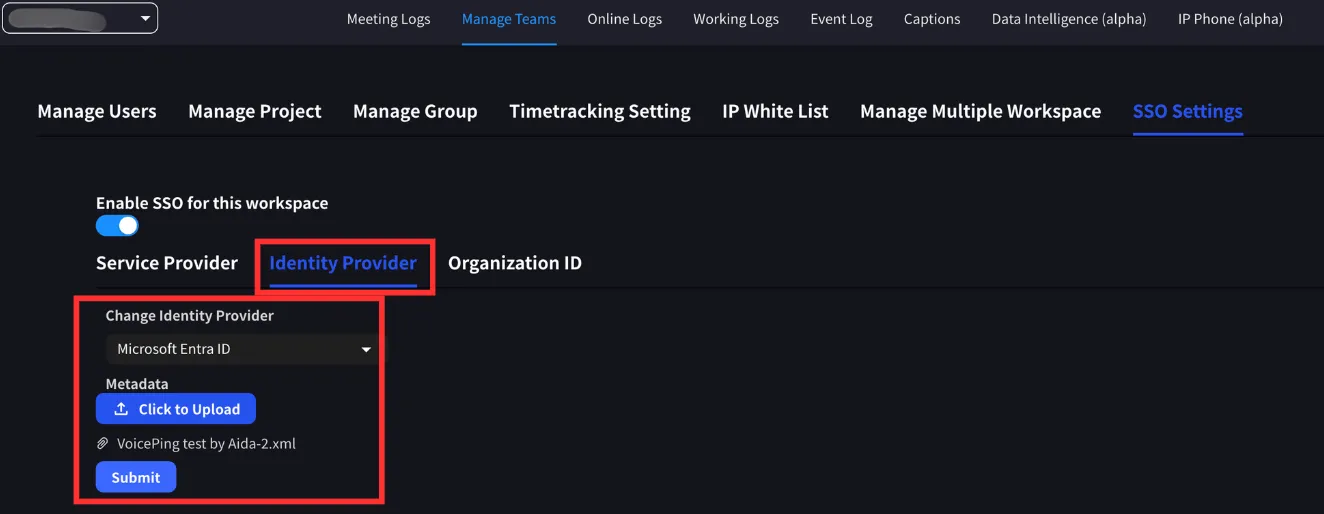
  <Step title="อัปโหลด IdP Metadata">
    สลับไปที่แท็บ Identity Provider เลือก Microsoft Entra ID เป็น IdP อัปโหลดไฟล์ IdP metadata และส่งการเปลี่ยนแปลง

    <Info>
      ไฟล์ metadata สามารถรับได้จาก Microsoft Entra ID
    </Info>

    <Frame>
      <img src="https://mintcdn.com/test-cf63e467/LU3oFsc_lcA5rDjy/ja/images/sso-entra/09-upload-metadata.png?fit=max&auto=format&n=LU3oFsc_lcA5rDjy&q=85&s=83ccfb799777efc8bc4fcf0b73888d2c" alt="อัปโหลด metadata" width="1324" height="514" data-path="ja/images/sso-entra/09-upload-metadata.png" />
    </Frame>

    <Frame>
      <img src="https://mintcdn.com/test-cf63e467/LU3oFsc_lcA5rDjy/ja/images/sso-entra/18-voiceping-sso-settings.png?fit=max&auto=format&n=LU3oFsc_lcA5rDjy&q=85&s=e7d9b124a8056dc8b94c2be2422df5f5" alt="การตั้งค่า SSO VoicePing" width="1134" height="370" data-path="ja/images/sso-entra/18-voiceping-sso-settings.png" />
    </Frame>

    <Frame>
      <img src="https://mintcdn.com/test-cf63e467/LU3oFsc_lcA5rDjy/ja/images/sso-entra/19-upload-metadata-xml.png?fit=max&auto=format&n=LU3oFsc_lcA5rDjy&q=85&s=168dae8854d6775e31f6c99f7bacc6da" alt="อัปโหลด metadata XML" width="940" height="306" data-path="ja/images/sso-entra/19-upload-metadata-xml.png" />
    </Frame>
  </Step>

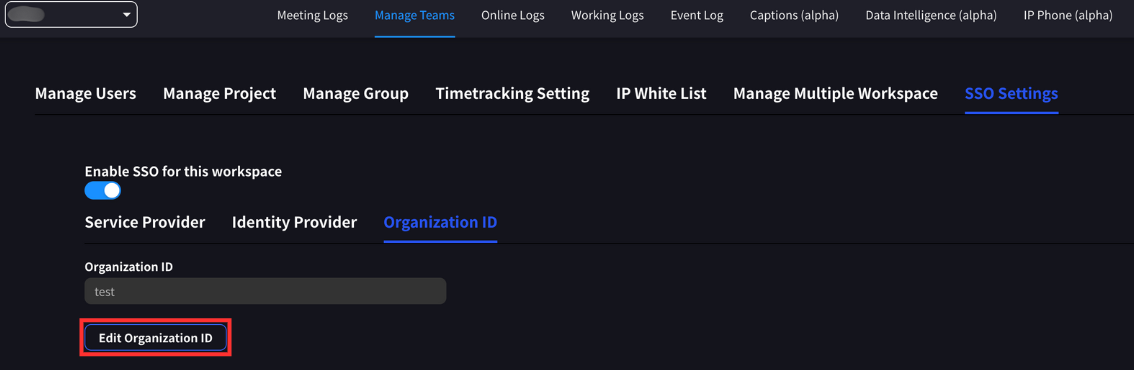
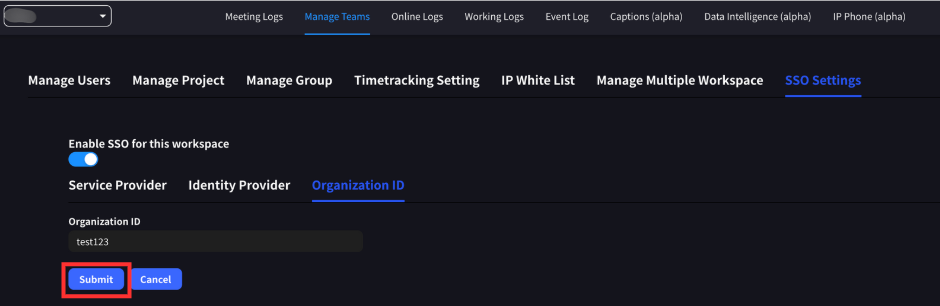
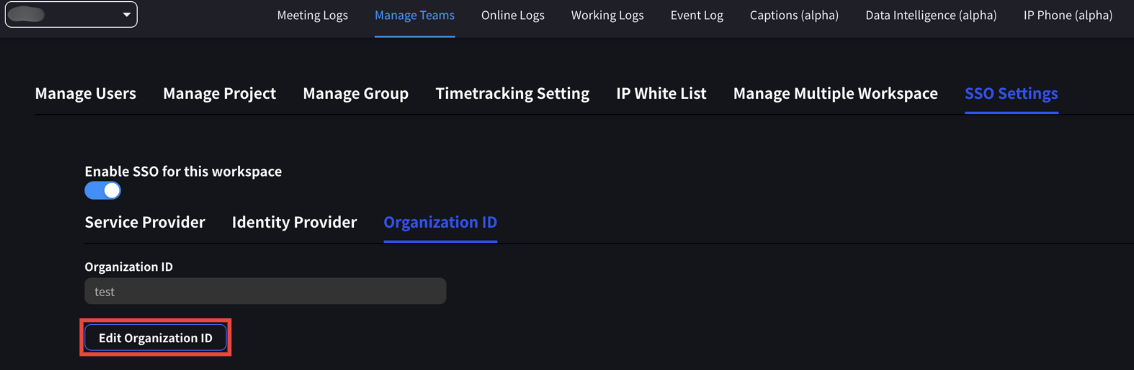
  <Step title="กำหนด Organization ID">
    กำหนด Organization ID ต้องเป็นสตริงที่ไม่ซ้ำกันอย่างน้อย 3 ตัวอักษรและไม่เกิน 20 ตัวอักษร

    <Warning>
      Organization ID จะถูกขอจากผู้ใช้เมื่อลงชื่อเข้าใช้ด้วย SSO
    </Warning>

    <Frame>
      <img src="https://mintcdn.com/test-cf63e467/LU3oFsc_lcA5rDjy/ja/images/sso-entra/10-org-id.png?fit=max&auto=format&n=LU3oFsc_lcA5rDjy&q=85&s=6ab40a533c140ac9482eb9e3b519f474" alt="ตั้งค่า Organization ID" width="1134" height="370" data-path="ja/images/sso-entra/10-org-id.png" />
    </Frame>

    <Frame>
      <img src="https://mintcdn.com/test-cf63e467/LU3oFsc_lcA5rDjy/ja/images/sso-entra/20-organization-id.png?fit=max&auto=format&n=LU3oFsc_lcA5rDjy&q=85&s=0ff5b81ad00148106d961eadf624377c" alt="หน้าจอป้อน Organization ID" width="1468" height="360" data-path="ja/images/sso-entra/20-organization-id.png" />
    </Frame>

    <Frame>
      <img src="https://mintcdn.com/test-cf63e467/LU3oFsc_lcA5rDjy/ja/images/sso-entra/21-sso-enabled-confirmation.png?fit=max&auto=format&n=LU3oFsc_lcA5rDjy&q=85&s=c6f12c9adccded7db5cd5412e3979461" alt="ยืนยันเปิดใช้งาน SSO" width="934" height="762" data-path="ja/images/sso-entra/21-sso-enabled-confirmation.png" />
    </Frame>
  </Step>

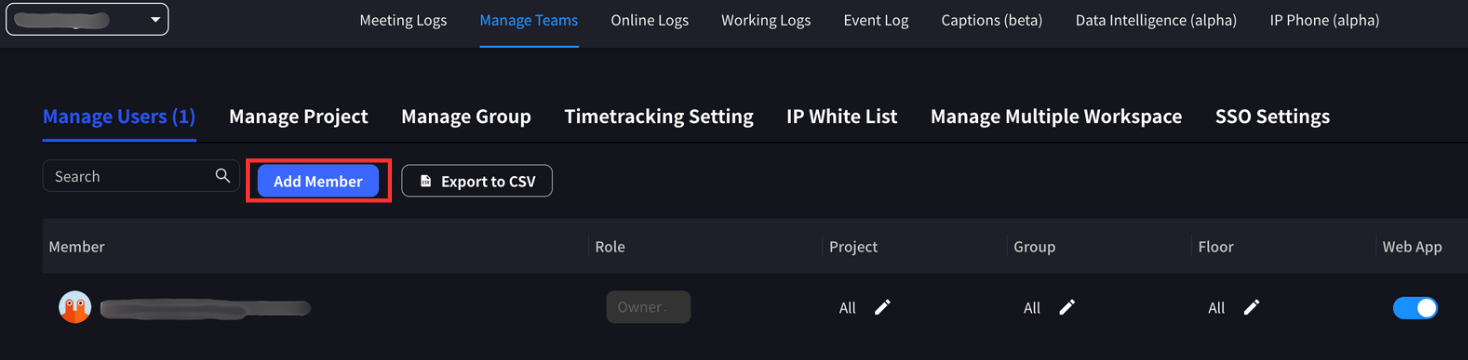
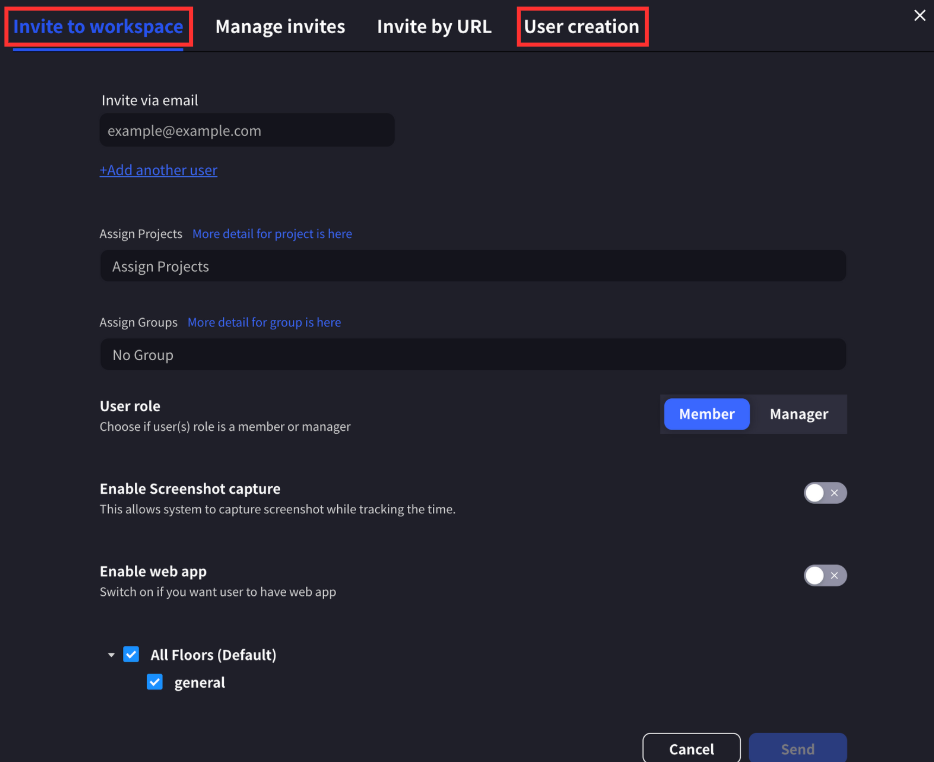
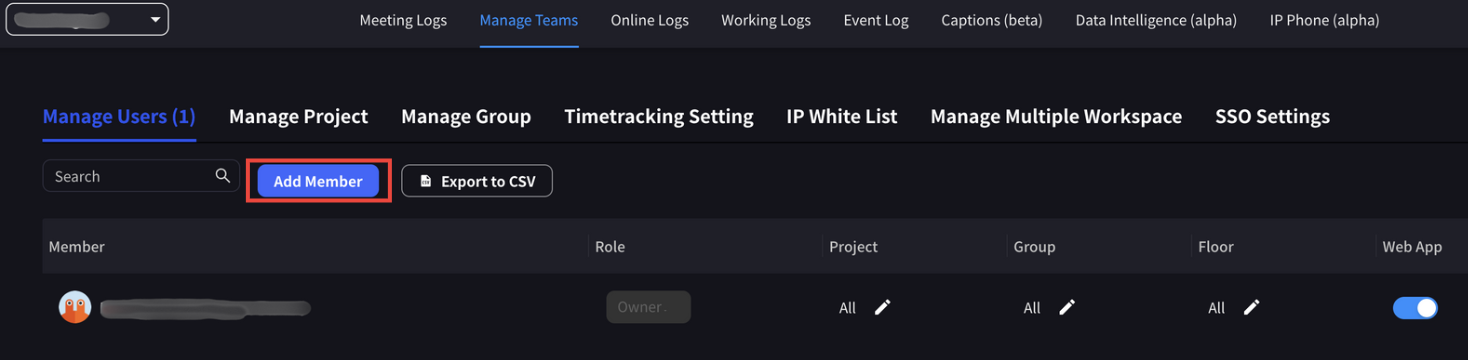
  <Step title="เพิ่มผู้ใช้">
    เพิ่มผู้ใช้ในเวิร์กสเปซ ที่อยู่อีเมลของผู้ใช้ต้องตรงกับที่อยู่อีเมลของผู้ใช้ที่เลือกในการกำหนดค่า Microsoft Entra ID

    ผู้ใช้สามารถเพิ่มได้โดยการเชิญหรือสร้างโดยตรง
    <Frame>
      <img src="https://mintcdn.com/test-cf63e467/LU3oFsc_lcA5rDjy/ja/images/sso-entra/11-add-workspace-users.png?fit=max&auto=format&n=LU3oFsc_lcA5rDjy&q=85&s=d5f8aaf20d9af87901c7181838ccbbf7" alt="เพิ่มผู้ใช้เวิร์กสเปซ" width="1468" height="360" data-path="ja/images/sso-entra/11-add-workspace-users.png" />
    </Frame>

    <Frame>
      <img src="https://mintcdn.com/test-cf63e467/LU3oFsc_lcA5rDjy/ja/images/sso-entra/22-user-assignment.png?fit=max&auto=format&n=LU3oFsc_lcA5rDjy&q=85&s=bc4bc3baab78f34b9d9a227d3939a8b1" alt="กำหนดผู้ใช้" width="1024" height="1667" data-path="ja/images/sso-entra/22-user-assignment.png" />
    </Frame>
  </Step>
</Steps>

***

## ลงชื่อเข้าใช้ด้วย SSO

หลังจากกำหนดค่า SSO ในเวิร์กสเปซ:

* **เจ้าของและผู้จัดการ**: สามารถลงชื่อเข้าใช้ VoicePing ด้วยวิธีอื่น
* **ผู้ใช้สมาชิก**: ต้องยืนยันตัวตนผ่าน SSO

เมื่อคุณเชิญผู้ใช้ VoicePing ใหม่เข้าเวิร์กสเปซ SSO บัญชีผู้ใช้ VoicePing จะถูกจัดเตรียมเมื่อผู้ใช้ลงทะเบียนด้วย SSO

### ขั้นตอนการลงชื่อเข้าใช้

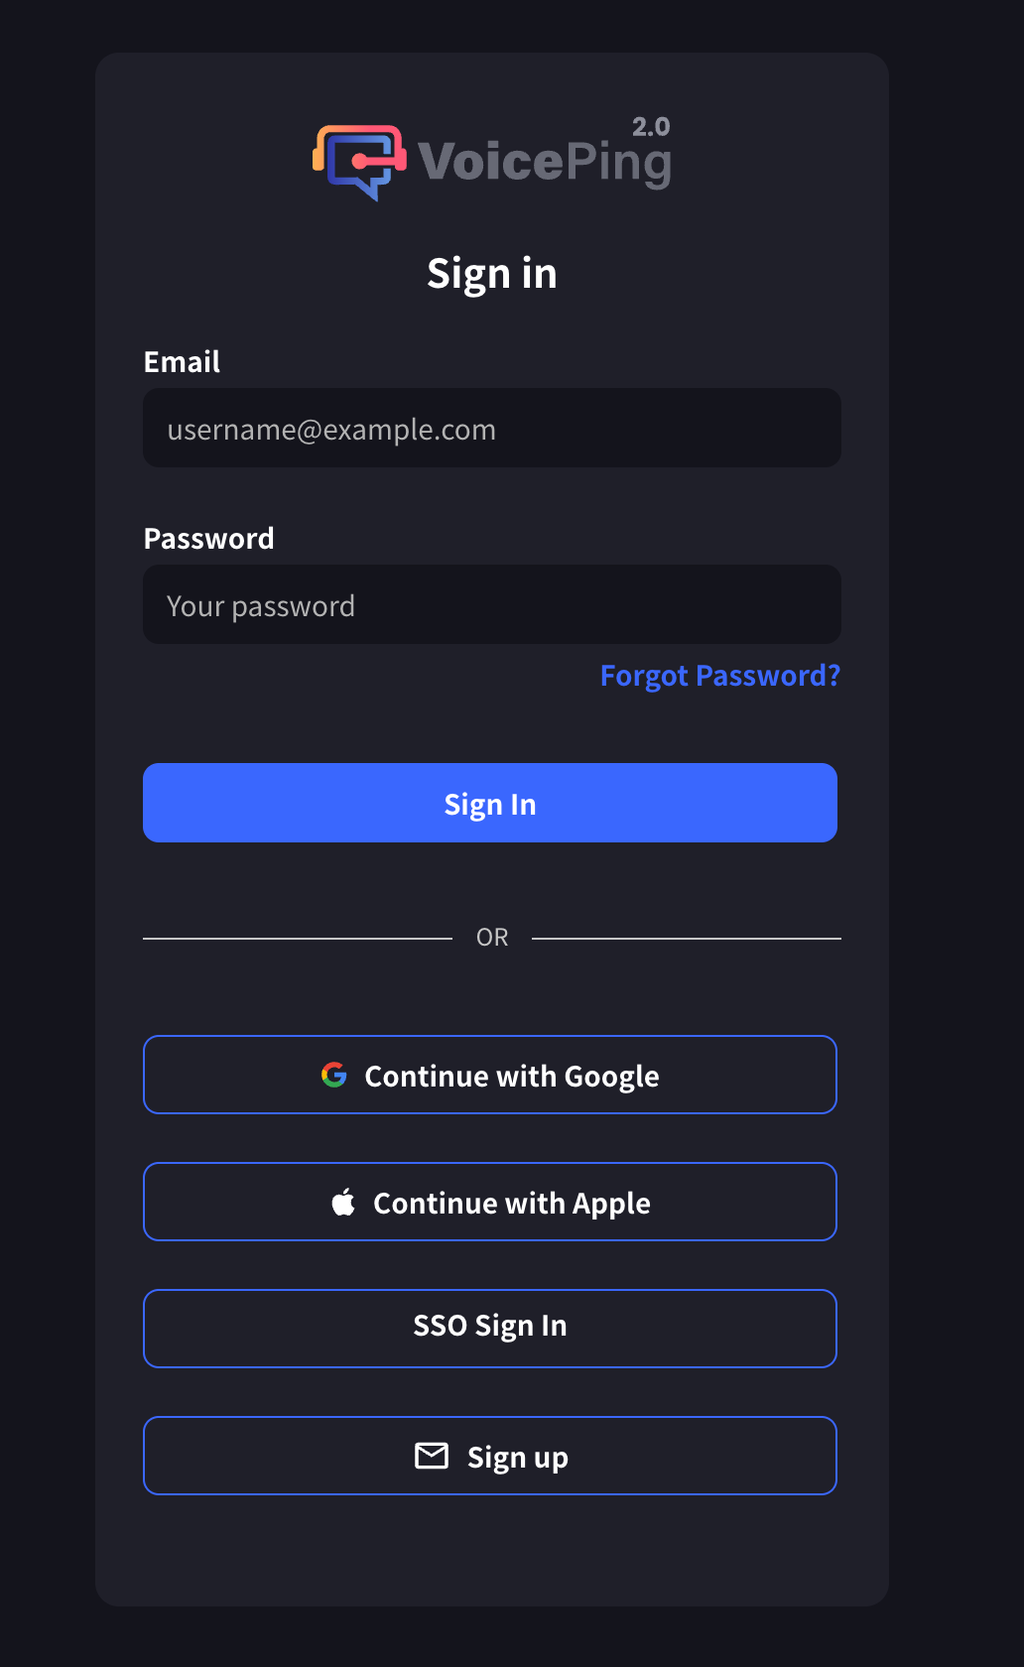
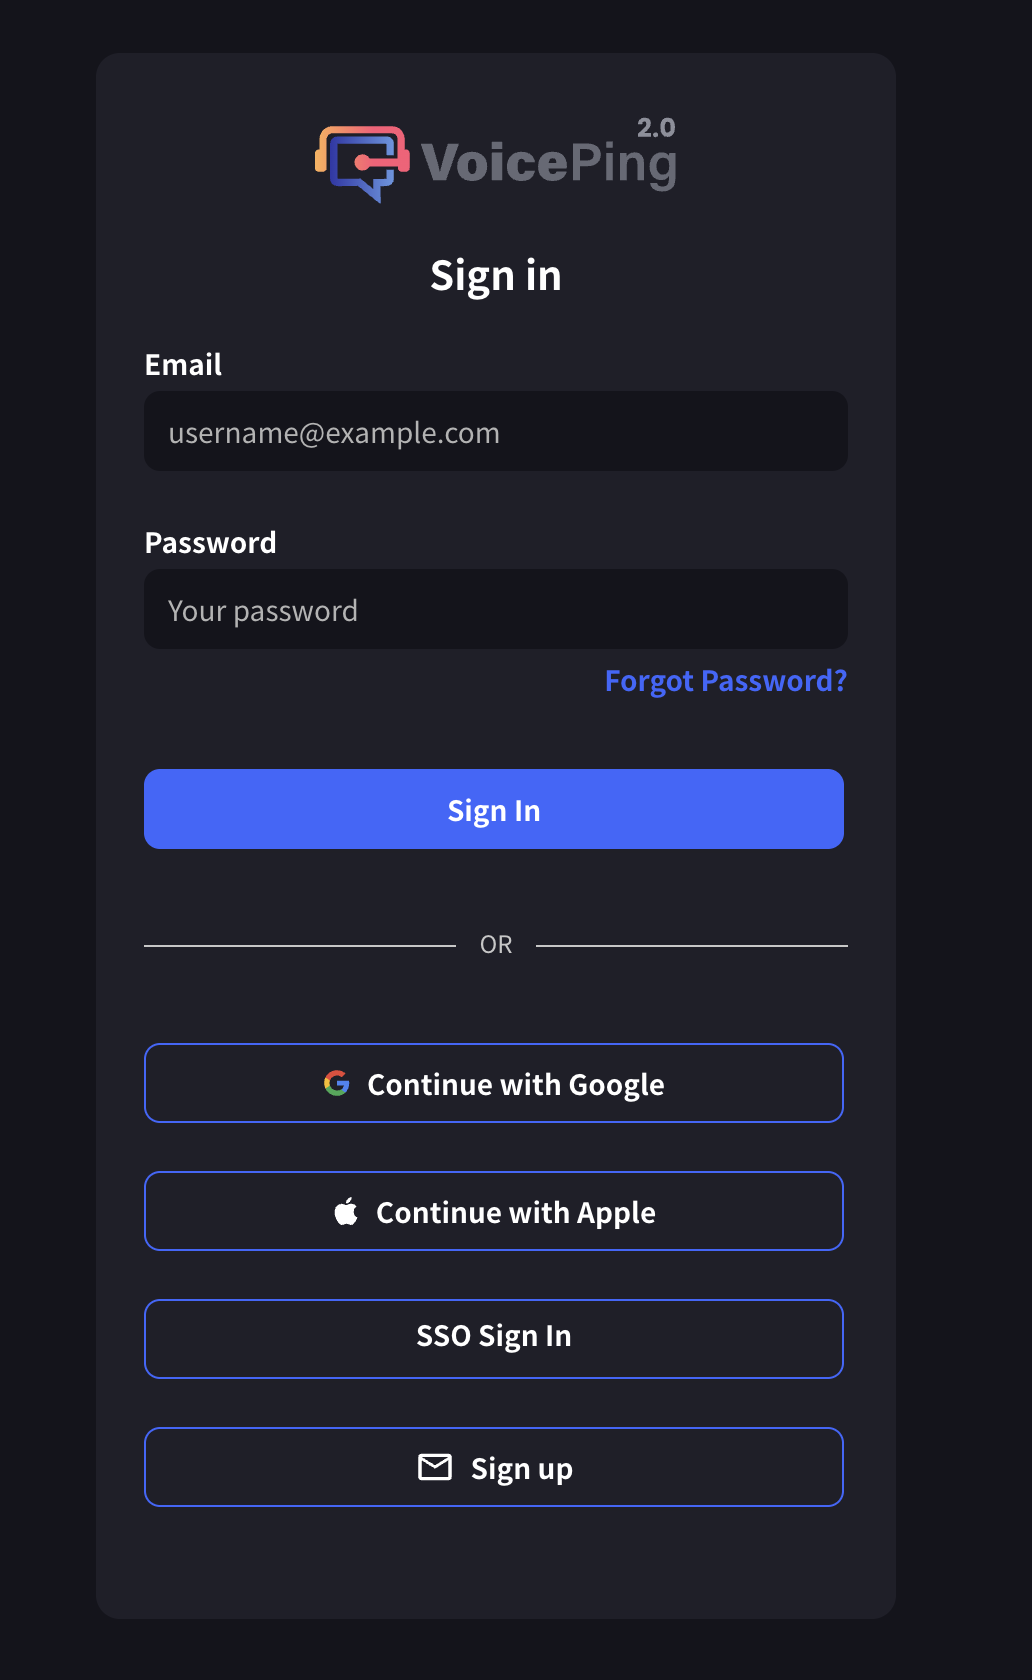
1. ไปที่หน้าลงชื่อเข้าใช้ VoicePing
2. กดปุ่ม "SSO Login"
<Frame>
  <img src="https://mintcdn.com/test-cf63e467/LU3oFsc_lcA5rDjy/ja/images/sso-entra/12-sso-login.png?fit=max&auto=format&n=LU3oFsc_lcA5rDjy&q=85&s=2bc56d7ceb21cab227505830301b5ec8" alt="ลงชื่อเข้าใช้ SSO" width="1032" height="1680" data-path="ja/images/sso-entra/12-sso-login.png" />
</Frame>

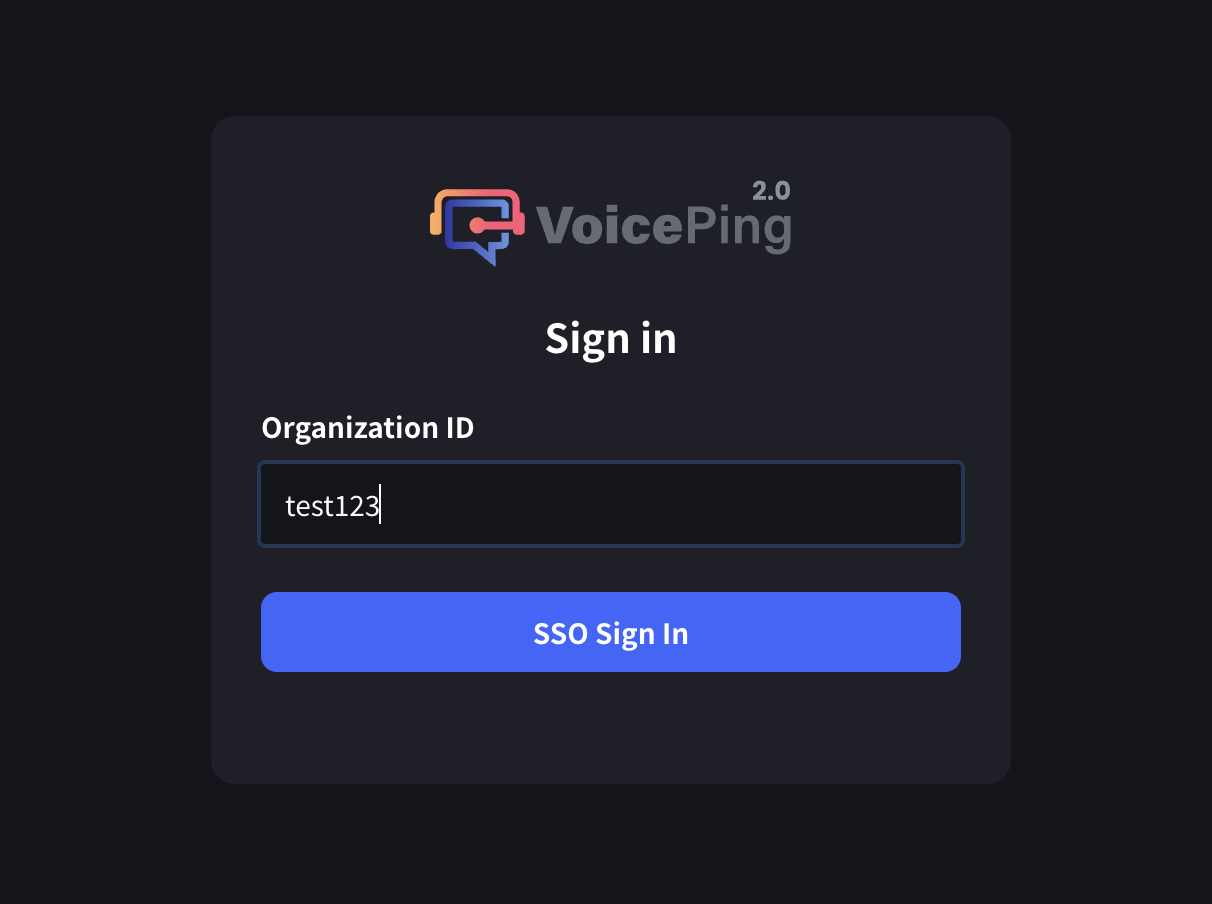
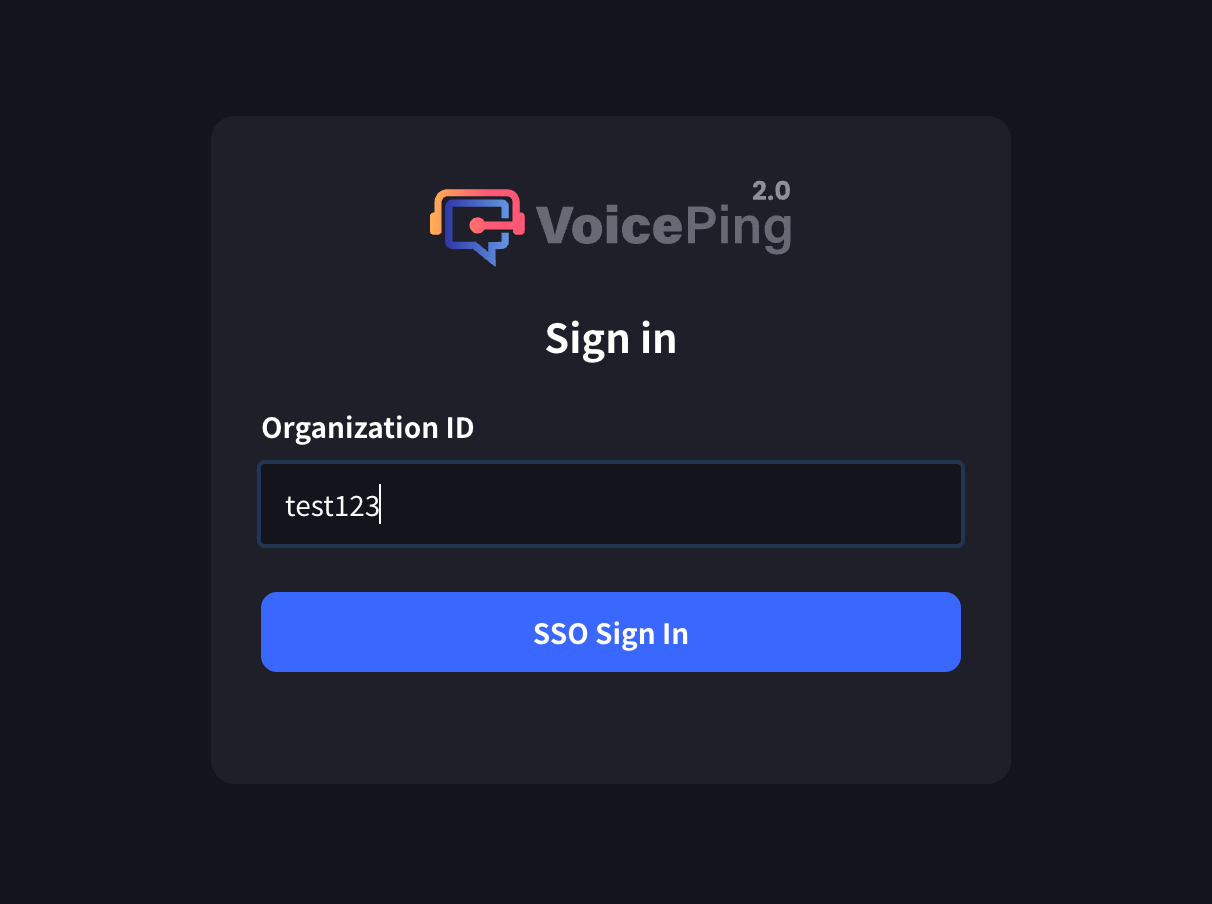
3. ป้อน Organization ID

<Frame>
  <img src="https://mintcdn.com/test-cf63e467/LU3oFsc_lcA5rDjy/ja/images/sso-entra/13-org-id-input.png?fit=max&auto=format&n=LU3oFsc_lcA5rDjy&q=85&s=b83087d876e61fc2f03f303cf0c8a92a" alt="ป้อน Organization ID" width="1212" height="904" data-path="ja/images/sso-entra/13-org-id-input.png" />
</Frame>

<Frame>
  <img src="https://mintcdn.com/test-cf63e467/LU3oFsc_lcA5rDjy/ja/images/sso-entra/23-test-sso-login.png?fit=max&auto=format&n=LU3oFsc_lcA5rDjy&q=85&s=23c62802ec383efc5a51a13ee3f8745e" alt="ทดสอบลงชื่อเข้าใช้ SSO" width="1212" height="904" data-path="ja/images/sso-entra/23-test-sso-login.png" />
</Frame>

<Frame>
  <img src="https://mintcdn.com/test-cf63e467/LU3oFsc_lcA5rDjy/ja/images/sso-entra/24-org-id-login-screen.png?fit=max&auto=format&n=LU3oFsc_lcA5rDjy&q=85&s=694925b91b1594a04ea55b51c7922e00" alt="หน้าจอลงชื่อเข้าใช้ Organization ID" width="1268" height="886" data-path="ja/images/sso-entra/24-org-id-login-screen.png" />
</Frame>

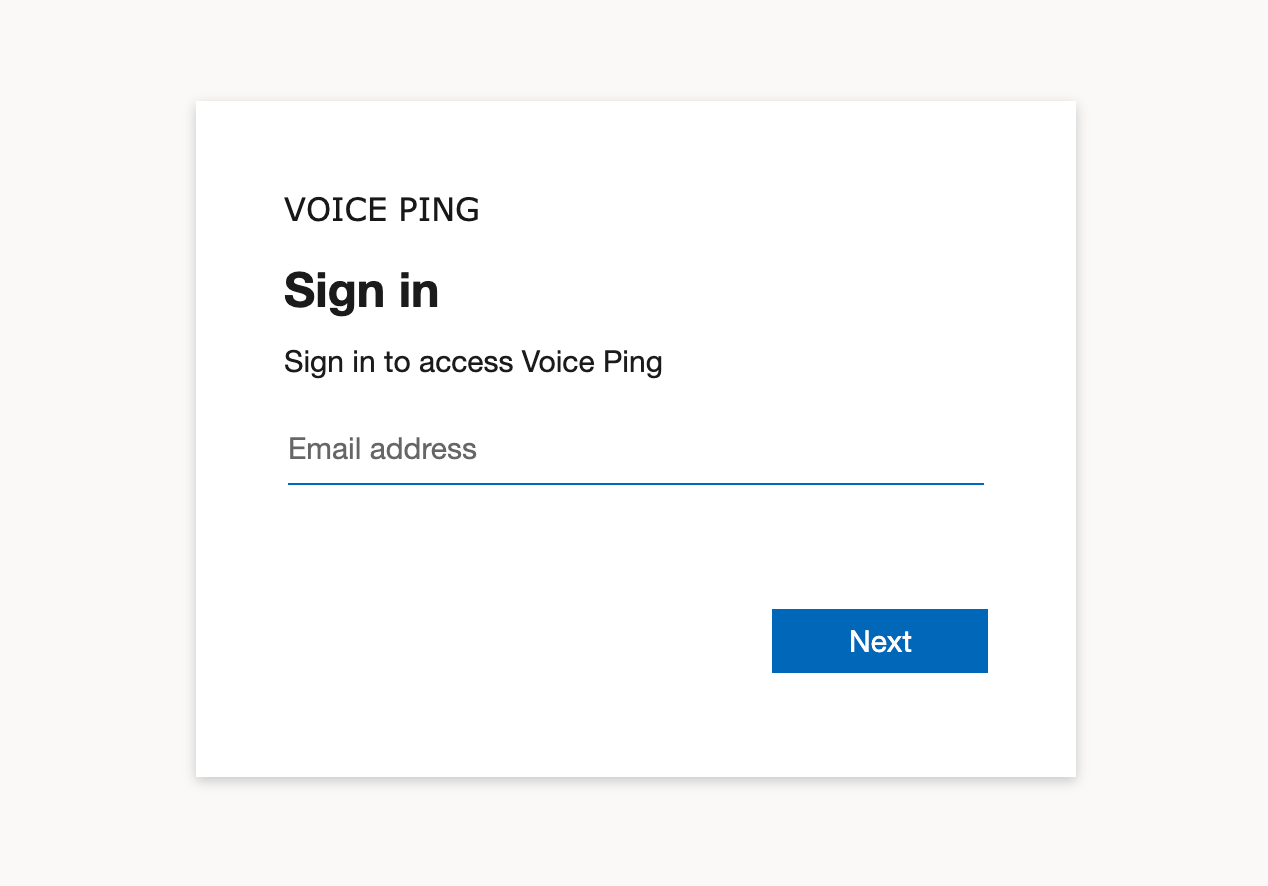
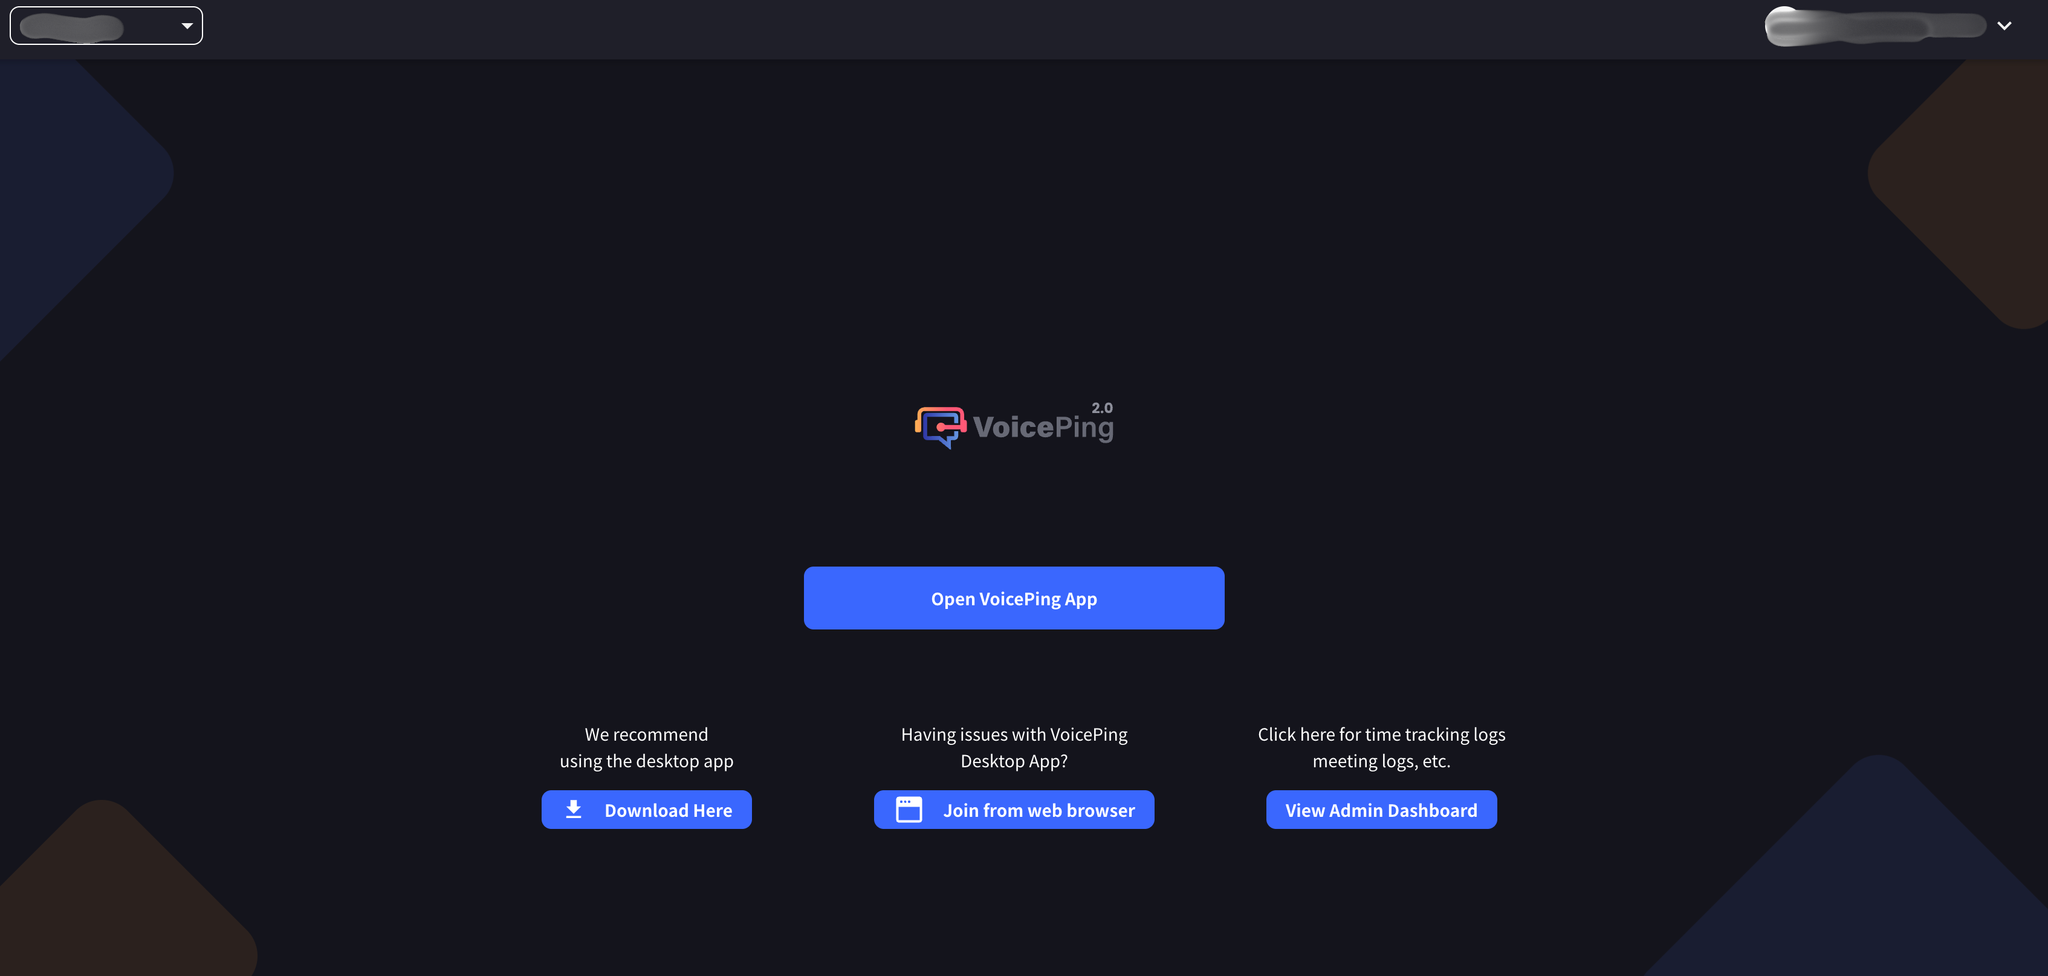
4. ยืนยันตัวตนที่หน้ายืนยันตัวตน Microsoft Entra ID
<Frame>
  <img src="https://mintcdn.com/test-cf63e467/LU3oFsc_lcA5rDjy/ja/images/sso-entra/25-sso-complete.png?fit=max&auto=format&n=LU3oFsc_lcA5rDjy&q=85&s=80a9bea3e92e40bc0d7219204a464783" alt="ยืนยันตัวตน SSO เสร็จสมบูรณ์" width="2048" height="976" data-path="ja/images/sso-entra/25-sso-complete.png" />
</Frame>

***

<ContactTh />