> ## Documentation Index
> Fetch the complete documentation index at: https://manual.voiceping.net/llms.txt
> Use this file to discover all available pages before exploring further.

# SSO設定指南（Microsoft Entra ID）

> 使用Microsoft Entra ID（原Azure AD）配置單點登入的指南

export const ContactZhTW = () => <>
    <Tip>
      如有任何問題，請透過<a href="https://forms.gle/6AUho7oj3zBr79e96">此表單</a>與我們聯繫。
    </Tip>

    ## 官方連結

    <CardGroup cols={2}>
      <Card title="官方網站" icon="globe" href="https://voiceping.net/en/">
        造訪官方網站
      </Card>
      <Card title="X (Twitter)" icon="x-twitter" href="https://x.com/VoicePingMedia">
        在X上追蹤我們
      </Card>
      <Card title="Facebook" icon="facebook" href="https://www.facebook.com/voiceping.inc">
        在Facebook上按讚
      </Card>
      <Card title="LinkedIn" icon="linkedin" href="https://www.linkedin.com/company/28684130/">
        在LinkedIn上連結
      </Card>
    </CardGroup>
  </>;

## 單點登入功能

企業版客戶可以在工作區中啟用單點登入（SSO），允許使用者使用Microsoft Entra ID登入VoicePing。

本指南將說明如何在工作區中啟用SSO，以及如何將Microsoft Entra ID配置為身分提供者（IdP）。

## 前提條件

<Check>擁有VoicePing企業版使用者帳號</Check>
<Check>擁有Microsoft Azure帳號</Check>

***

## 註冊身分提供者

### Microsoft Entra ID配置

<Steps>
  <Step title="將VoicePing新增到企業應用程式">
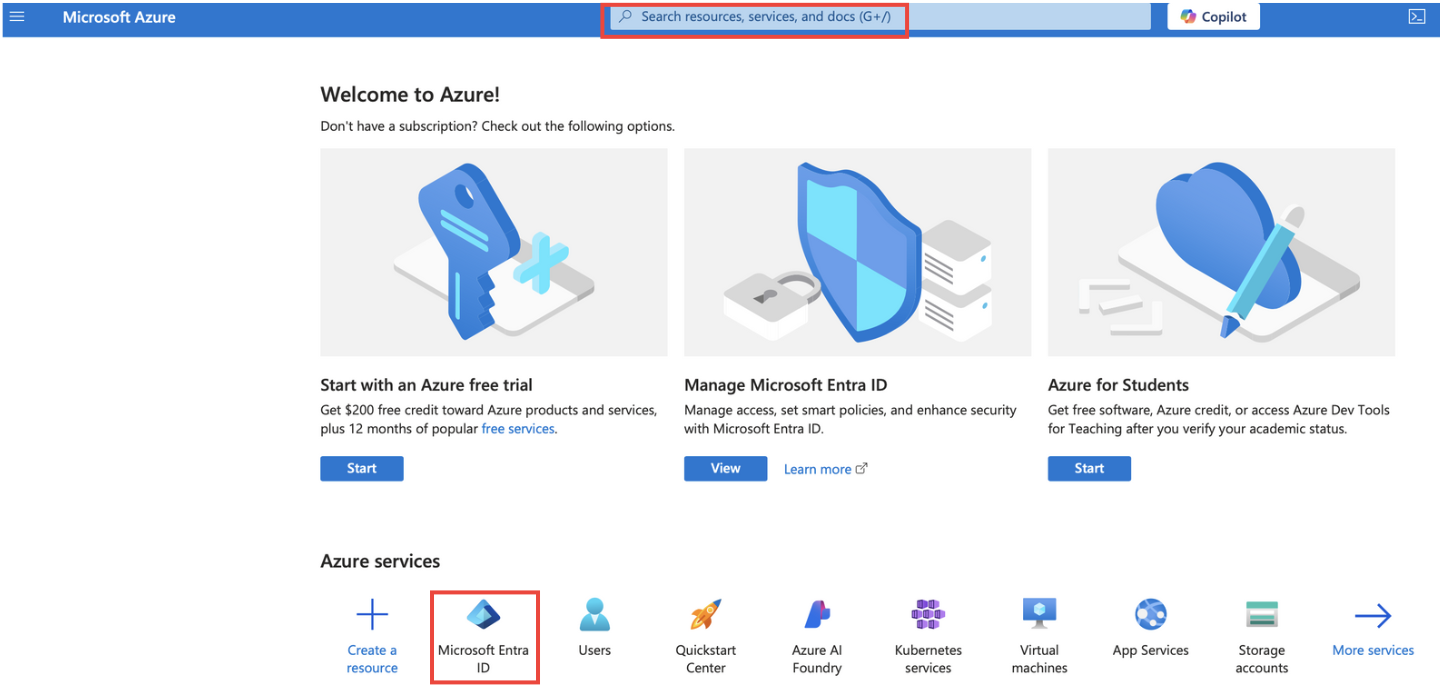
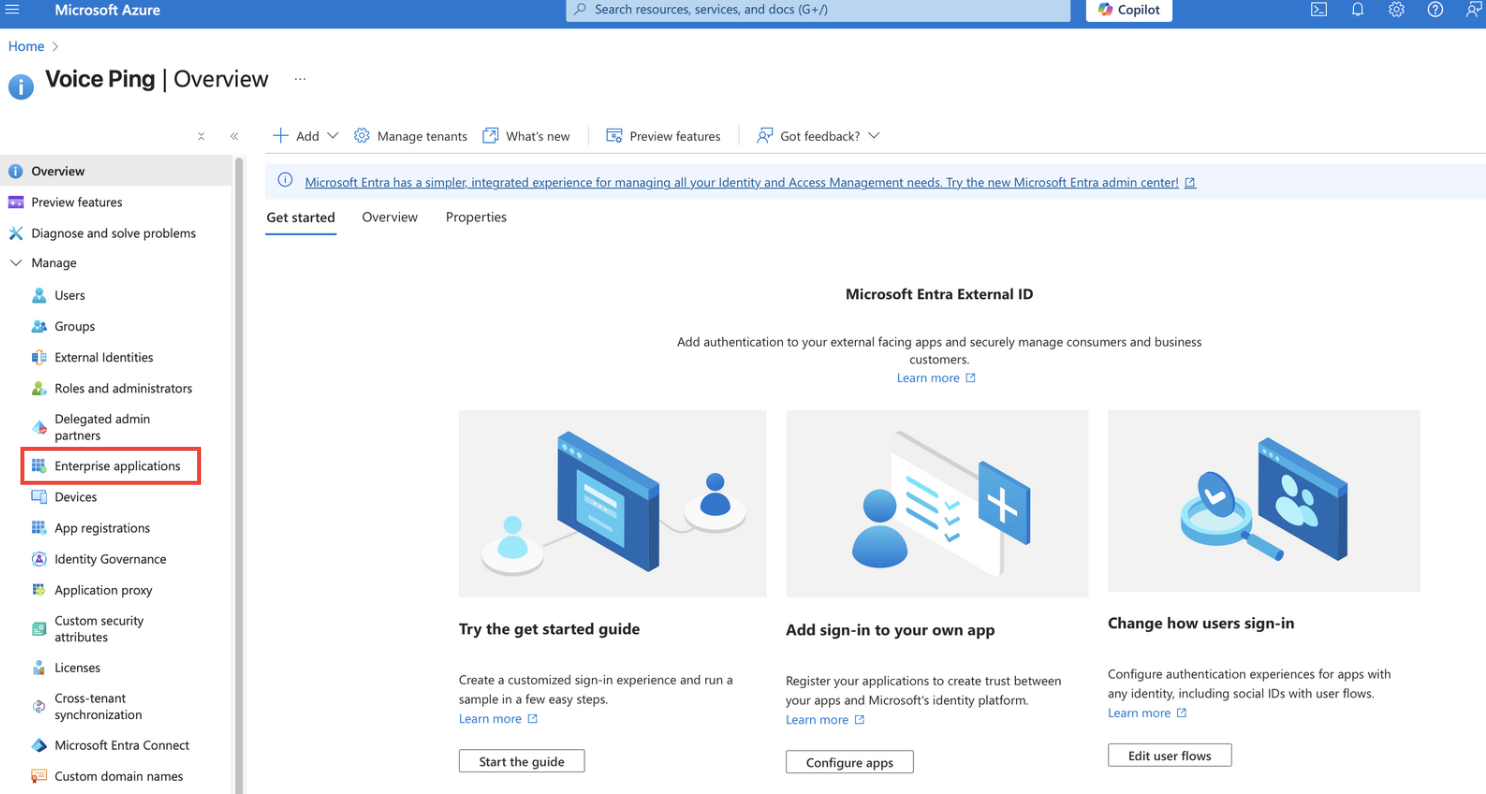
    從Azure入口網站開啟Microsoft Entra ID，進入企業應用程式頁面。

    <Frame>
      <img src="https://mintcdn.com/test-cf63e467/UDonPy9U4TF-4rTr/ja/images/sso-entra/01-azure-entra-id.png?fit=max&auto=format&n=UDonPy9U4TF-4rTr&q=85&s=b02e79d9bff931861b8146854d8716bf" alt="Azure Entra ID" width="1440" height="700" data-path="ja/images/sso-entra/01-azure-entra-id.png" />
    </Frame>

    點選「新建應用程式」，新增VoicePing。

    <Frame>
      <img src="https://mintcdn.com/test-cf63e467/UDonPy9U4TF-4rTr/ja/images/sso-entra/02-enterprise-apps.png?fit=max&auto=format&n=UDonPy9U4TF-4rTr&q=85&s=d15a2f004f309344646ec9a9cec6d924" alt="企業應用程式" width="1486" height="794" data-path="ja/images/sso-entra/02-enterprise-apps.png" />
    </Frame>
  </Step>

  <Step title="配置SAML 2.0協定">
    為IdP上的VoicePing應用程式配置使用SAML 2.0協定進行SSO。

    <Frame>
      <img src="https://mintcdn.com/test-cf63e467/UDonPy9U4TF-4rTr/ja/images/sso-entra/03-saml-setup.png?fit=max&auto=format&n=UDonPy9U4TF-4rTr&q=85&s=d1ee7ef387296219c8e00eb18e29544f" alt="SAML配置" width="1420" height="688" data-path="ja/images/sso-entra/03-saml-setup.png" />
    </Frame>
  </Step>

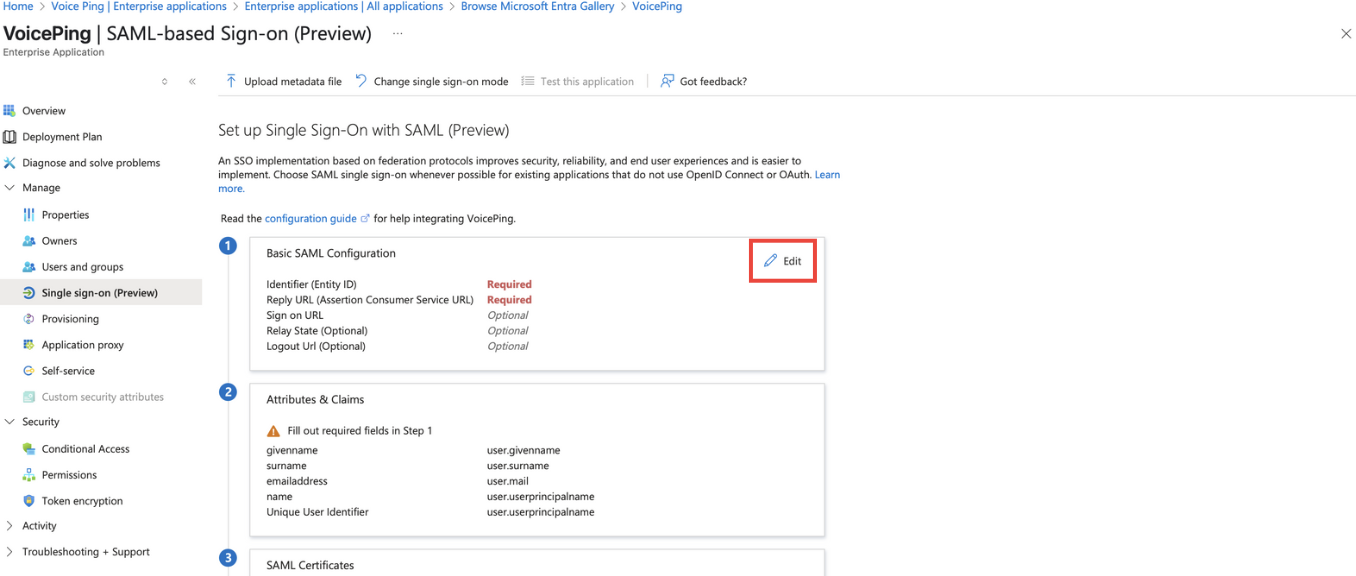
  <Step title="配置服務提供者（SP）資訊">
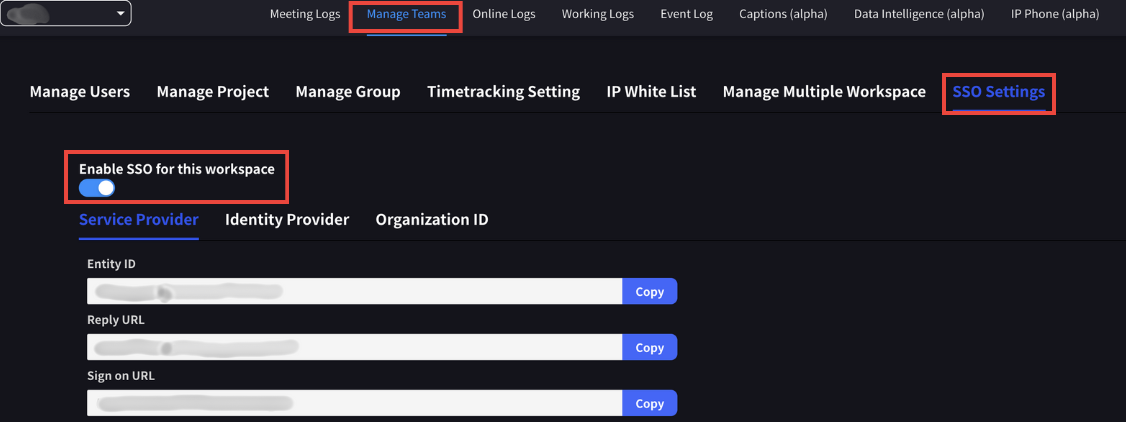
    您可以在VoicePing應用程式中工作區管理儀錶板的「團隊管理 > SSO設定」標籤頁中找到所需欄位。

    <Info>
      只有啟用了SSO的工作區的擁有者或管理員才能存取。
    </Info>

    | 專案        | 值                                          |
    | --------- | ------------------------------------------ |
    | ACS URL   | `https://api.voiceping.io/api/v1/user/acs` |
    | Entity ID | `voice-ping`                               |
    <Frame>
      <img src="https://mintcdn.com/test-cf63e467/UDonPy9U4TF-4rTr/ja/images/sso-entra/04-sp-config.png?fit=max&auto=format&n=UDonPy9U4TF-4rTr&q=85&s=d37efd4c234fecf241e8a29ee119a637" alt="SP配置" width="1356" height="576" data-path="ja/images/sso-entra/04-sp-config.png" />
    </Frame>
  </Step>

  <Step title="在SAML宣告中包含電子郵件地址">
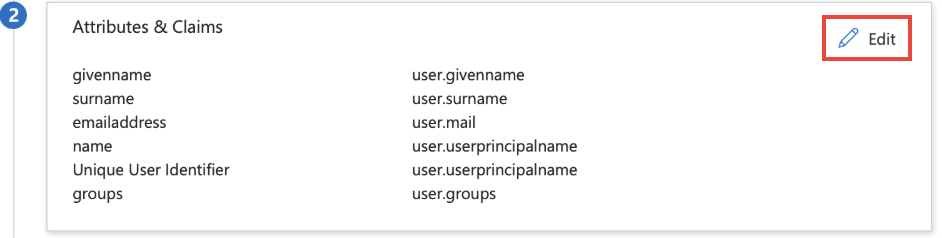
    在SAML宣告中包含使用者的電子郵件地址。這是在VoicePing平臺中進行身分驗證所必需的。

    <Warning>
      IdP中定義的電子郵件地址必須與在VoicePing中註冊使用者時使用的電子郵件地址相同。
    </Warning>

    Microsoft Entra ID預設應該已配置，如果未配置，請新增。

    <Frame>
      <img src="https://mintcdn.com/test-cf63e467/UDonPy9U4TF-4rTr/ja/images/sso-entra/05-claims.png?fit=max&auto=format&n=UDonPy9U4TF-4rTr&q=85&s=88af2ee3cc1463233ab55b5a9b46852e" alt="宣告配置" width="942" height="238" data-path="ja/images/sso-entra/05-claims.png" />
    </Frame>

    <Frame>
      <img src="https://mintcdn.com/test-cf63e467/LU3oFsc_lcA5rDjy/ja/images/sso-entra/14-configuration-step.png?fit=max&auto=format&n=LU3oFsc_lcA5rDjy&q=85&s=0d361d1f642bbad50d2bb306a5c519de" alt="配置步驟" width="1132" height="942" data-path="ja/images/sso-entra/14-configuration-step.png" />
    </Frame>

    <Frame>
      <img src="https://mintcdn.com/test-cf63e467/LU3oFsc_lcA5rDjy/ja/images/sso-entra/15-attributes-mapping.png?fit=max&auto=format&n=LU3oFsc_lcA5rDjy&q=85&s=62b9ba6c8f3b5013a59763be13ca4541" alt="屬性對應" width="1126" height="422" data-path="ja/images/sso-entra/15-attributes-mapping.png" />
    </Frame>

    <Frame>
      <img src="https://mintcdn.com/test-cf63e467/LU3oFsc_lcA5rDjy/ja/images/sso-entra/16-claim-configuration.png?fit=max&auto=format&n=LU3oFsc_lcA5rDjy&q=85&s=6b55f0de6c87852a3de9e50ea708f5d6" alt="宣告配置" width="1324" height="514" data-path="ja/images/sso-entra/16-claim-configuration.png" />
    </Frame>
  </Step>

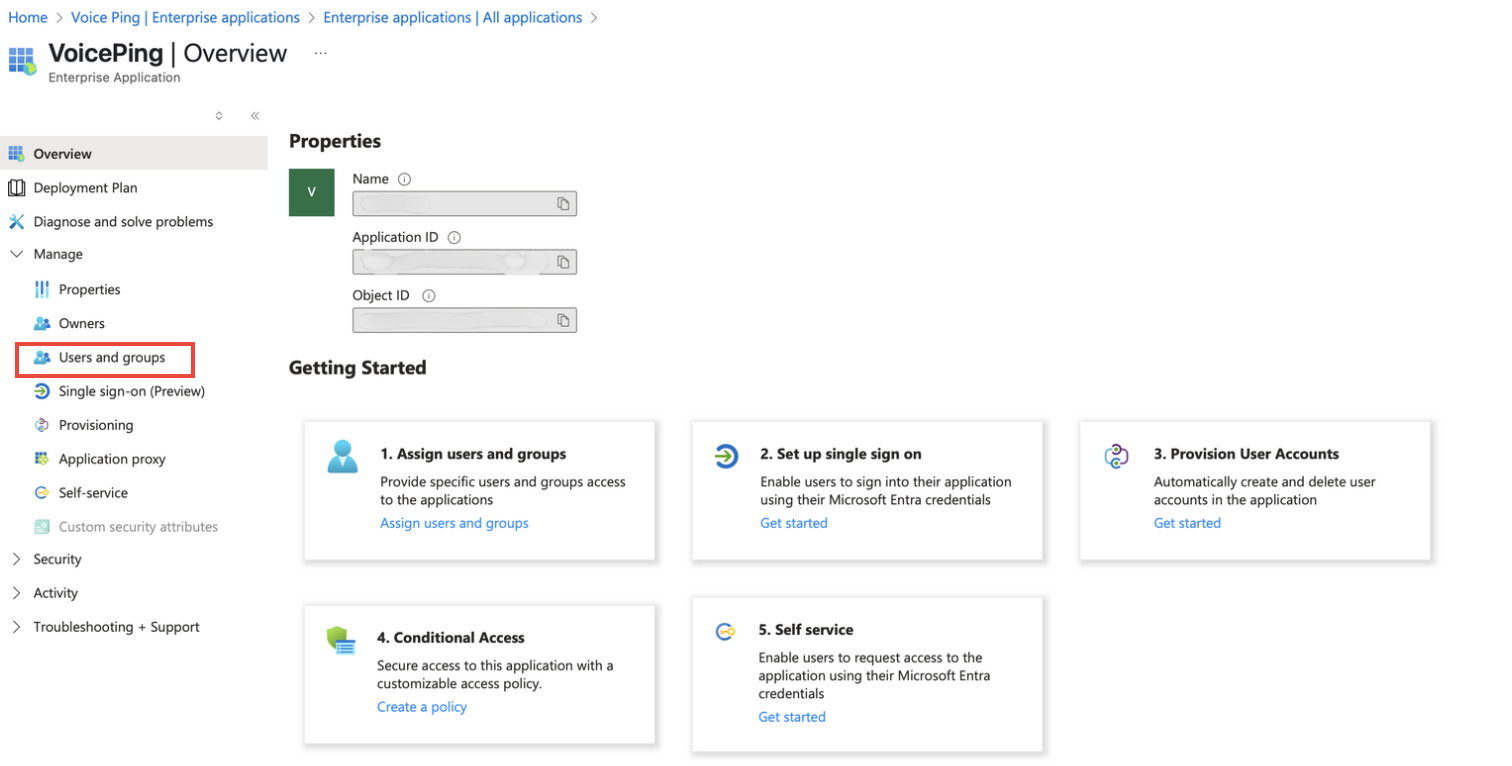
  <Step title="新增使用者">
    將使用者新增到建立的VoicePing應用程式。

    1. 從Microsoft Entra ID的VoicePing應用程式開啟「使用者和群組」頁面
    2. 點選「新增使用者/群組」
    3. 選擇要授予存取許可權的使用者或群組
    4. 點選「選擇」和「分配」
    <Frame>
      <img src="https://mintcdn.com/test-cf63e467/UDonPy9U4TF-4rTr/ja/images/sso-entra/06-add-users.png?fit=max&auto=format&n=UDonPy9U4TF-4rTr&q=85&s=669c43583e467126f06e9ad0db5c4024" alt="新增使用者" width="1512" height="766" data-path="ja/images/sso-entra/06-add-users.png" />
    </Frame>
  </Step>

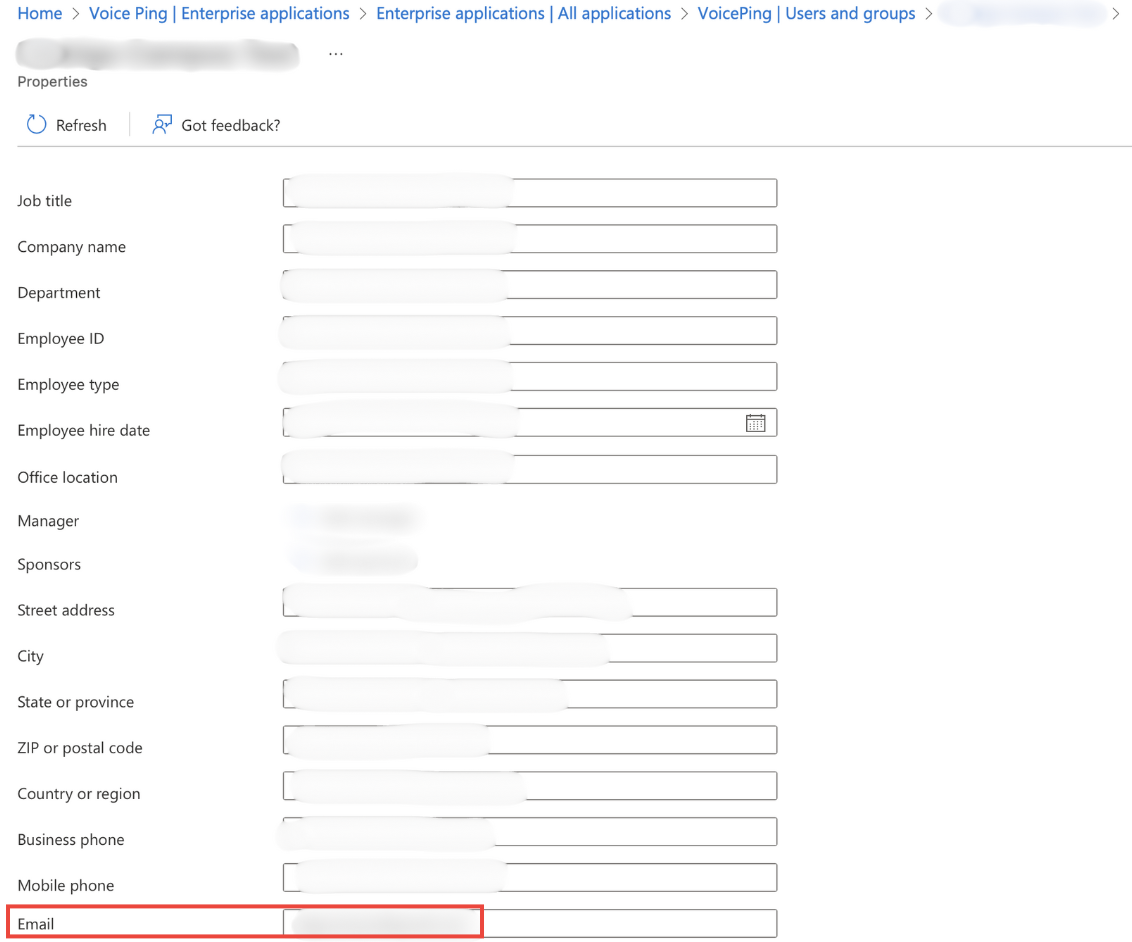
  <Step title="確認電子郵件地址">
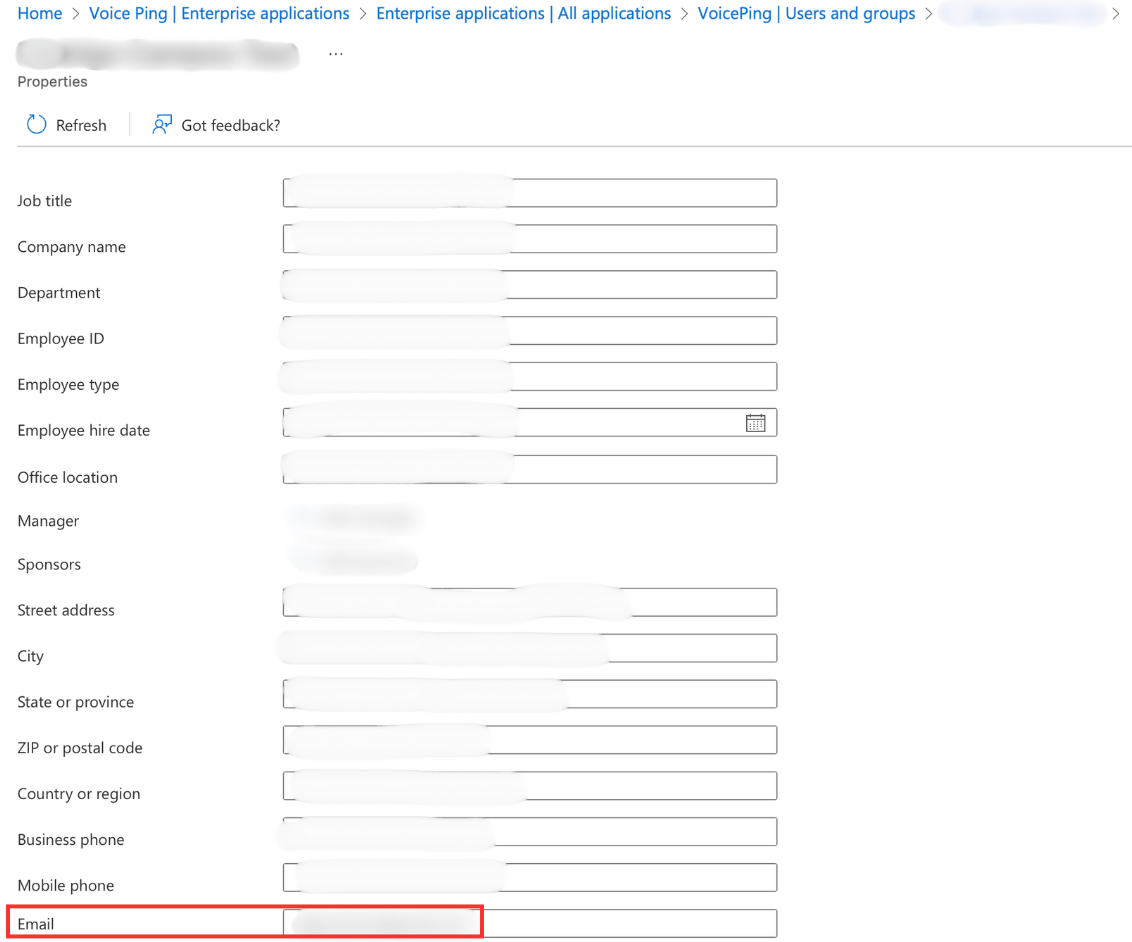
    請確認新增的使用者已在Microsoft Azure上設定了電子郵件地址。

    <Frame>
      <img src="https://mintcdn.com/test-cf63e467/LU3oFsc_lcA5rDjy/ja/images/sso-entra/07-verify-email.png?fit=max&auto=format&n=LU3oFsc_lcA5rDjy&q=85&s=4a4424d581be8ffc3db16bd508527283" alt="確認電子郵件地址" width="1132" height="942" data-path="ja/images/sso-entra/07-verify-email.png" />
    </Frame>
  </Step>

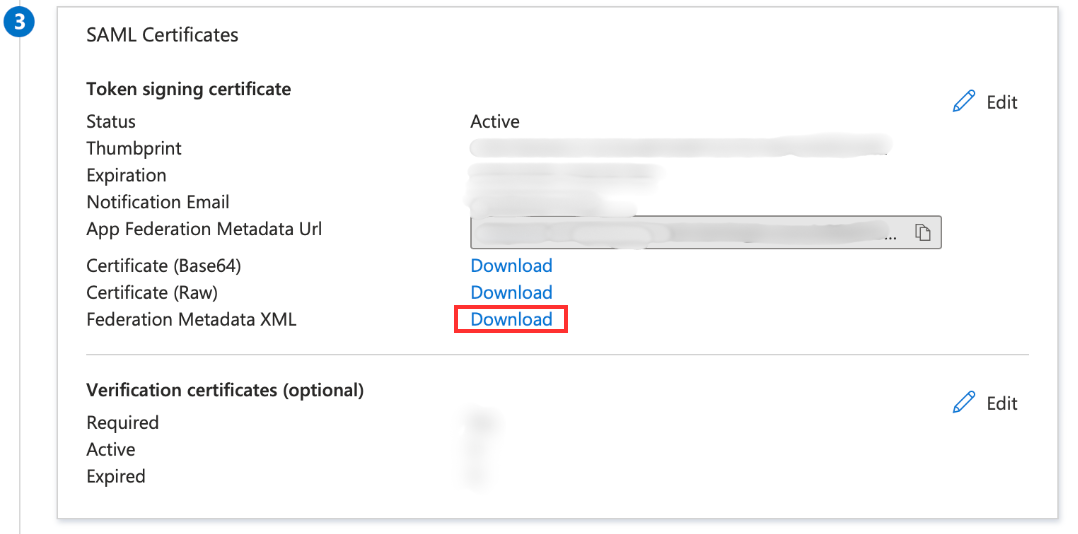
  <Step title="下載中繼資料檔案">
    從IdP（Microsoft Entra ID）下載中繼資料檔案。此檔案稍後將在VoicePing端使用。

    <Frame>
      <img src="https://mintcdn.com/test-cf63e467/LU3oFsc_lcA5rDjy/ja/images/sso-entra/17-download-metadata.png?fit=max&auto=format&n=LU3oFsc_lcA5rDjy&q=85&s=eebd136808932f4a3df27ff401669a08" alt="下載中繼資料" width="1078" height="534" data-path="ja/images/sso-entra/17-download-metadata.png" />
    </Frame>
  </Step>
</Steps>

***

## VoicePing配置

<Steps>
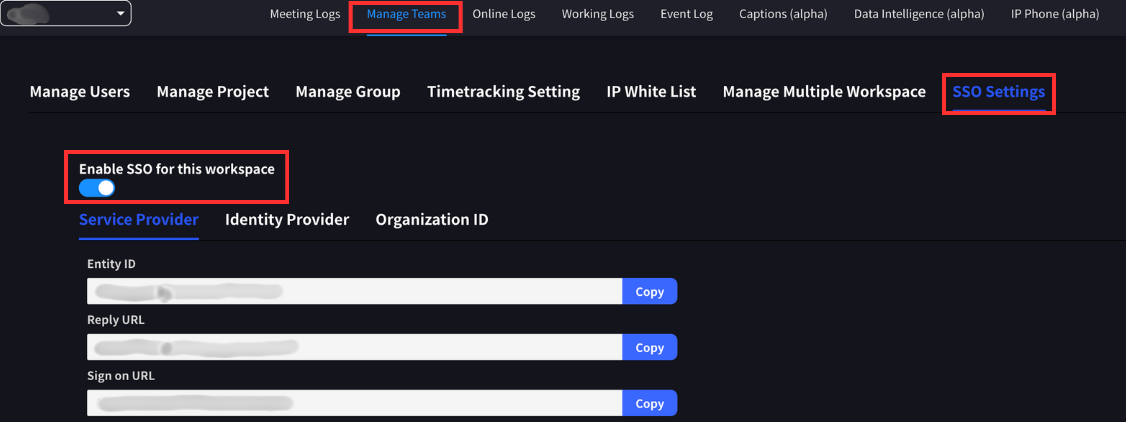
  <Step title="啟用SSO">
    進入工作區管理儀錶板，開啟「團隊管理 > SSO設定」標籤頁，啟用SSO。

    <Frame>
      <img src="https://mintcdn.com/test-cf63e467/LU3oFsc_lcA5rDjy/ja/images/sso-entra/08-enable-sso.png?fit=max&auto=format&n=LU3oFsc_lcA5rDjy&q=85&s=455be44d72a3955447f0438c5ee0e50f" alt="啟用SSO" width="1126" height="422" data-path="ja/images/sso-entra/08-enable-sso.png" />
    </Frame>
  </Step>

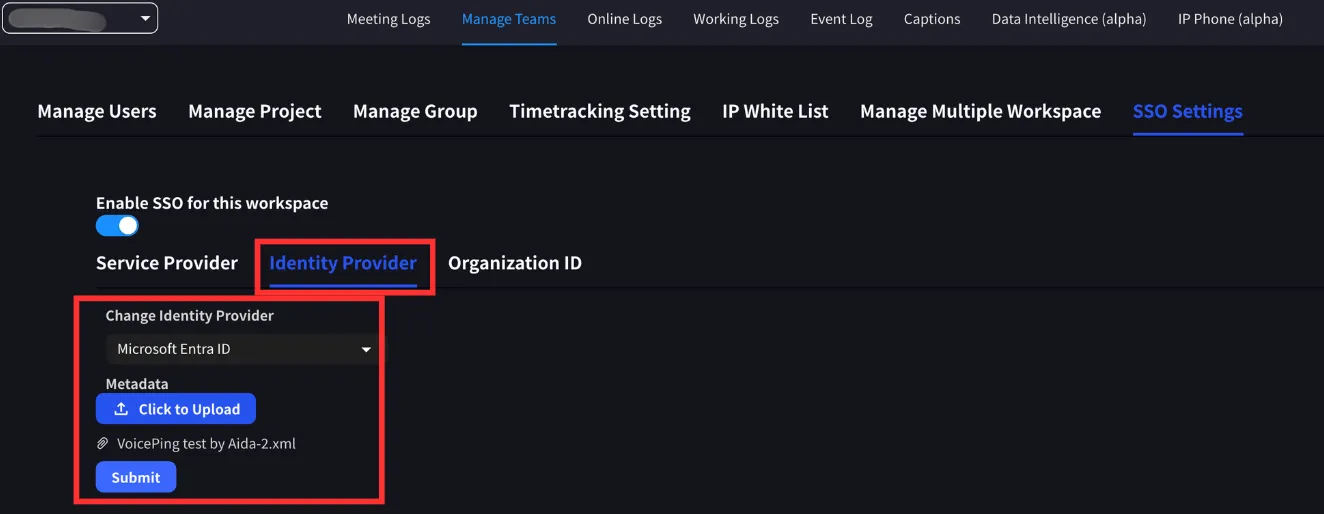
  <Step title="上傳IdP中繼資料">
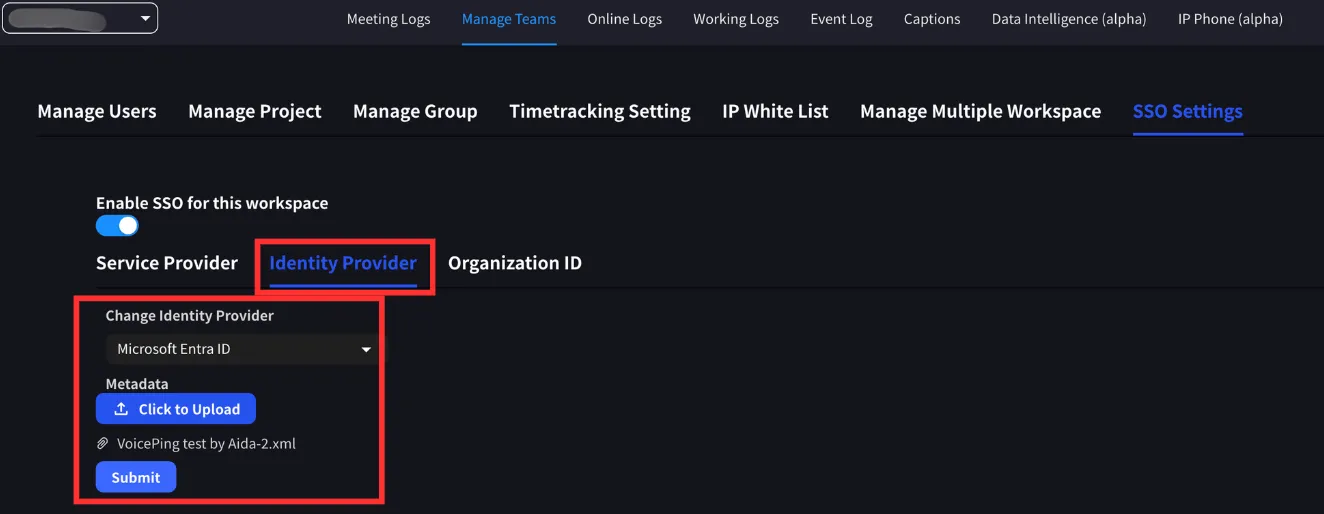
    切換到身分提供者標籤頁。選擇Microsoft Entra ID作為IdP，上傳IdP中繼資料檔案並提交變更。

    <Info>
      中繼資料檔案可從Microsoft Entra ID取得。
    </Info>

    <Frame>
      <img src="https://mintcdn.com/test-cf63e467/LU3oFsc_lcA5rDjy/ja/images/sso-entra/09-upload-metadata.png?fit=max&auto=format&n=LU3oFsc_lcA5rDjy&q=85&s=83ccfb799777efc8bc4fcf0b73888d2c" alt="上傳中繼資料" width="1324" height="514" data-path="ja/images/sso-entra/09-upload-metadata.png" />
    </Frame>

    <Frame>
      <img src="https://mintcdn.com/test-cf63e467/LU3oFsc_lcA5rDjy/ja/images/sso-entra/18-voiceping-sso-settings.png?fit=max&auto=format&n=LU3oFsc_lcA5rDjy&q=85&s=e7d9b124a8056dc8b94c2be2422df5f5" alt="VoicePing SSO設定" width="1134" height="370" data-path="ja/images/sso-entra/18-voiceping-sso-settings.png" />
    </Frame>

    <Frame>
      <img src="https://mintcdn.com/test-cf63e467/LU3oFsc_lcA5rDjy/ja/images/sso-entra/19-upload-metadata-xml.png?fit=max&auto=format&n=LU3oFsc_lcA5rDjy&q=85&s=168dae8854d6775e31f6c99f7bacc6da" alt="上傳中繼資料XML" width="940" height="306" data-path="ja/images/sso-entra/19-upload-metadata-xml.png" />
    </Frame>
  </Step>

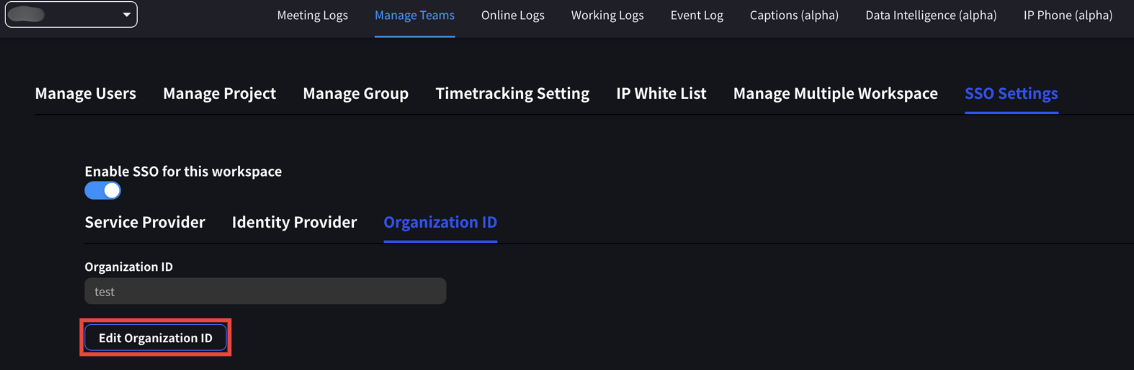
  <Step title="定義組織ID">
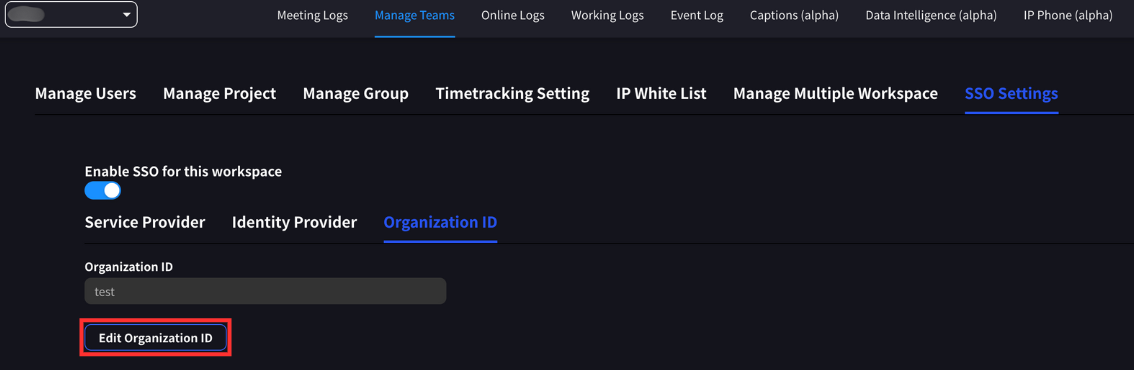
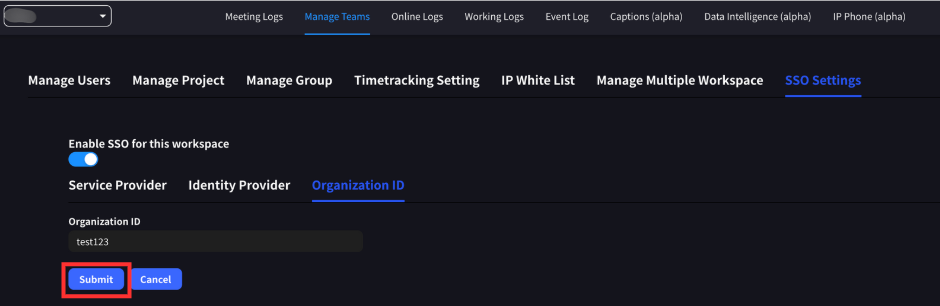
    定義組織ID。這必須是一個至少3個字元、最多20個字元的唯一字串。

    <Warning>
      組織ID將在SSO登入時向使用者請求。
    </Warning>

    <Frame>
      <img src="https://mintcdn.com/test-cf63e467/LU3oFsc_lcA5rDjy/ja/images/sso-entra/10-org-id.png?fit=max&auto=format&n=LU3oFsc_lcA5rDjy&q=85&s=6ab40a533c140ac9482eb9e3b519f474" alt="組織ID設定" width="1134" height="370" data-path="ja/images/sso-entra/10-org-id.png" />
    </Frame>

    <Frame>
      <img src="https://mintcdn.com/test-cf63e467/LU3oFsc_lcA5rDjy/ja/images/sso-entra/20-organization-id.png?fit=max&auto=format&n=LU3oFsc_lcA5rDjy&q=85&s=0ff5b81ad00148106d961eadf624377c" alt="組織ID輸入介面" width="1468" height="360" data-path="ja/images/sso-entra/20-organization-id.png" />
    </Frame>

    <Frame>
      <img src="https://mintcdn.com/test-cf63e467/LU3oFsc_lcA5rDjy/ja/images/sso-entra/21-sso-enabled-confirmation.png?fit=max&auto=format&n=LU3oFsc_lcA5rDjy&q=85&s=c6f12c9adccded7db5cd5412e3979461" alt="SSO啟用確認" width="934" height="762" data-path="ja/images/sso-entra/21-sso-enabled-confirmation.png" />
    </Frame>
  </Step>

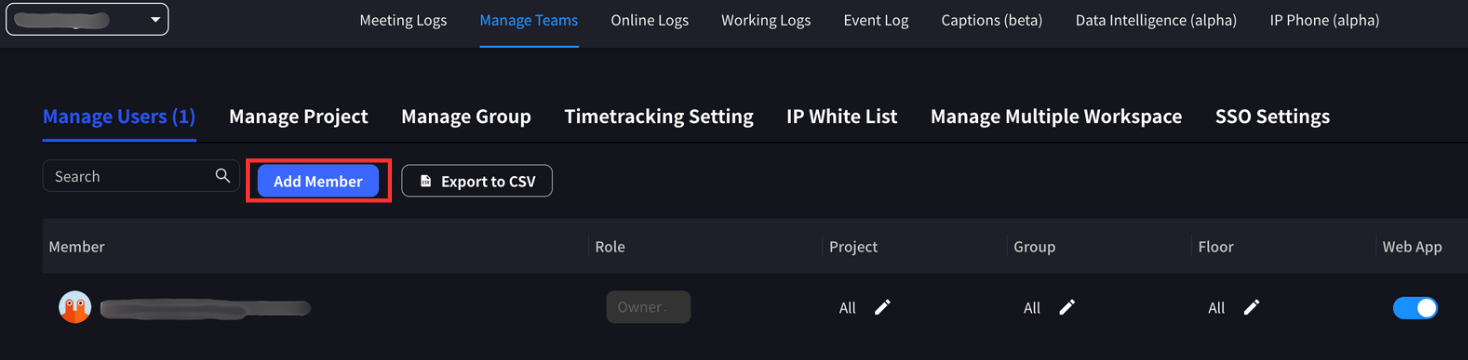
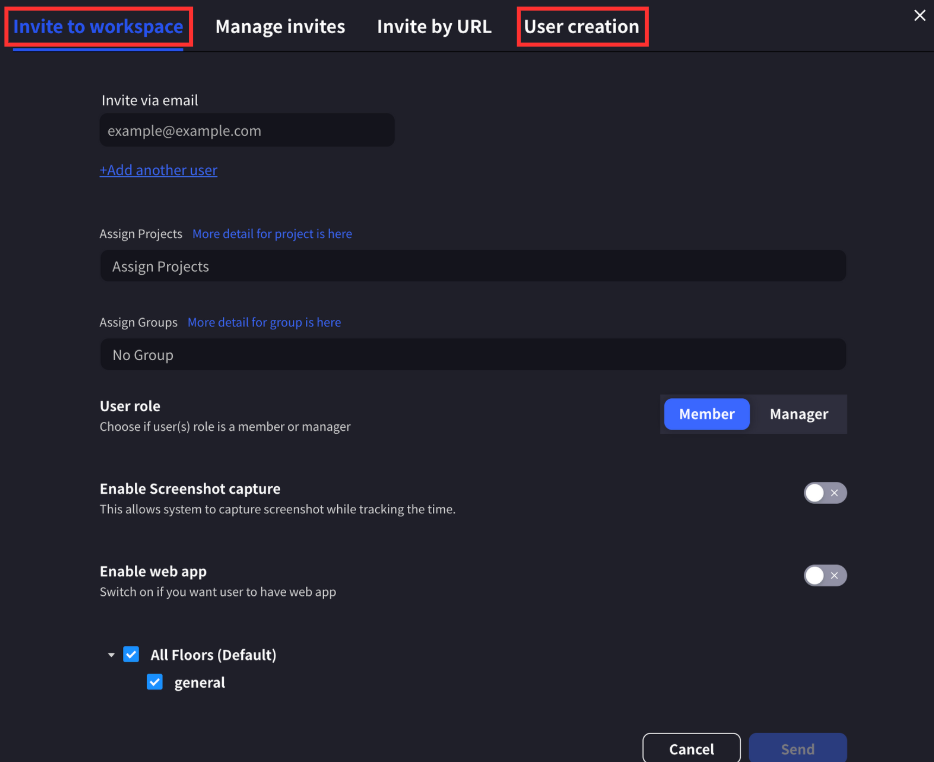
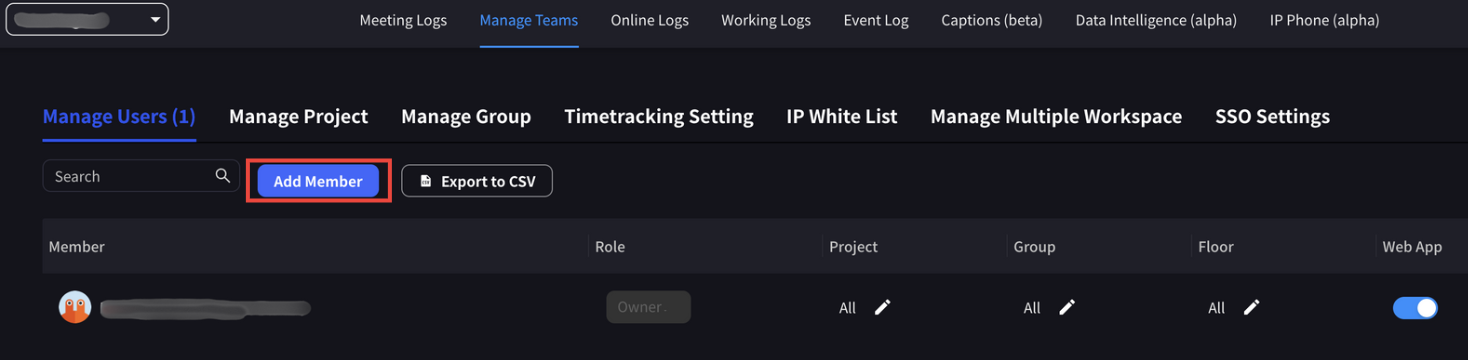
  <Step title="新增使用者">
    將使用者新增到工作區。使用者的電子郵件地址必須與Microsoft Entra ID配置中選擇的使用者電子郵件地址相符。

    使用者可以透過邀請或直接建立的方式新增。
    <Frame>
      <img src="https://mintcdn.com/test-cf63e467/LU3oFsc_lcA5rDjy/ja/images/sso-entra/11-add-workspace-users.png?fit=max&auto=format&n=LU3oFsc_lcA5rDjy&q=85&s=d5f8aaf20d9af87901c7181838ccbbf7" alt="新增工作區使用者" width="1468" height="360" data-path="ja/images/sso-entra/11-add-workspace-users.png" />
    </Frame>

    <Frame>
      <img src="https://mintcdn.com/test-cf63e467/LU3oFsc_lcA5rDjy/ja/images/sso-entra/22-user-assignment.png?fit=max&auto=format&n=LU3oFsc_lcA5rDjy&q=85&s=bc4bc3baab78f34b9d9a227d3939a8b1" alt="使用者分配" width="1024" height="1667" data-path="ja/images/sso-entra/22-user-assignment.png" />
    </Frame>
  </Step>
</Steps>

***

## SSO登入

工作區配置SSO後：

* **擁有者和管理員**：可以透過其他方式登入VoicePing
* **普通成員**：需要透過SSO進行身分驗證

當邀請新的VoicePing使用者加入SSO工作區時，使用者透過SSO註冊後將取得VoicePing使用者帳號。

### 登入步驟

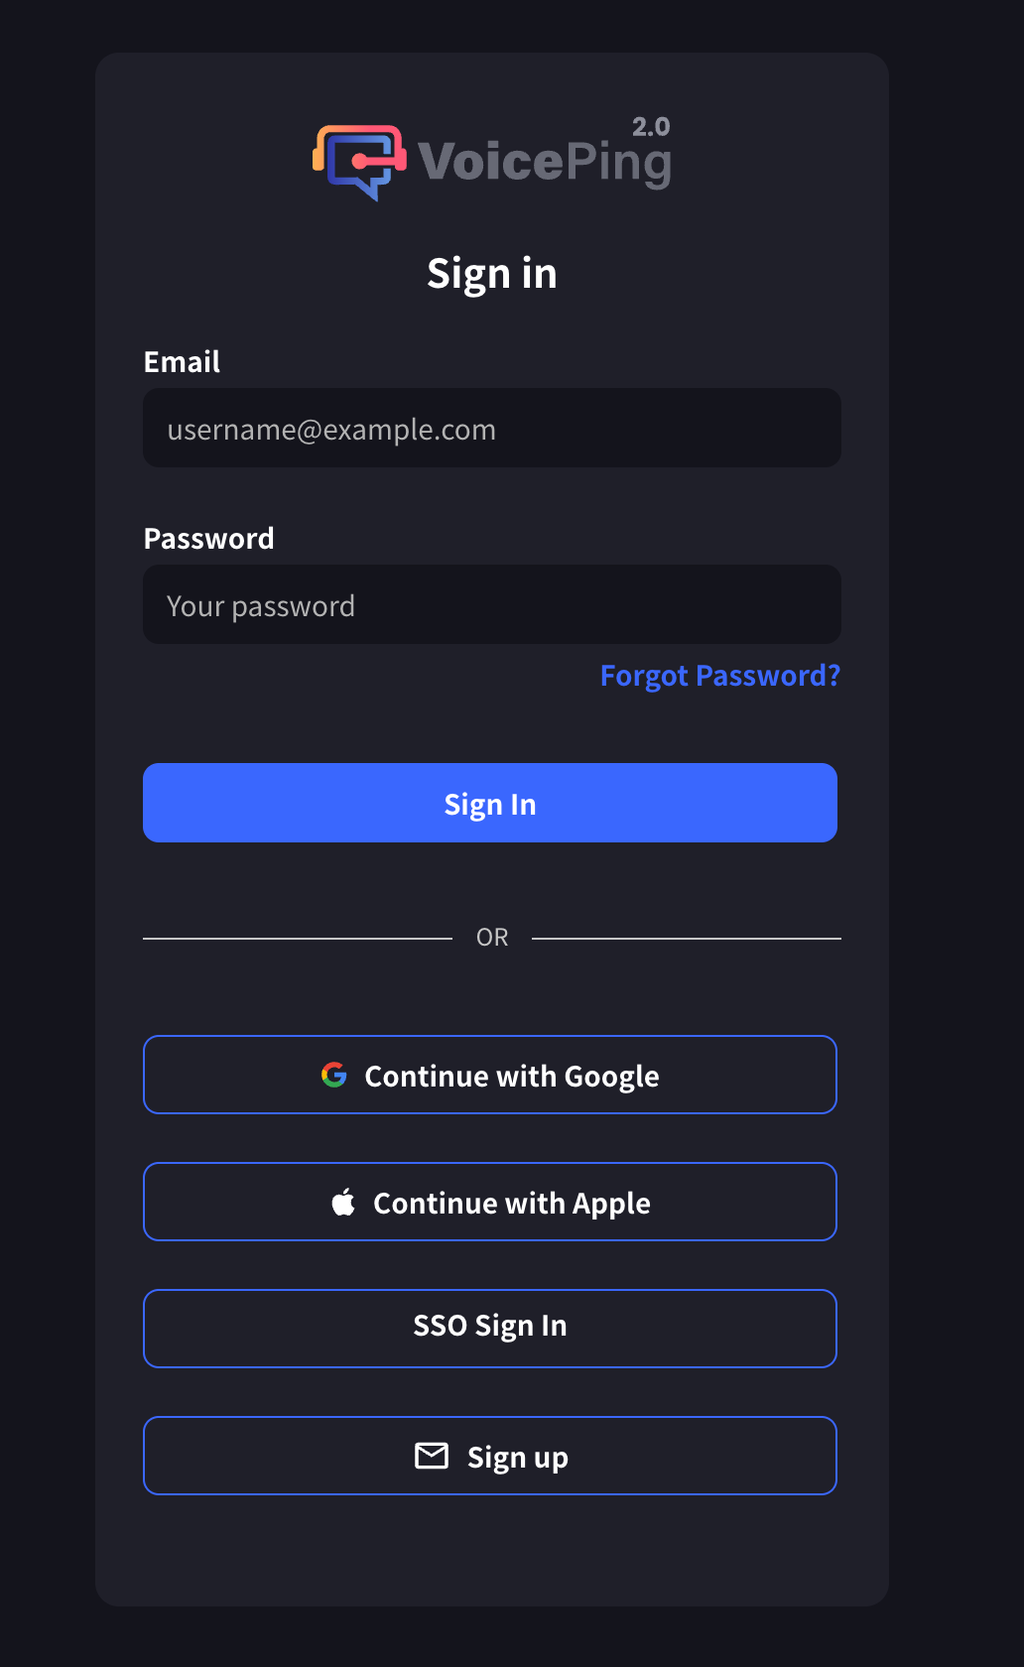
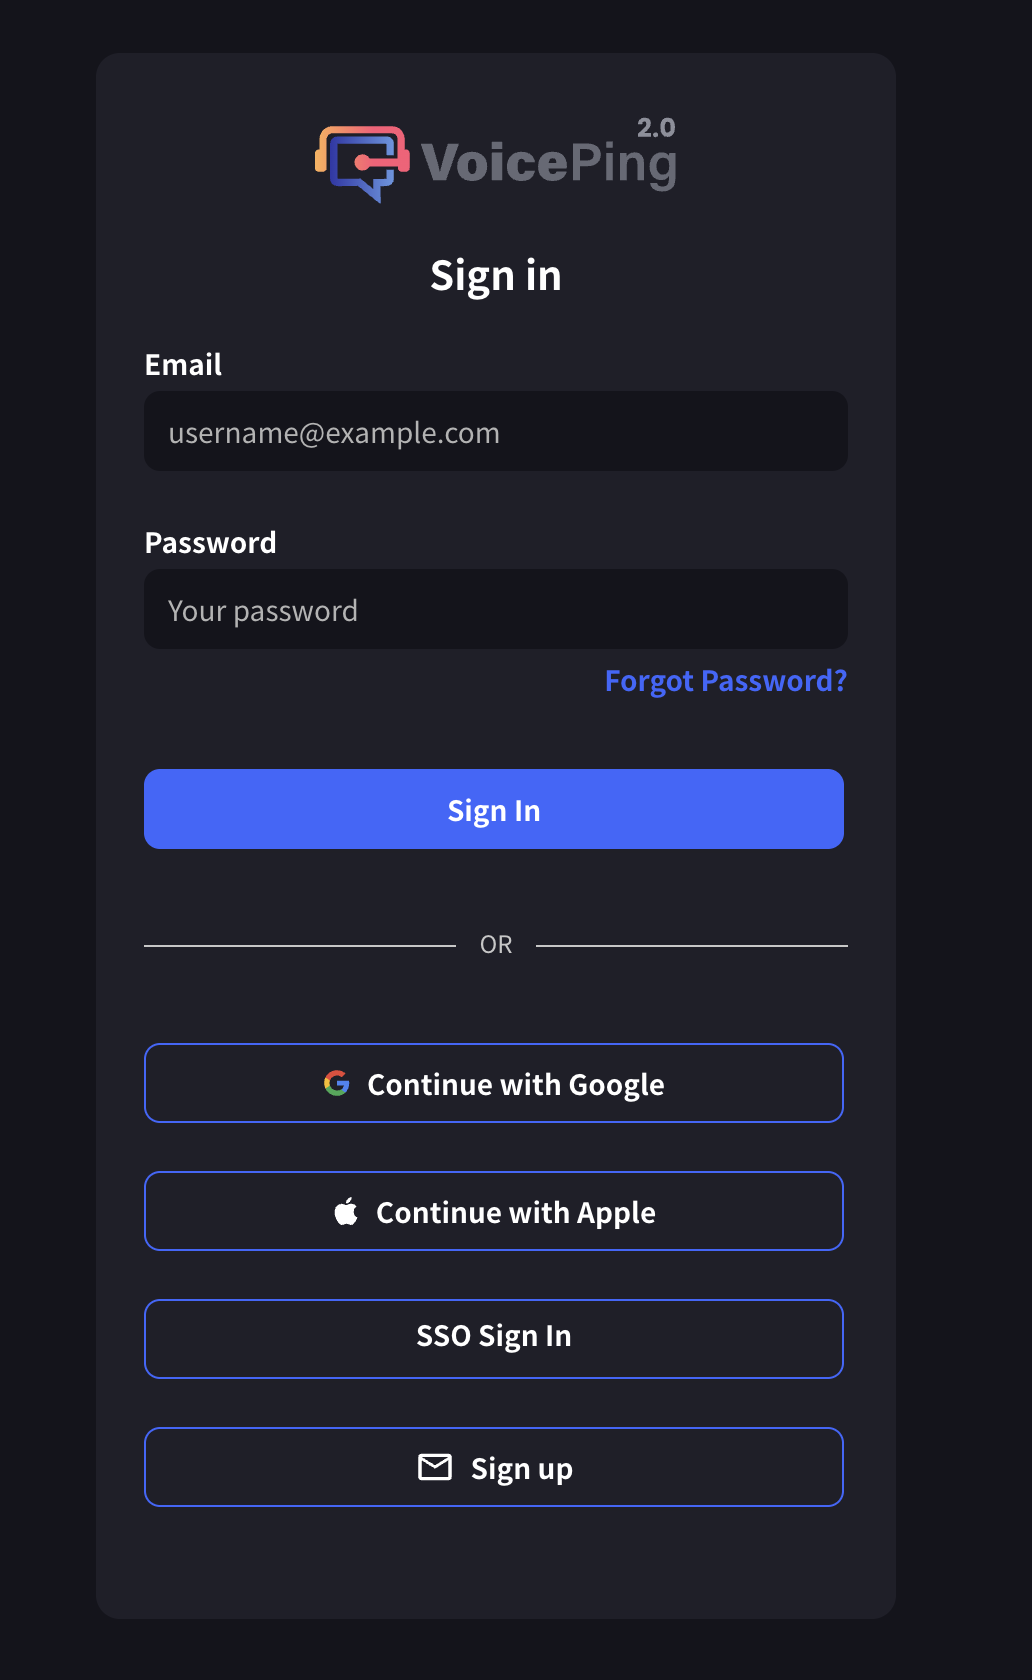
1. 進入VoicePing登入頁面
2. 點選「SSO登入」按鈕
<Frame>
  <img src="https://mintcdn.com/test-cf63e467/LU3oFsc_lcA5rDjy/ja/images/sso-entra/12-sso-login.png?fit=max&auto=format&n=LU3oFsc_lcA5rDjy&q=85&s=2bc56d7ceb21cab227505830301b5ec8" alt="SSO登入" width="1032" height="1680" data-path="ja/images/sso-entra/12-sso-login.png" />
</Frame>

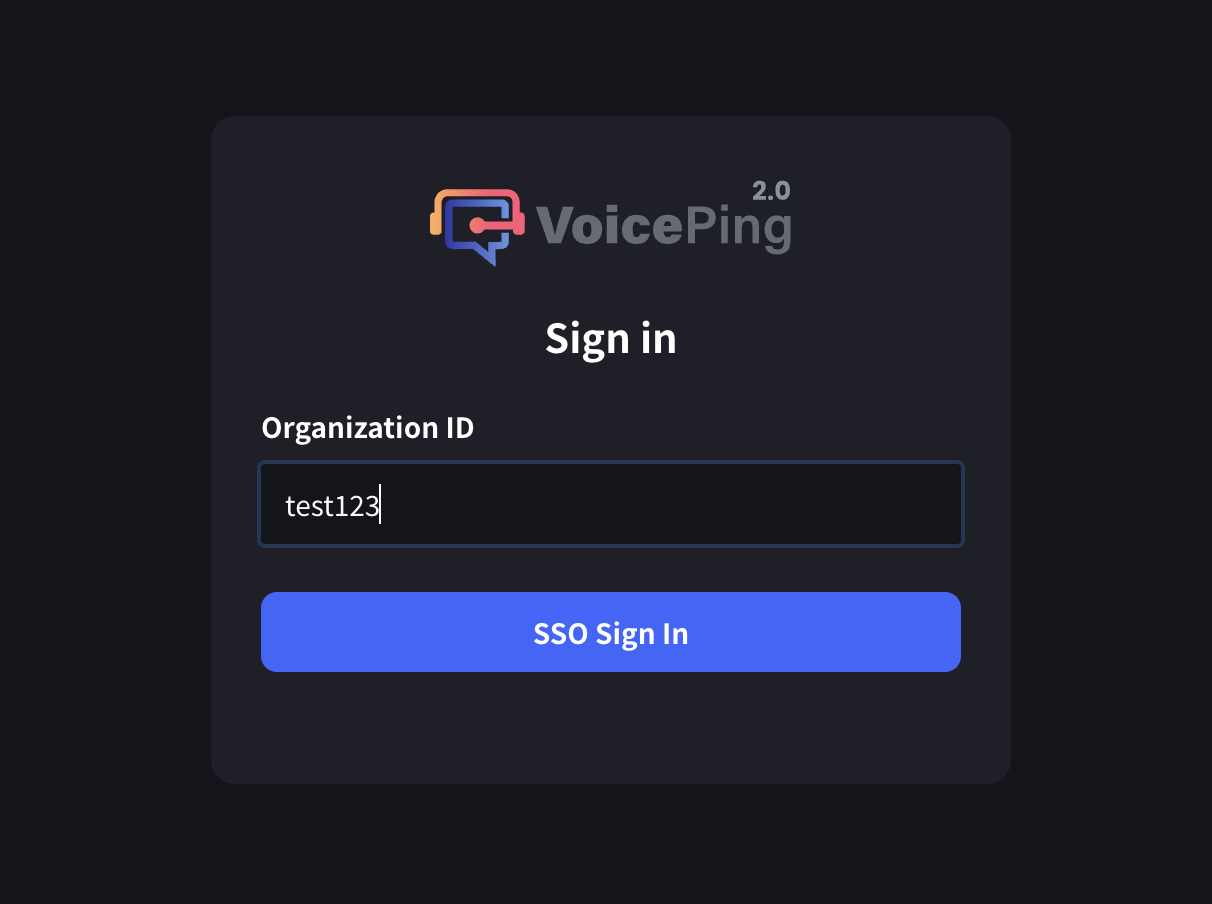
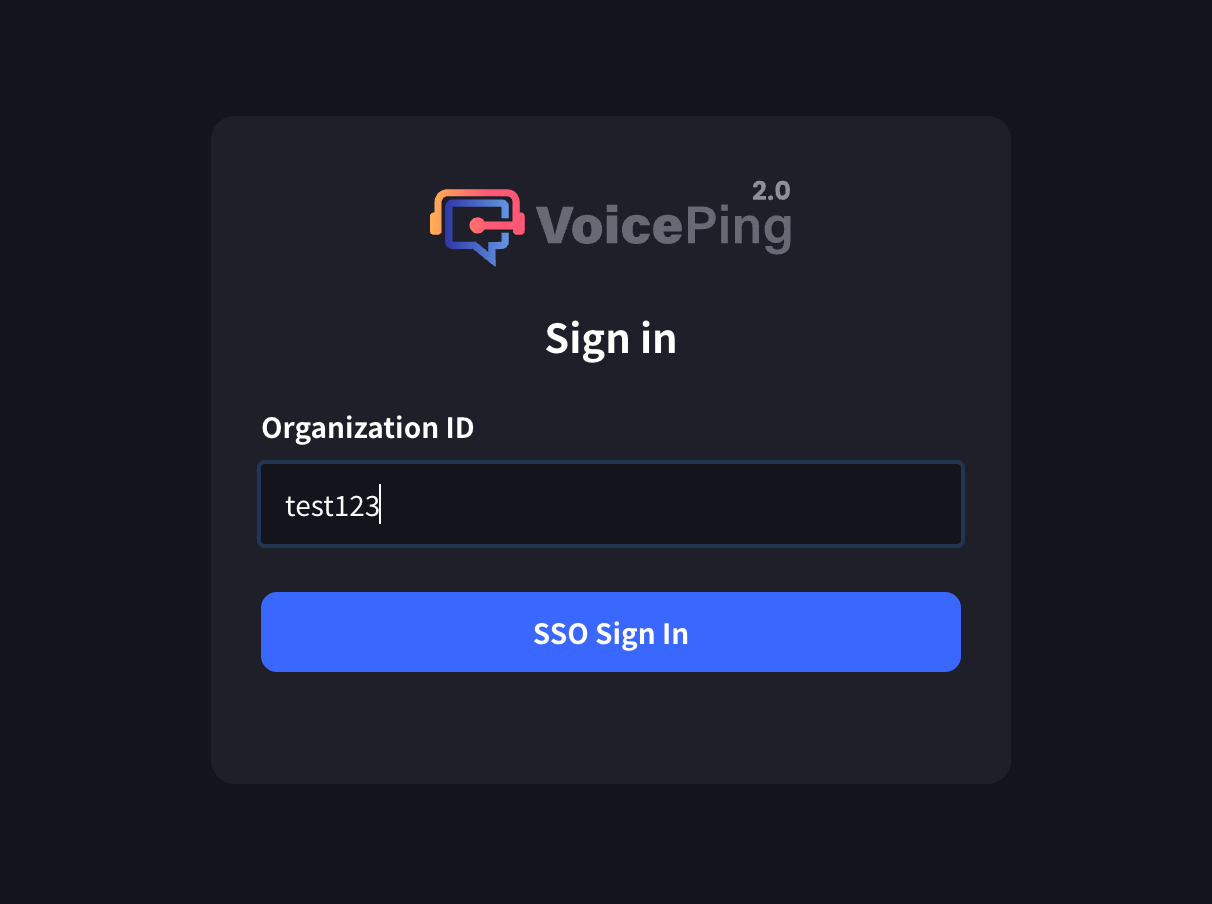
3. 輸入組織ID

<Frame>
  <img src="https://mintcdn.com/test-cf63e467/LU3oFsc_lcA5rDjy/ja/images/sso-entra/13-org-id-input.png?fit=max&auto=format&n=LU3oFsc_lcA5rDjy&q=85&s=b83087d876e61fc2f03f303cf0c8a92a" alt="組織ID輸入" width="1212" height="904" data-path="ja/images/sso-entra/13-org-id-input.png" />
</Frame>

<Frame>
  <img src="https://mintcdn.com/test-cf63e467/LU3oFsc_lcA5rDjy/ja/images/sso-entra/23-test-sso-login.png?fit=max&auto=format&n=LU3oFsc_lcA5rDjy&q=85&s=23c62802ec383efc5a51a13ee3f8745e" alt="SSO登入測試" width="1212" height="904" data-path="ja/images/sso-entra/23-test-sso-login.png" />
</Frame>

<Frame>
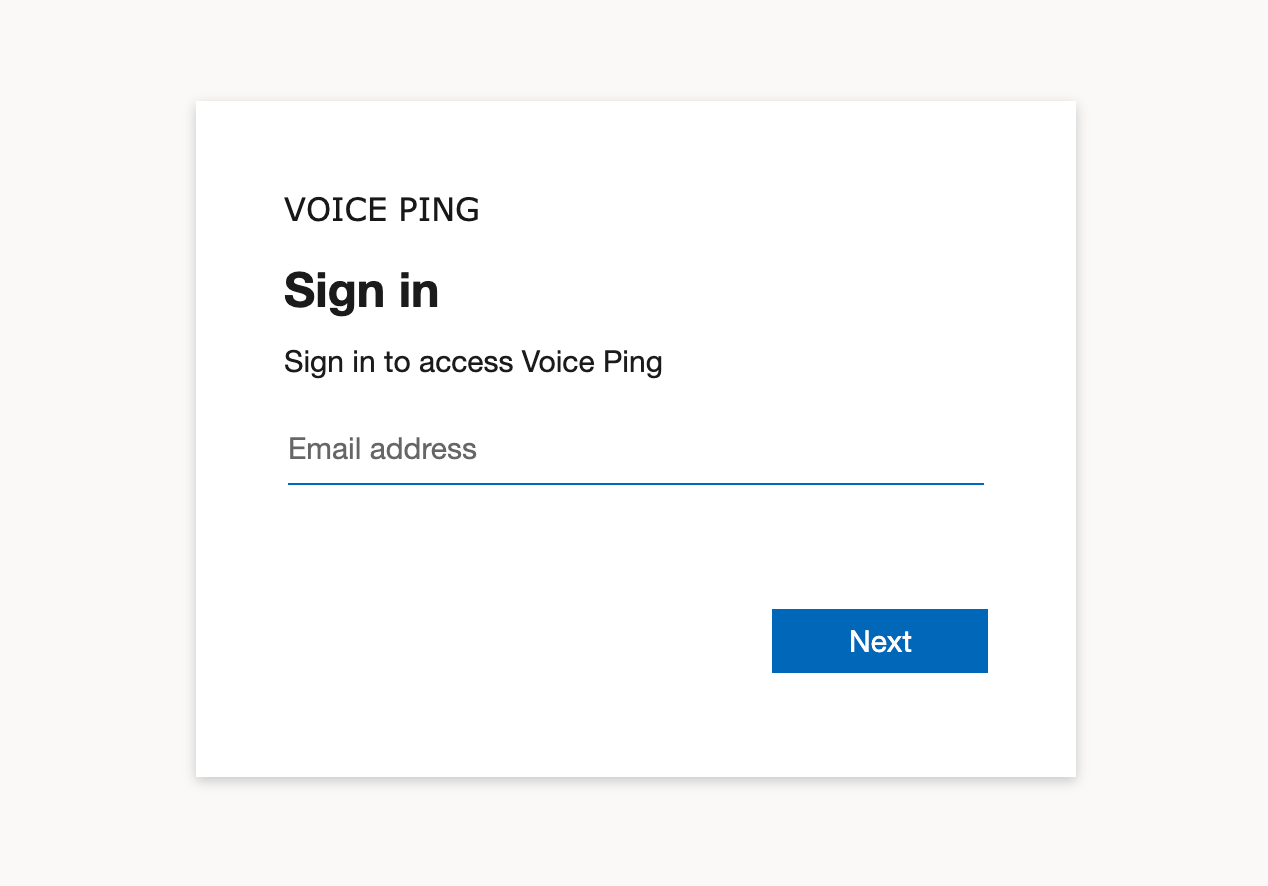
  <img src="https://mintcdn.com/test-cf63e467/LU3oFsc_lcA5rDjy/ja/images/sso-entra/24-org-id-login-screen.png?fit=max&auto=format&n=LU3oFsc_lcA5rDjy&q=85&s=694925b91b1594a04ea55b51c7922e00" alt="組織ID登入介面" width="1268" height="886" data-path="ja/images/sso-entra/24-org-id-login-screen.png" />
</Frame>

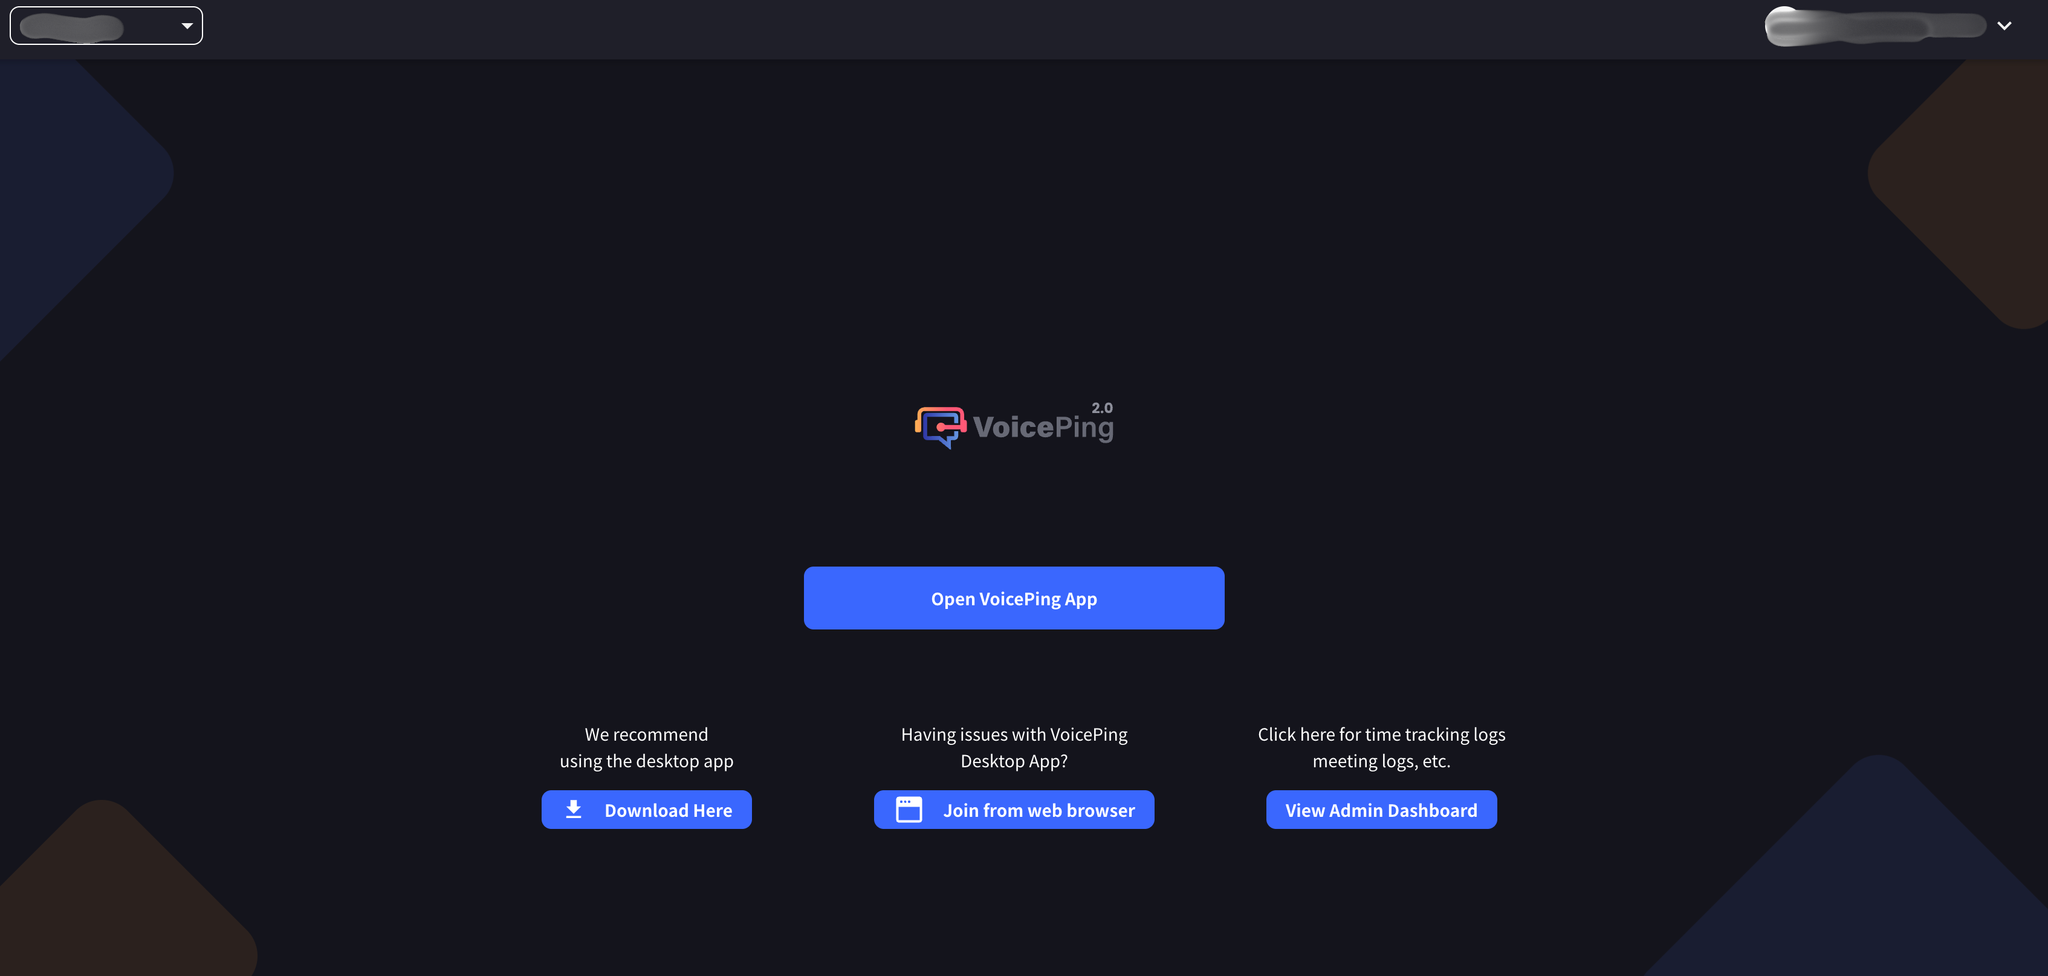
4. 在Microsoft Entra ID認證頁面進行認證

<Frame>
  <img src="https://mintcdn.com/test-cf63e467/LU3oFsc_lcA5rDjy/ja/images/sso-entra/25-sso-complete.png?fit=max&auto=format&n=LU3oFsc_lcA5rDjy&q=85&s=80a9bea3e92e40bc0d7219204a464783" alt="SSO認證完成" width="2048" height="976" data-path="ja/images/sso-entra/25-sso-complete.png" />
</Frame>

***

<ContactZhTW />