> ## Documentation Index
> Fetch the complete documentation index at: https://manual.voiceping.net/llms.txt
> Use this file to discover all available pages before exploring further.
# API Access
> 使用带作用域的 API 密钥,从您自己的后端查询 VoicePing 会议记录。提供 TypeScript、Python、Java、Go 代码示例。
export const FeedbackZh = () => <>
对该功能有想法或需求?请通过 Product Feedback 发送给团队。
官方链接
访问官方网站
在X上关注我们
在Facebook上点赞
在LinkedIn上连接
;
 ## 从您的后端查询 VoicePing 会议记录
API Access 面向服务器到服务器的工作流 ― 定时导出、CRM 同步、看板、合规归档等。您在工作区中创建 API 密钥,为其授予一组作用域,您的后端通过标准 bearer 令牌调用 VoicePing API。
如果是 **人** 通过 AI 客户端提问,请改用 [MCP Access](/zh/external-access/mcp)。
```text theme={null}
If a person is asking questions, use MCP Access.
If a server is fetching data, use API Access.
```
***
## 何时使用 API Access
| 使用场景 | 示例 |
| ------------ | ----------------------------- |
| 定时导出 | 每周五导出本周会议记录 |
| 内部报表 | 构建每周会议摘要报告 |
| CRM 或 PM 工作流 | 将会议记录摘要推送至 Salesforce 或 Asana |
| 合规归档 | 将会议记录存入指定合规存储 |
| 看板 | 将会议记录元数据接入分析系统 |
***
## 创建 API 密钥
1. 打开 **工作区设置 → 外部访问 → API Access** 。
2. 若 **API Access Mode** 尚未开启,请先启用。
3. 点击 **Create API key** 。
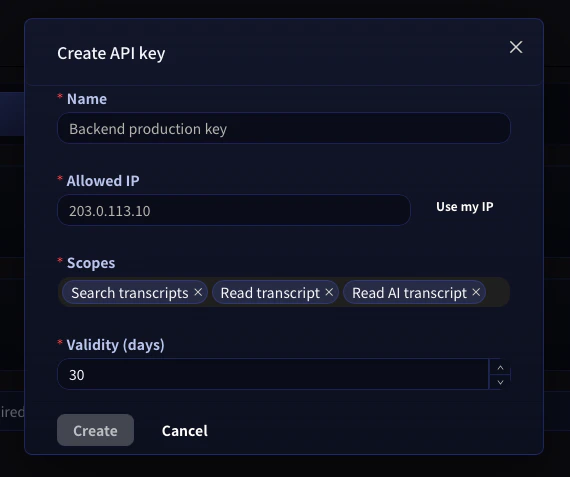
4. 选择名称、**允许的 IP 地址**(推荐)、密钥所需 **作用域** 和有效期。
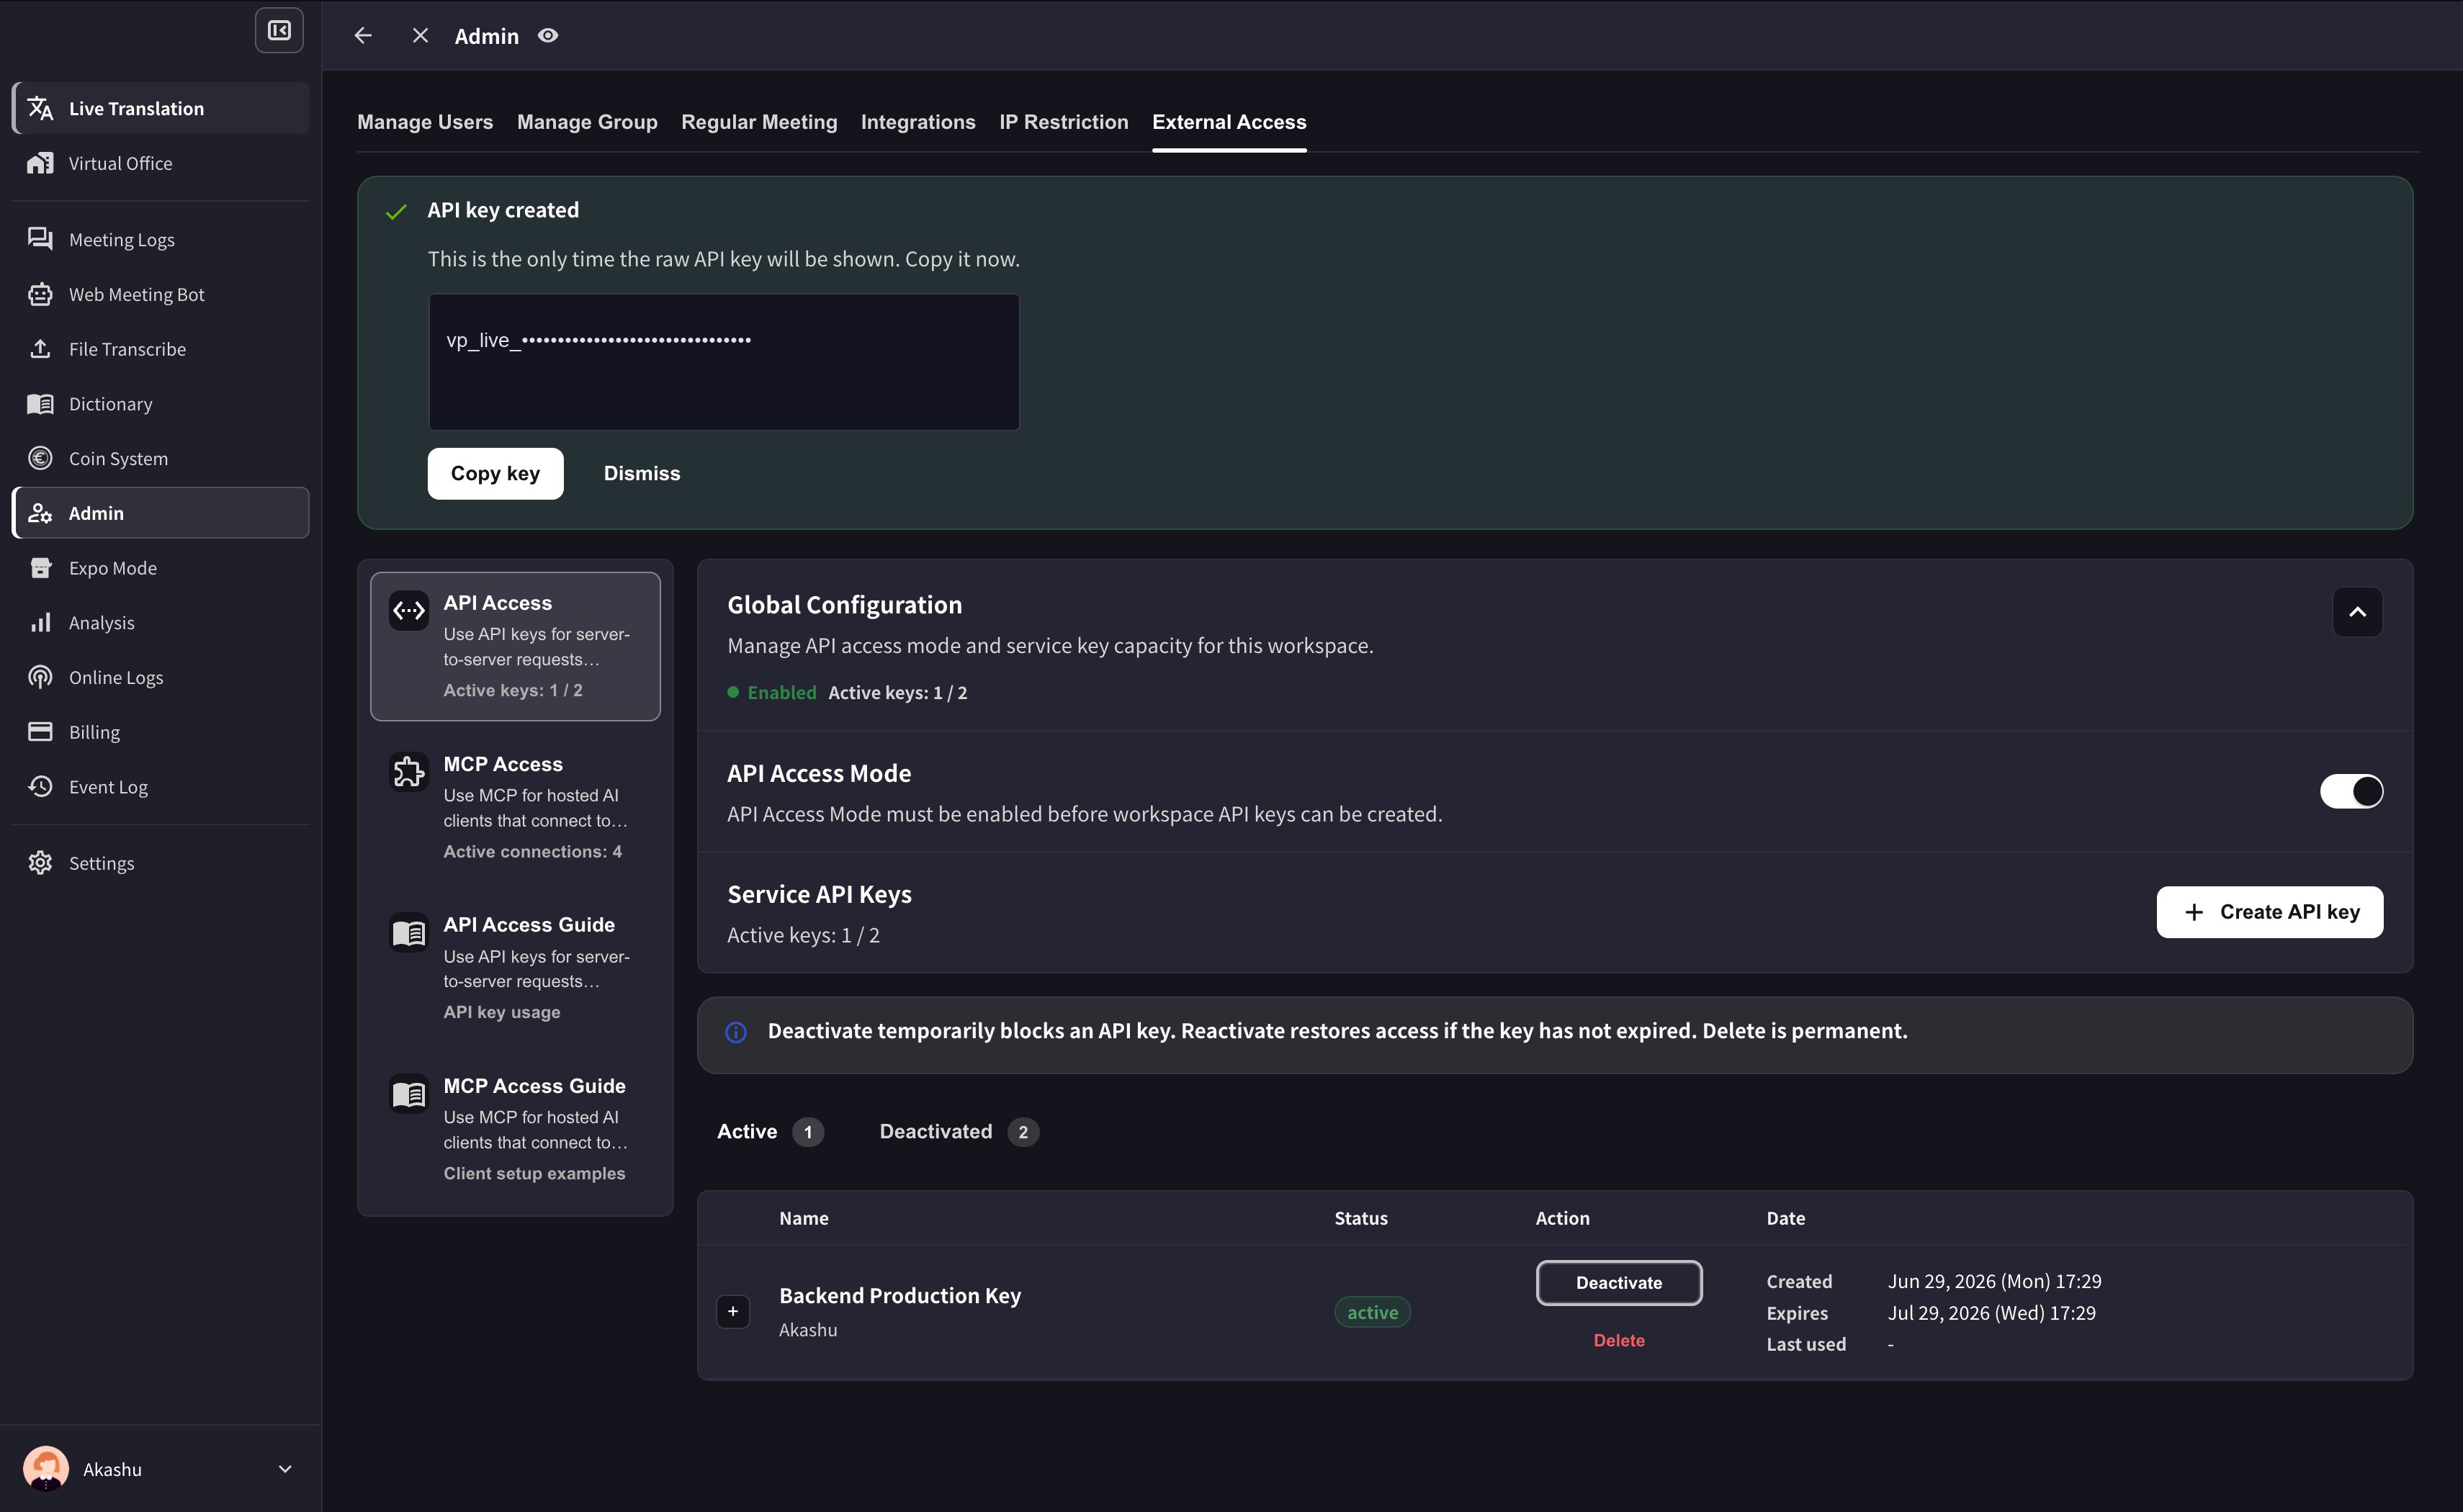
5. 立即复制生成的密钥并保存到密钥管理器。完整密钥仅显示一次。
## 从您的后端查询 VoicePing 会议记录
API Access 面向服务器到服务器的工作流 ― 定时导出、CRM 同步、看板、合规归档等。您在工作区中创建 API 密钥,为其授予一组作用域,您的后端通过标准 bearer 令牌调用 VoicePing API。
如果是 **人** 通过 AI 客户端提问,请改用 [MCP Access](/zh/external-access/mcp)。
```text theme={null}
If a person is asking questions, use MCP Access.
If a server is fetching data, use API Access.
```
***
## 何时使用 API Access
| 使用场景 | 示例 |
| ------------ | ----------------------------- |
| 定时导出 | 每周五导出本周会议记录 |
| 内部报表 | 构建每周会议摘要报告 |
| CRM 或 PM 工作流 | 将会议记录摘要推送至 Salesforce 或 Asana |
| 合规归档 | 将会议记录存入指定合规存储 |
| 看板 | 将会议记录元数据接入分析系统 |
***
## 创建 API 密钥
1. 打开 **工作区设置 → 外部访问 → API Access** 。
2. 若 **API Access Mode** 尚未开启,请先启用。
3. 点击 **Create API key** 。
4. 选择名称、**允许的 IP 地址**(推荐)、密钥所需 **作用域** 和有效期。
5. 立即复制生成的密钥并保存到密钥管理器。完整密钥仅显示一次。
 After the key is created, VoicePing shows the raw key only once. Copy it before dismissing the success panel.
 **切勿提交 API 密钥到代码仓库。** 将它们保存在环境变量或密钥管理器中。为进一步提升安全性,可在创建密钥弹窗中将每个密钥绑定到特定 **允许的 IP 地址** ― 即使密钥泄漏,来自其他 IP 的请求也会被拒绝。
***
## 请求身份验证
所有请求均使用 bearer 令牌对 `https://api.voiceping.io` 进行身份验证:
```http theme={null}
GET /api/v1/transcripts/search?q=pricing&limit=10 HTTP/1.1
Host: api.voiceping.io
Authorization: Bearer
```
将密钥设置为环境变量 `VOICEPING_API_KEY` ,下方示例将会自动读取。
***
## 快速开始 — 按语言调用 API
同样的两步流程 ― **搜索会议记录,然后获取一条** ― 用四种语言呈现。首先展示 TypeScript;请按您的技术栈切换标签。
```typescript TypeScript theme={null}
// Requires Node.js 18+ (for built-in fetch)
const apiKey = process.env.VOICEPING_API_KEY!;
const base = "https://api.voiceping.io/api/v1";
const headers = { Authorization: `Bearer ${apiKey}` };
// 1. Search transcripts
const searchRes = await fetch(
`${base}/transcripts/search?q=pricing&limit=10`,
{ headers },
);
const { transcripts } = await searchRes.json();
// 2. Read the first result in full
const detailRes = await fetch(
`${base}/transcripts/${transcripts[0].id}`,
{ headers },
);
const transcript = await detailRes.json();
console.log(transcript.title, transcript.content);
```
```python Python theme={null}
# pip install requests
import os
import requests
api_key = os.environ["VOICEPING_API_KEY"]
base = "https://api.voiceping.io/api/v1"
headers = {"Authorization": f"Bearer {api_key}"}
# 1. Search transcripts
search = requests.get(
f"{base}/transcripts/search",
headers=headers,
params={"q": "pricing", "limit": 10},
).json()
# 2. Read the first result in full
first_id = search["transcripts"][0]["id"]
detail = requests.get(
f"{base}/transcripts/{first_id}",
headers=headers,
).json()
print(detail["title"], detail["content"])
```
```java Java theme={null}
// Java 11+ (uses built-in java.net.http)
import java.net.URI;
import java.net.http.HttpClient;
import java.net.http.HttpRequest;
import java.net.http.HttpResponse;
public class VoicePingQuickstart {
public static void main(String[] args) throws Exception {
String apiKey = System.getenv("VOICEPING_API_KEY");
String base = "https://api.voiceping.io/api/v1";
HttpClient client = HttpClient.newHttpClient();
// 1. Search transcripts
HttpRequest search = HttpRequest.newBuilder()
.uri(URI.create(base + "/transcripts/search?q=pricing&limit=10"))
.header("Authorization", "Bearer " + apiKey)
.GET()
.build();
HttpResponse searchRes =
client.send(search, HttpResponse.BodyHandlers.ofString());
System.out.println(searchRes.body());
// 2. Read a transcript (parse the id from searchRes.body() first;
// shown here with a placeholder)
HttpRequest detail = HttpRequest.newBuilder()
.uri(URI.create(base + "/transcripts/TRANSCRIPT_ID"))
.header("Authorization", "Bearer " + apiKey)
.GET()
.build();
HttpResponse detailRes =
client.send(detail, HttpResponse.BodyHandlers.ofString());
System.out.println(detailRes.body());
}
}
```
```go Go theme={null}
// go run main.go
package main
import (
"fmt"
"io"
"net/http"
"os"
)
func main() {
apiKey := os.Getenv("VOICEPING_API_KEY")
base := "https://api.voiceping.io/api/v1"
// 1. Search transcripts
req, _ := http.NewRequest("GET",
base+"/transcripts/search?q=pricing&limit=10", nil)
req.Header.Set("Authorization", "Bearer "+apiKey)
res, err := http.DefaultClient.Do(req)
if err != nil {
panic(err)
}
defer res.Body.Close()
body, _ := io.ReadAll(res.Body)
fmt.Println(string(body))
// 2. Read a transcript by id (parse id from body first)
detailReq, _ := http.NewRequest("GET",
base+"/transcripts/TRANSCRIPT_ID", nil)
detailReq.Header.Set("Authorization", "Bearer "+apiKey)
detailRes, _ := http.DefaultClient.Do(detailReq)
defer detailRes.Body.Close()
detailBody, _ := io.ReadAll(detailRes.Body)
fmt.Println(string(detailBody))
}
```
***
## 下一步
返回作用域、生命周期控制和事件日志总览页(MCP 与 API 通用)。
若是人通过 Claude、ChatGPT、Codex、Claude Code 或 Gemini CLI 提问,请改用 MCP Access。
**切勿提交 API 密钥到代码仓库。** 将它们保存在环境变量或密钥管理器中。为进一步提升安全性,可在创建密钥弹窗中将每个密钥绑定到特定 **允许的 IP 地址** ― 即使密钥泄漏,来自其他 IP 的请求也会被拒绝。
***
## 请求身份验证
所有请求均使用 bearer 令牌对 `https://api.voiceping.io` 进行身份验证:
```http theme={null}
GET /api/v1/transcripts/search?q=pricing&limit=10 HTTP/1.1
Host: api.voiceping.io
Authorization: Bearer
```
将密钥设置为环境变量 `VOICEPING_API_KEY` ,下方示例将会自动读取。
***
## 快速开始 — 按语言调用 API
同样的两步流程 ― **搜索会议记录,然后获取一条** ― 用四种语言呈现。首先展示 TypeScript;请按您的技术栈切换标签。
```typescript TypeScript theme={null}
// Requires Node.js 18+ (for built-in fetch)
const apiKey = process.env.VOICEPING_API_KEY!;
const base = "https://api.voiceping.io/api/v1";
const headers = { Authorization: `Bearer ${apiKey}` };
// 1. Search transcripts
const searchRes = await fetch(
`${base}/transcripts/search?q=pricing&limit=10`,
{ headers },
);
const { transcripts } = await searchRes.json();
// 2. Read the first result in full
const detailRes = await fetch(
`${base}/transcripts/${transcripts[0].id}`,
{ headers },
);
const transcript = await detailRes.json();
console.log(transcript.title, transcript.content);
```
```python Python theme={null}
# pip install requests
import os
import requests
api_key = os.environ["VOICEPING_API_KEY"]
base = "https://api.voiceping.io/api/v1"
headers = {"Authorization": f"Bearer {api_key}"}
# 1. Search transcripts
search = requests.get(
f"{base}/transcripts/search",
headers=headers,
params={"q": "pricing", "limit": 10},
).json()
# 2. Read the first result in full
first_id = search["transcripts"][0]["id"]
detail = requests.get(
f"{base}/transcripts/{first_id}",
headers=headers,
).json()
print(detail["title"], detail["content"])
```
```java Java theme={null}
// Java 11+ (uses built-in java.net.http)
import java.net.URI;
import java.net.http.HttpClient;
import java.net.http.HttpRequest;
import java.net.http.HttpResponse;
public class VoicePingQuickstart {
public static void main(String[] args) throws Exception {
String apiKey = System.getenv("VOICEPING_API_KEY");
String base = "https://api.voiceping.io/api/v1";
HttpClient client = HttpClient.newHttpClient();
// 1. Search transcripts
HttpRequest search = HttpRequest.newBuilder()
.uri(URI.create(base + "/transcripts/search?q=pricing&limit=10"))
.header("Authorization", "Bearer " + apiKey)
.GET()
.build();
HttpResponse searchRes =
client.send(search, HttpResponse.BodyHandlers.ofString());
System.out.println(searchRes.body());
// 2. Read a transcript (parse the id from searchRes.body() first;
// shown here with a placeholder)
HttpRequest detail = HttpRequest.newBuilder()
.uri(URI.create(base + "/transcripts/TRANSCRIPT_ID"))
.header("Authorization", "Bearer " + apiKey)
.GET()
.build();
HttpResponse detailRes =
client.send(detail, HttpResponse.BodyHandlers.ofString());
System.out.println(detailRes.body());
}
}
```
```go Go theme={null}
// go run main.go
package main
import (
"fmt"
"io"
"net/http"
"os"
)
func main() {
apiKey := os.Getenv("VOICEPING_API_KEY")
base := "https://api.voiceping.io/api/v1"
// 1. Search transcripts
req, _ := http.NewRequest("GET",
base+"/transcripts/search?q=pricing&limit=10", nil)
req.Header.Set("Authorization", "Bearer "+apiKey)
res, err := http.DefaultClient.Do(req)
if err != nil {
panic(err)
}
defer res.Body.Close()
body, _ := io.ReadAll(res.Body)
fmt.Println(string(body))
// 2. Read a transcript by id (parse id from body first)
detailReq, _ := http.NewRequest("GET",
base+"/transcripts/TRANSCRIPT_ID", nil)
detailReq.Header.Set("Authorization", "Bearer "+apiKey)
detailRes, _ := http.DefaultClient.Do(detailReq)
defer detailRes.Body.Close()
detailBody, _ := io.ReadAll(detailRes.Body)
fmt.Println(string(detailBody))
}
```
***
## 下一步
返回作用域、生命周期控制和事件日志总览页(MCP 与 API 通用)。
若是人通过 Claude、ChatGPT、Codex、Claude Code 或 Gemini CLI 提问,请改用 MCP Access。