> ## Documentation Index
> Fetch the complete documentation index at: https://manual.voiceping.net/llms.txt
> Use this file to discover all available pages before exploring further.
# MCP Access — Setup
> Enable VoicePing MCP Access and connect any MCP-compatible AI client — ChatGPT, Claude, Claude Code, Codex CLI, or Gemini CLI. Step-by-step screenshots for ChatGPT and Claude.
export const FeedbackEn = () => <>
Have an idea or request about this feature? Send it to the team via Product Feedback.
Official Links
Visit our official website
Follow us on X
Like us on Facebook
Connect on LinkedIn
;
 ## Connect Your AI Client to VoicePing Transcripts
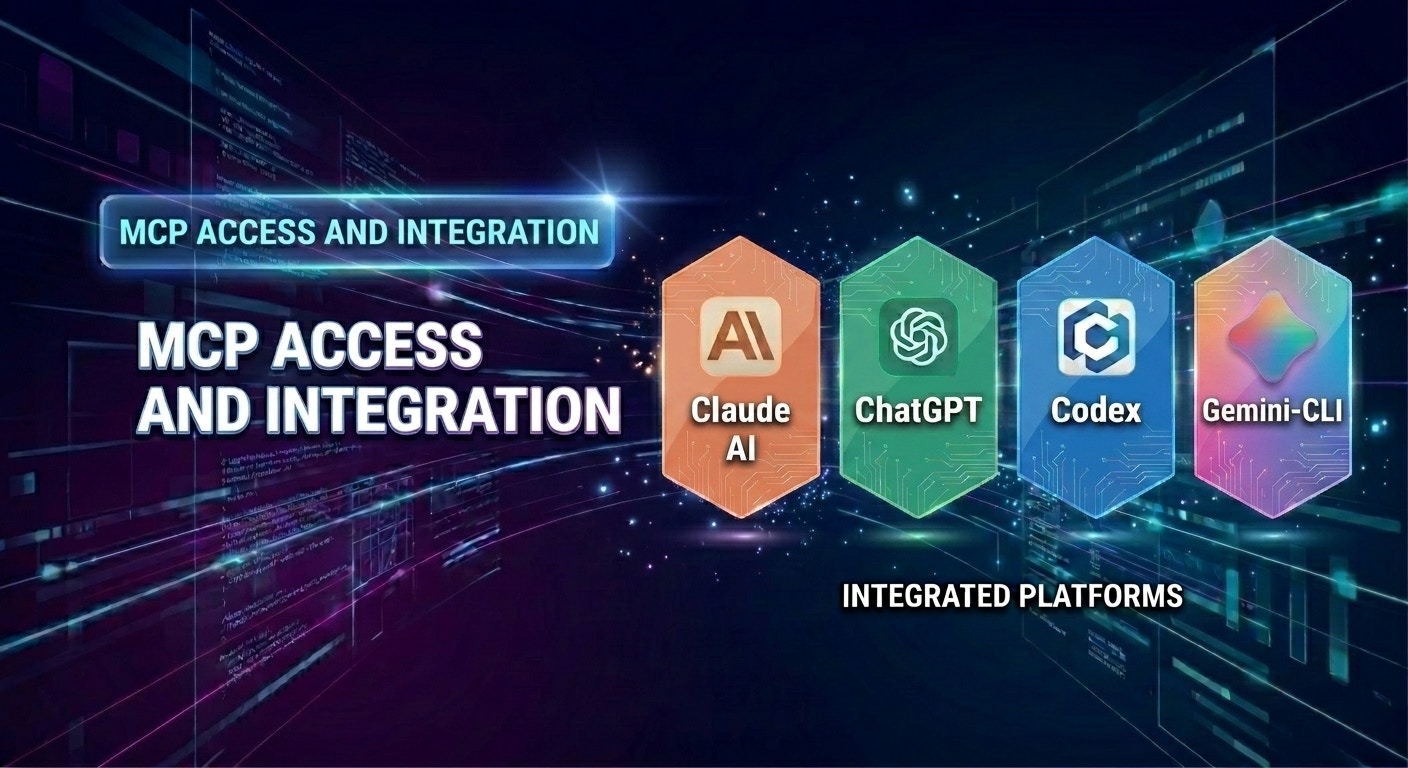
MCP Access turns your VoicePing workspace into a data source any MCP-compatible AI client can read from. Connect once, approve the scopes, and any question you'd normally answer by opening transcripts manually, you can ask in chat.
This page covers only the **setup**. Once you're connected, see the workflow pages for copy-paste prompt flows:
Turn the last 3–4 meetings with a customer into a time-boxed agenda.
Extract goals, pain points, timeline — produce an executive-ready proposal draft.
Recap decisions, assign owners, push a professional follow-up.
Pull every meeting run by a set of teammates and produce a KPI report.
Surface recurring blockers and produce a prioritized action plan.
***
## How to enable MCP Access
You need to turn MCP Access on once in your VoicePing workspace, then connect it to the AI client of your choice.
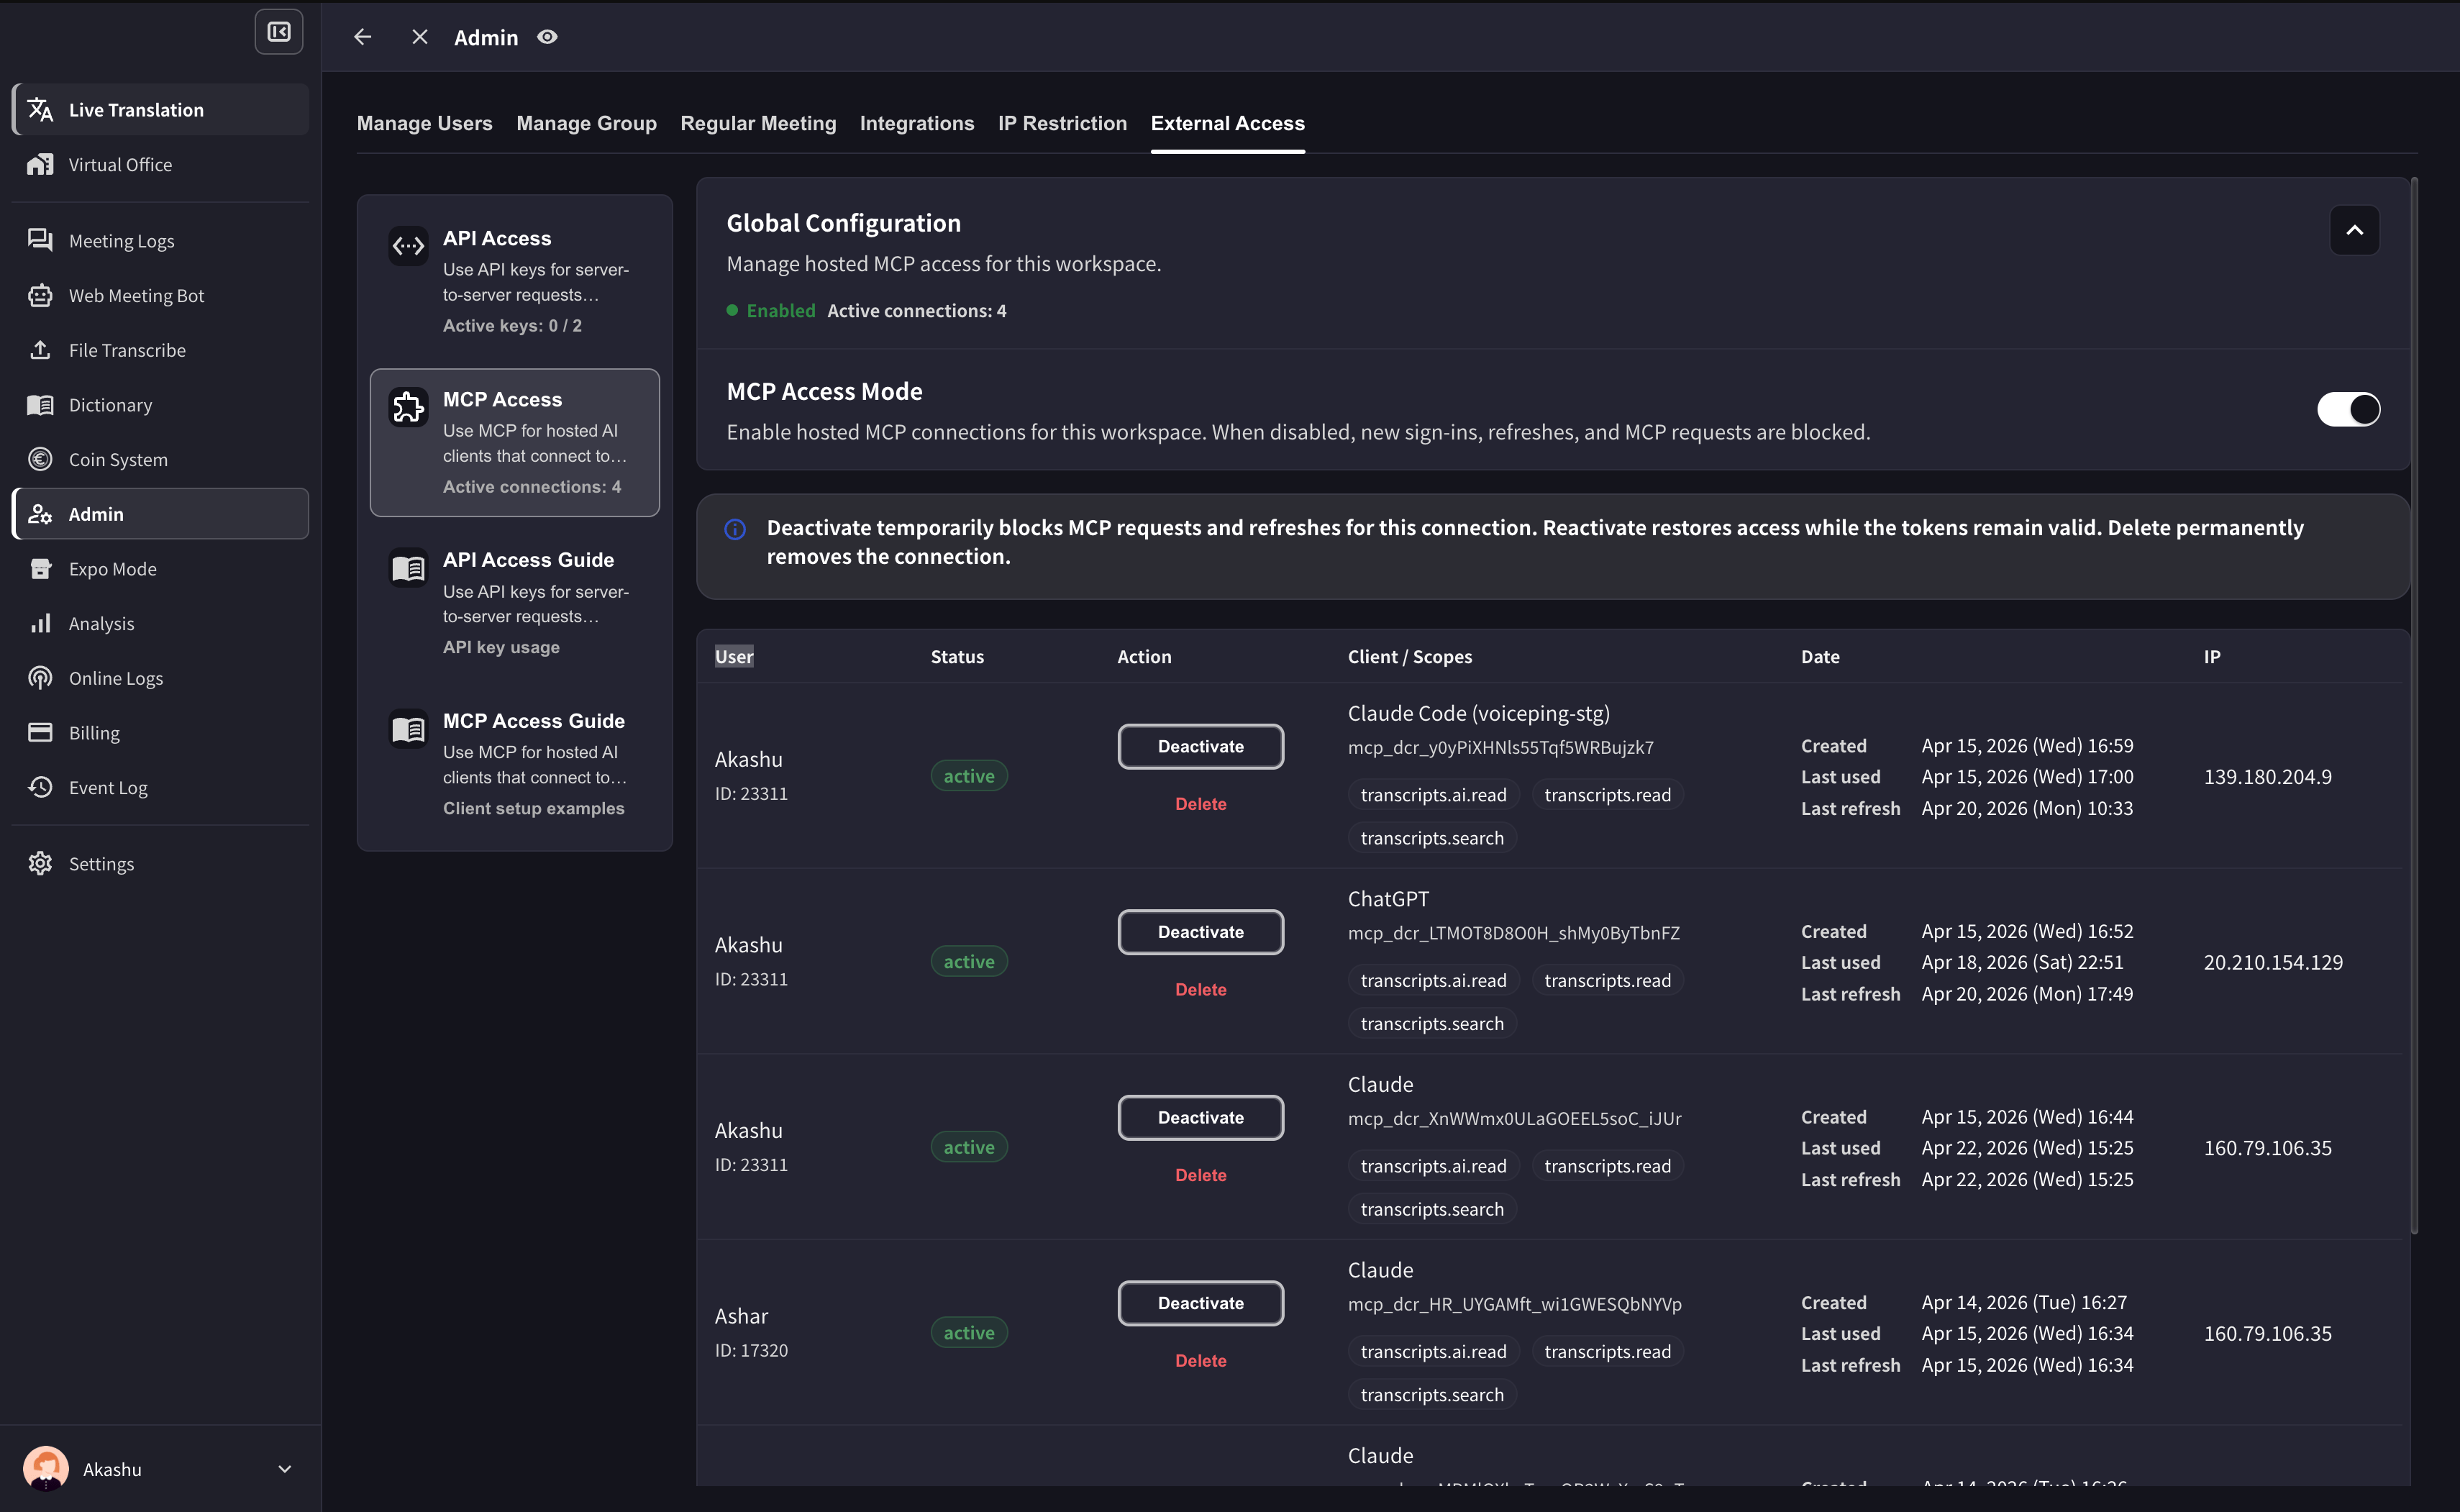
Open **workspace settings → External Access**, and enable **MCP Access**. You'll see the active connections area where every client that connects will appear.
## Connect Your AI Client to VoicePing Transcripts
MCP Access turns your VoicePing workspace into a data source any MCP-compatible AI client can read from. Connect once, approve the scopes, and any question you'd normally answer by opening transcripts manually, you can ask in chat.
This page covers only the **setup**. Once you're connected, see the workflow pages for copy-paste prompt flows:
Turn the last 3–4 meetings with a customer into a time-boxed agenda.
Extract goals, pain points, timeline — produce an executive-ready proposal draft.
Recap decisions, assign owners, push a professional follow-up.
Pull every meeting run by a set of teammates and produce a KPI report.
Surface recurring blockers and produce a prioritized action plan.
***
## How to enable MCP Access
You need to turn MCP Access on once in your VoicePing workspace, then connect it to the AI client of your choice.
Open **workspace settings → External Access**, and enable **MCP Access**. You'll see the active connections area where every client that connects will appear.
 Open your MCP-compatible AI client (Claude, ChatGPT, Codex, Claude Code, Gemini CLI, or another MCP tool) and add the VoicePing MCP server.
The VoicePing MCP server URL is:
```text theme={null}
https://api.voiceping.io/mcp
```
Expand the guide for your tool — ChatGPT and Claude are covered below with step-by-step screenshots. For other clients, use the official docs table that follows.
Prerequisite: ChatGPT Pro or Plus with **Developer Mode** enabled (Settings → Connectors → Advanced → Developer Mode).
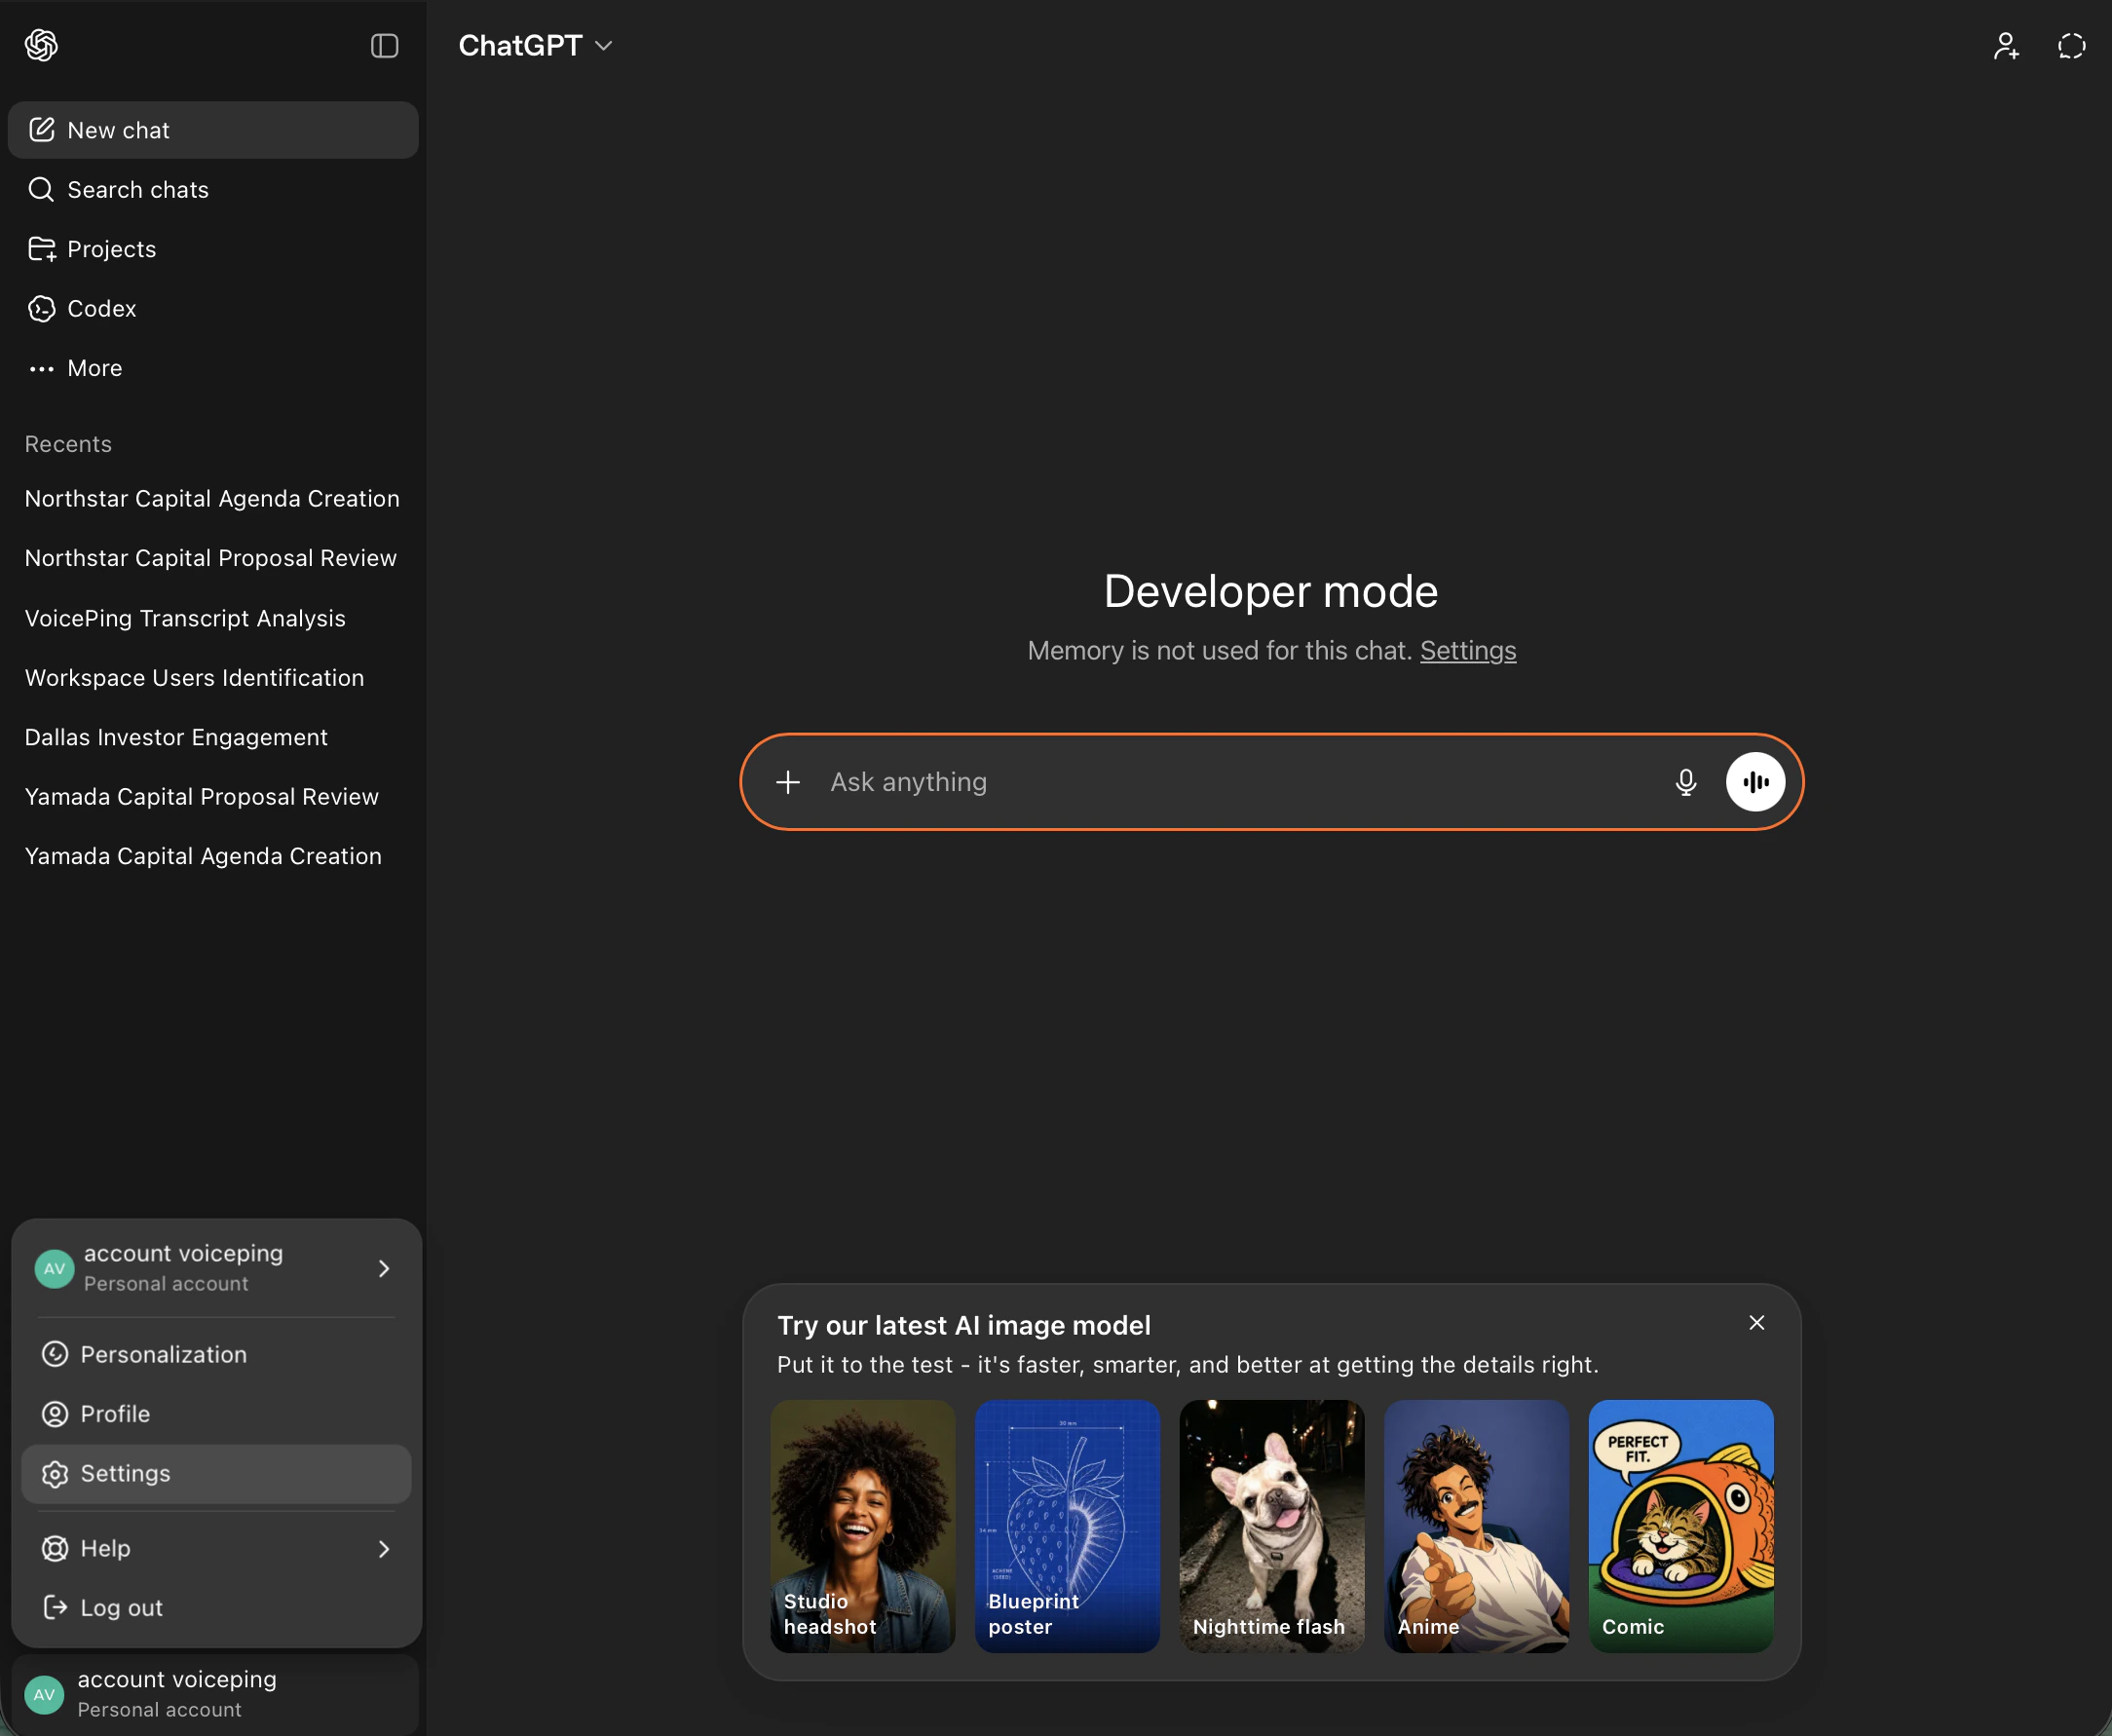
In ChatGPT (Developer Mode), click your account avatar in the bottom-left and choose **Settings**.
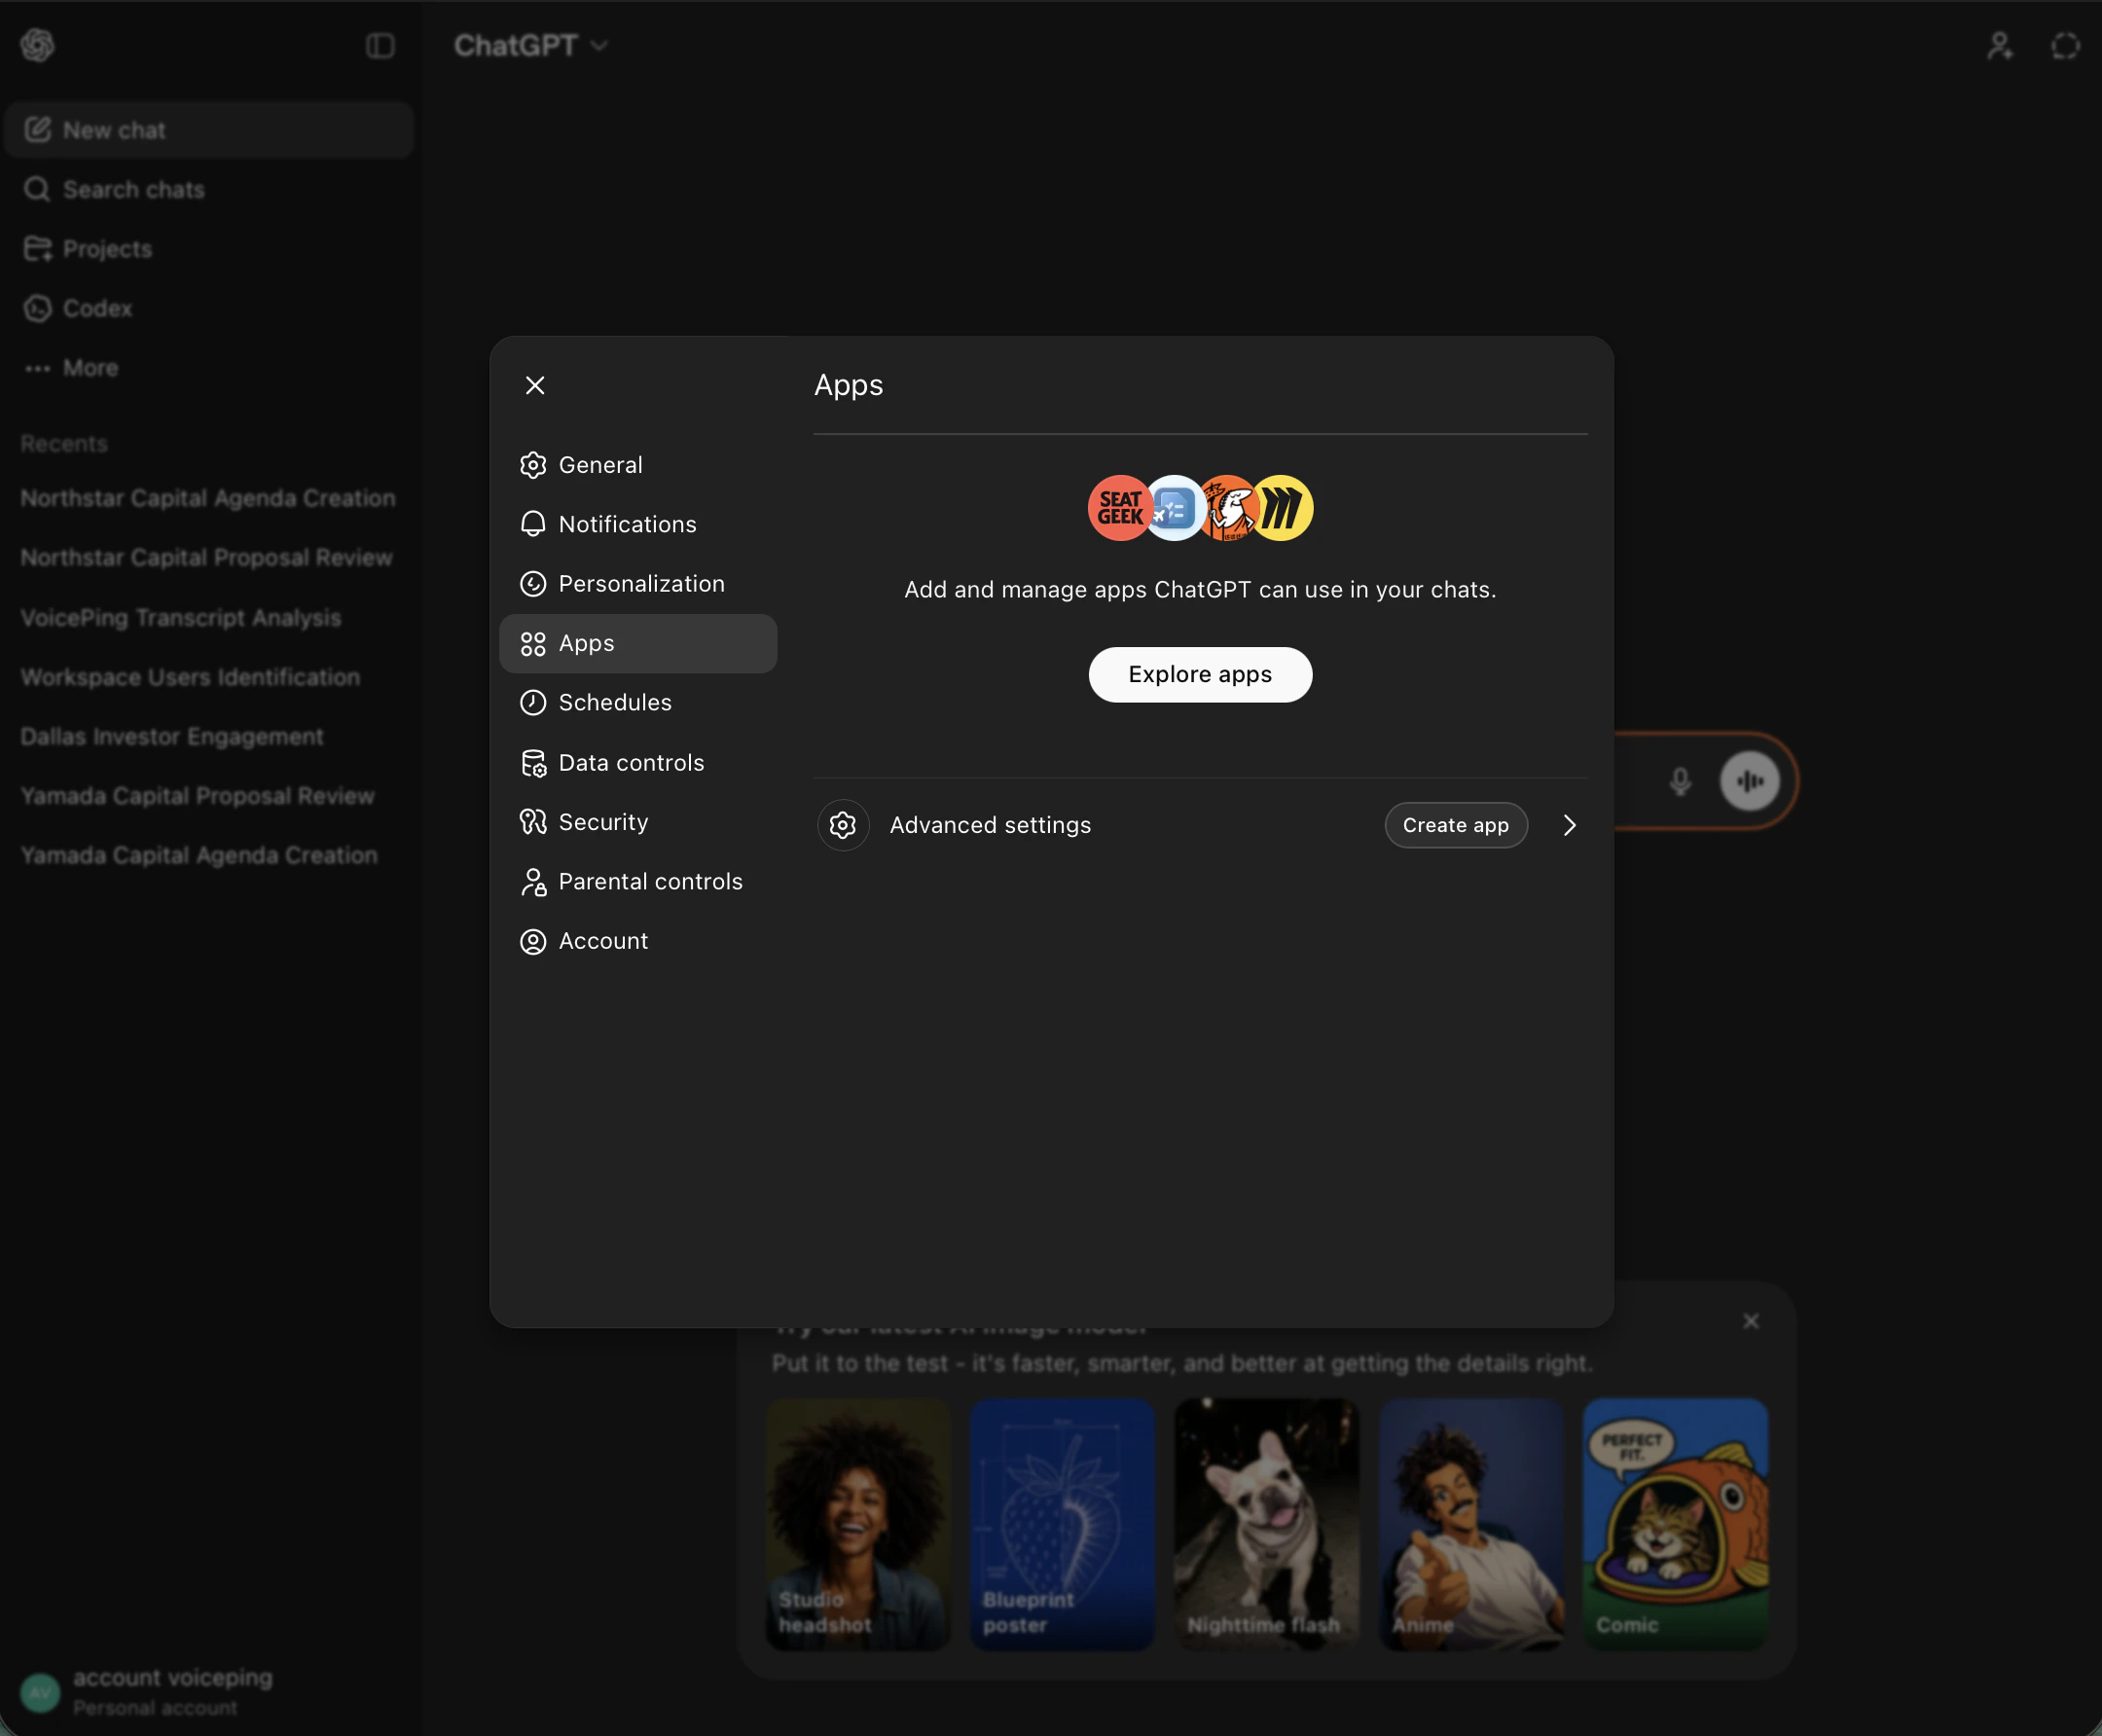
In Settings, open the **Apps** tab, then under **Advanced settings** click **Create app**.
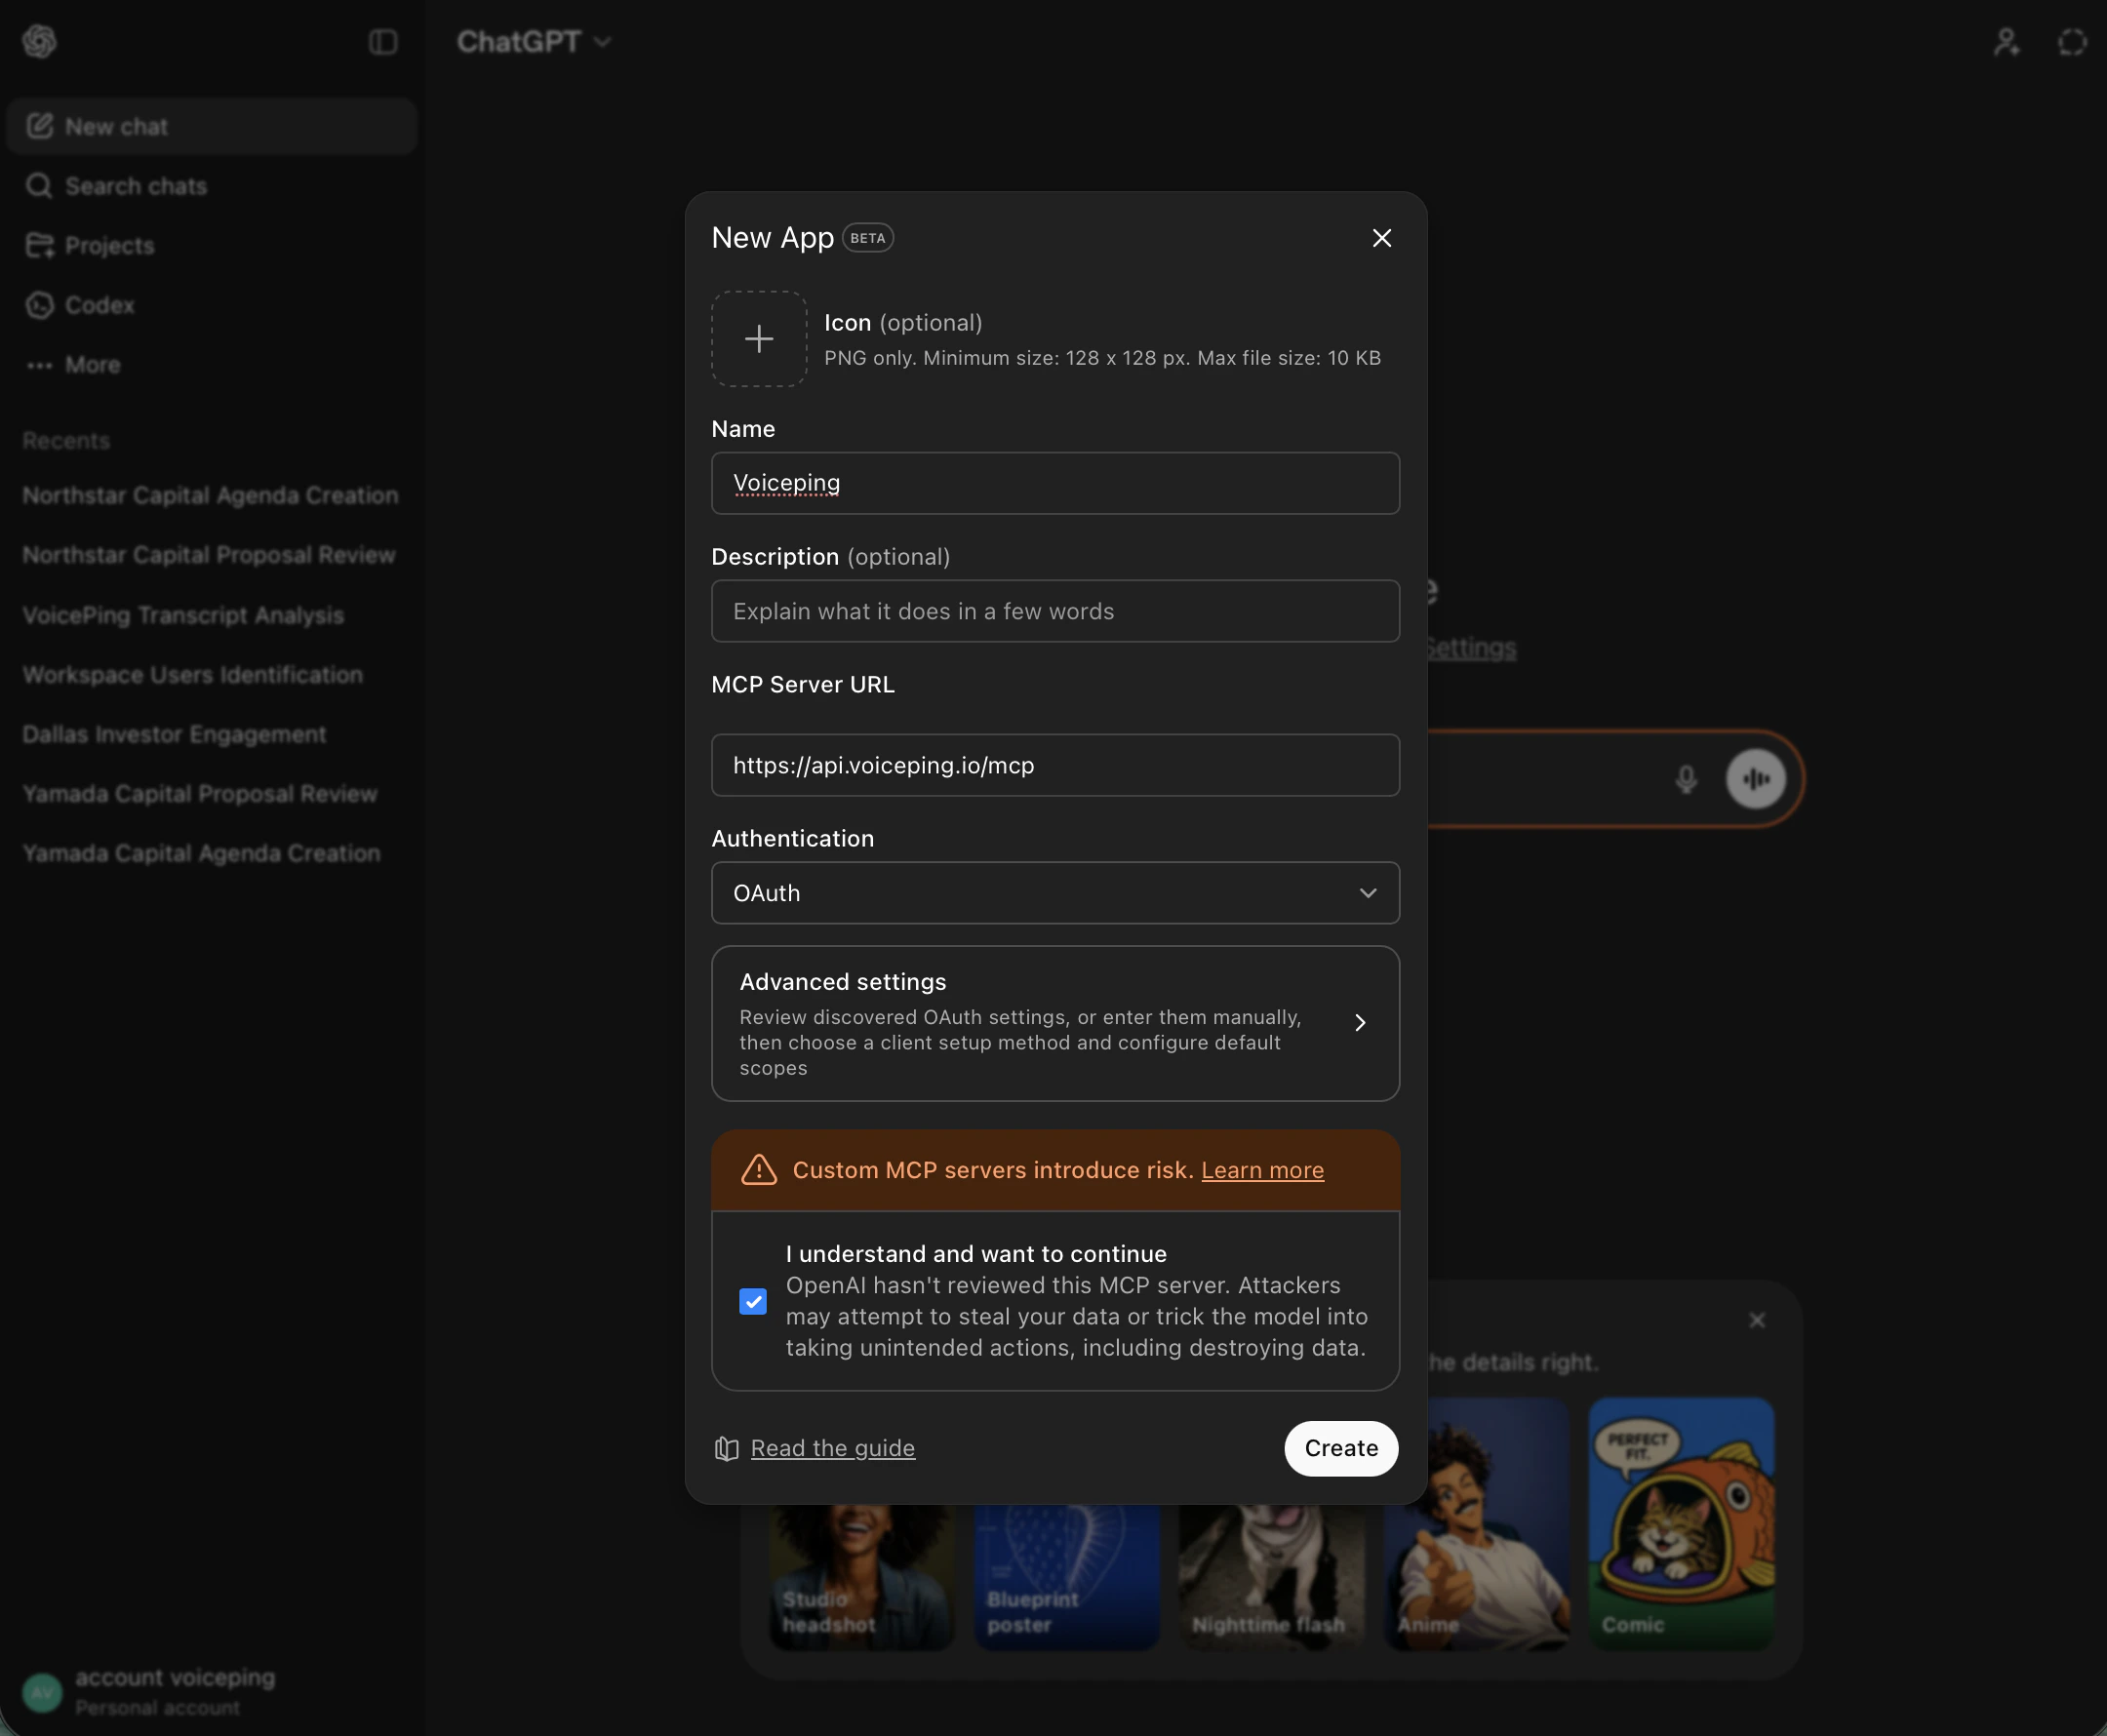
* **Name:** `Voiceping`
* **MCP Server URL:** `https://api.voiceping.io/mcp`
* **Authentication:** `OAuth`
* Tick the **"I understand and want to continue"** checkbox
* Click **Create**
ChatGPT will open the VoicePing OAuth flow automatically — approve the transcript scopes to finish the connection.
Works in Claude Desktop and Claude on the web.
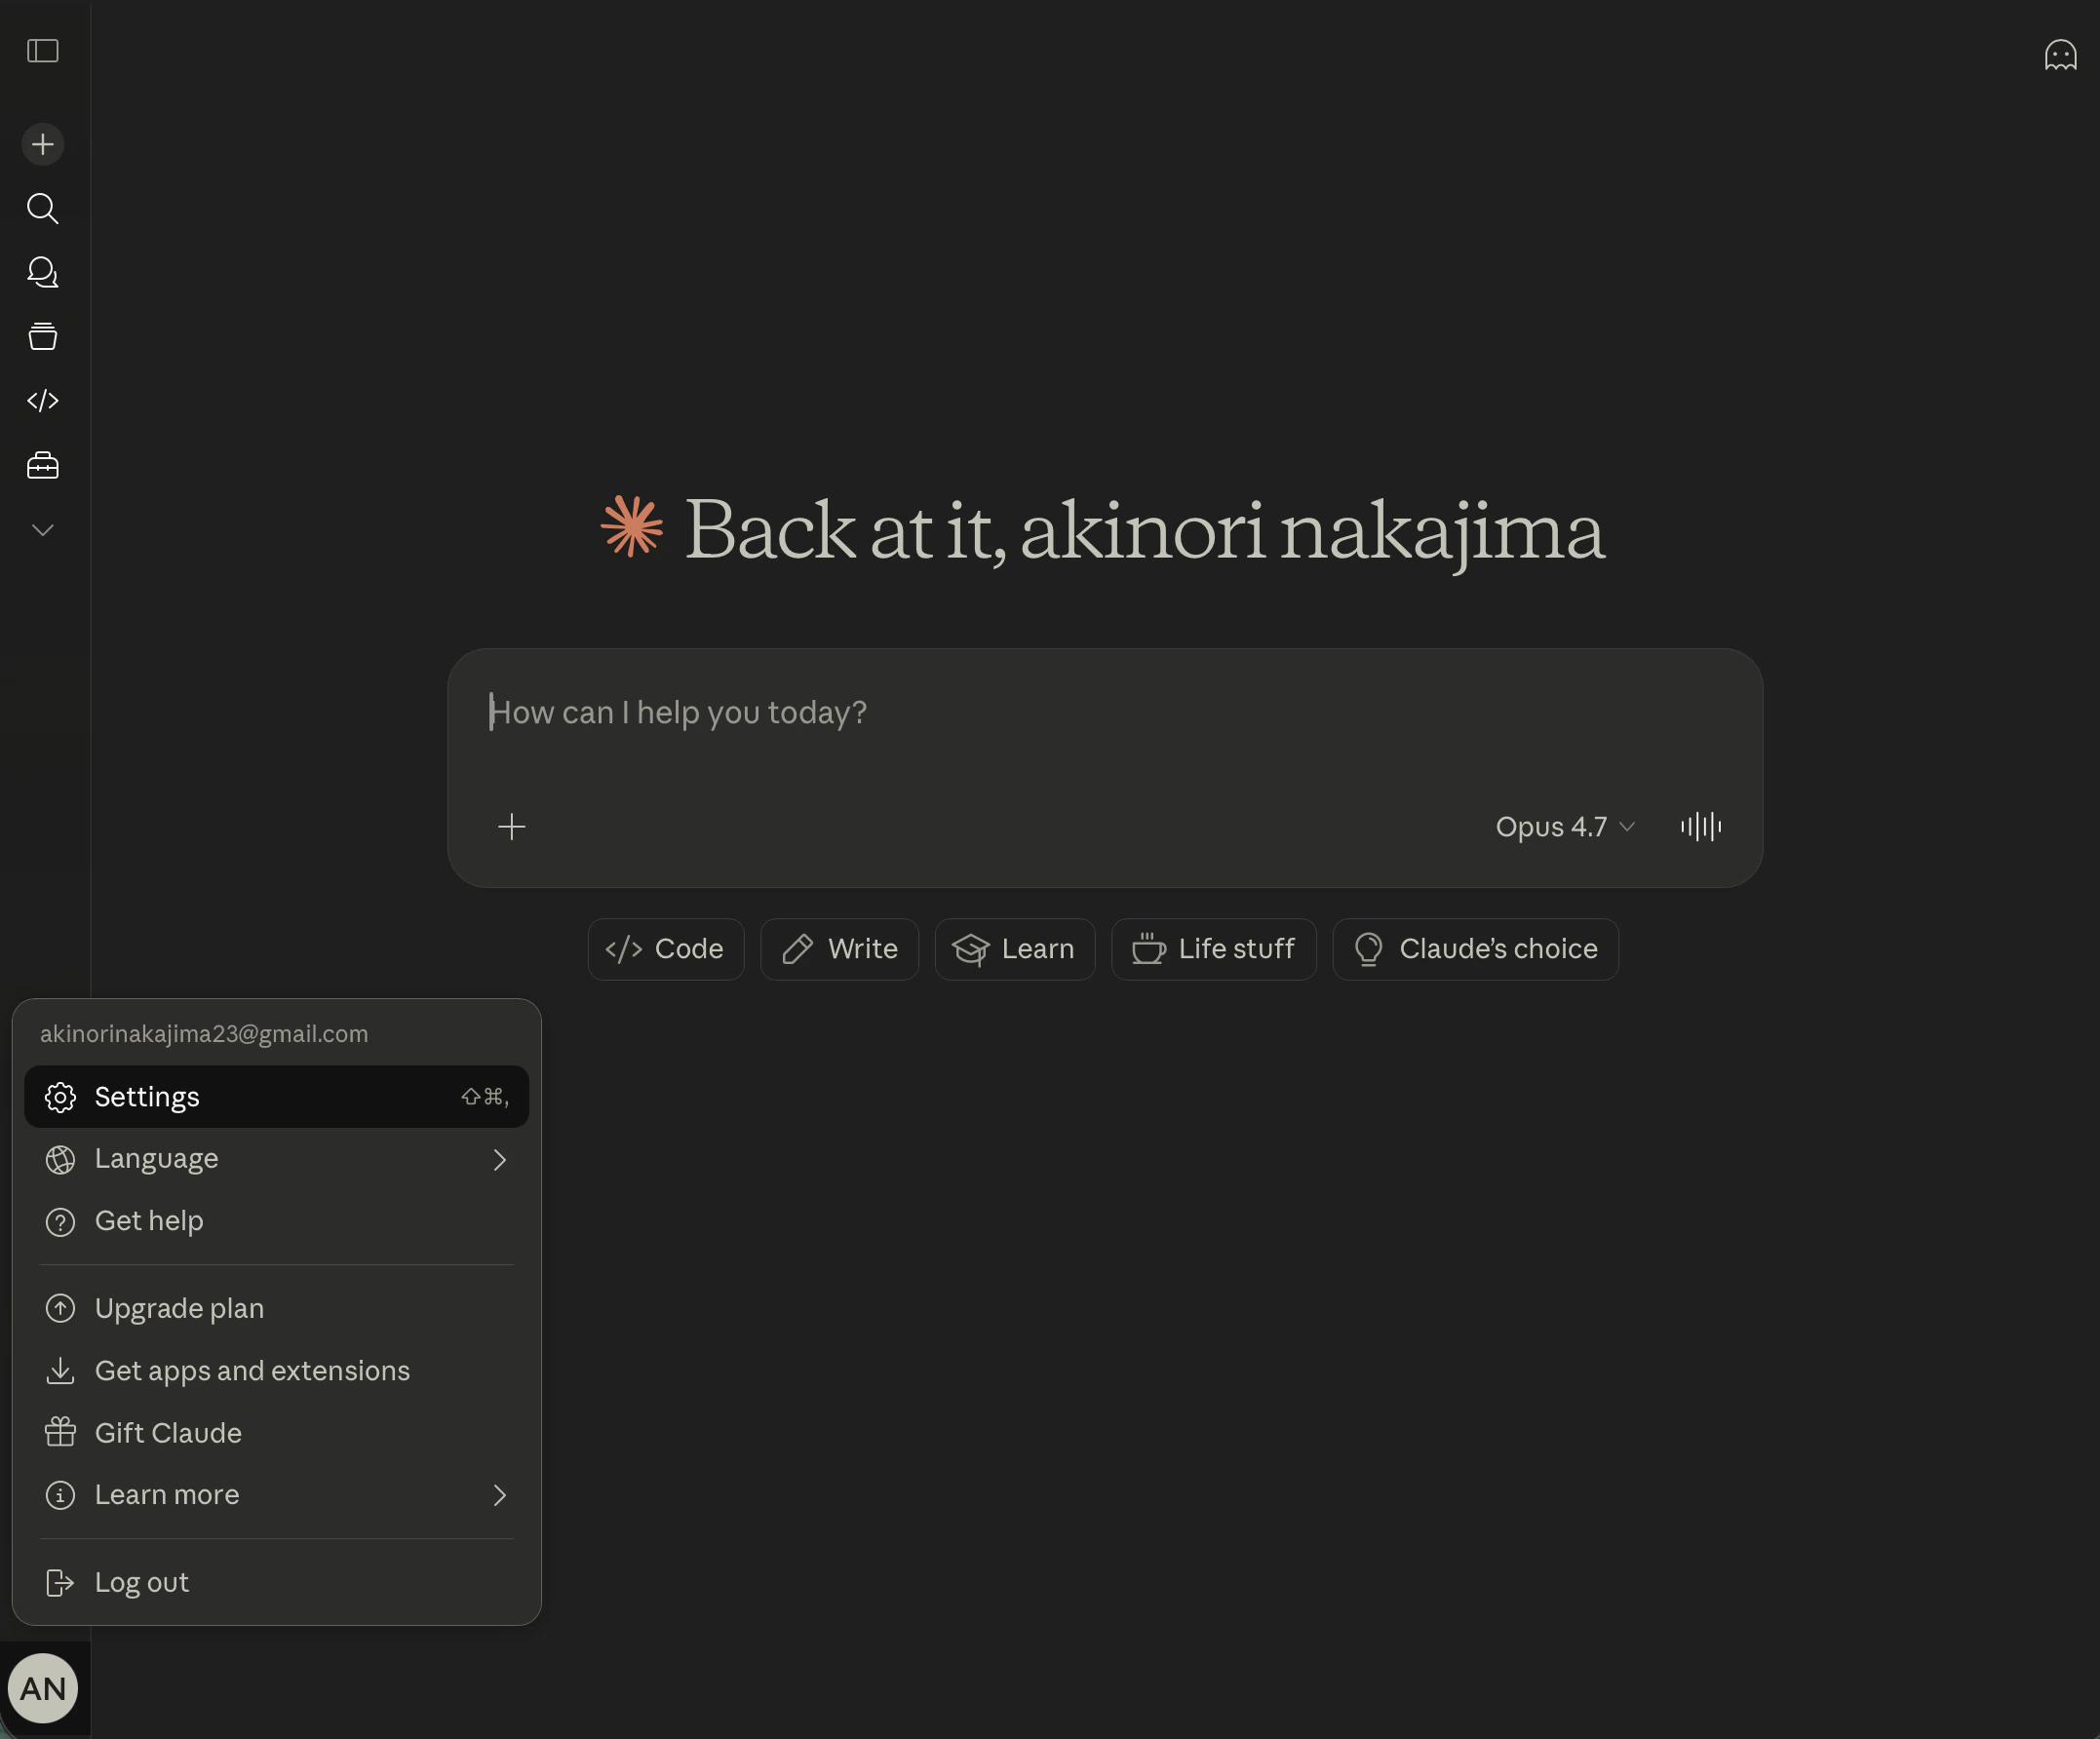
Click your account avatar in the bottom-left and choose **Settings**.
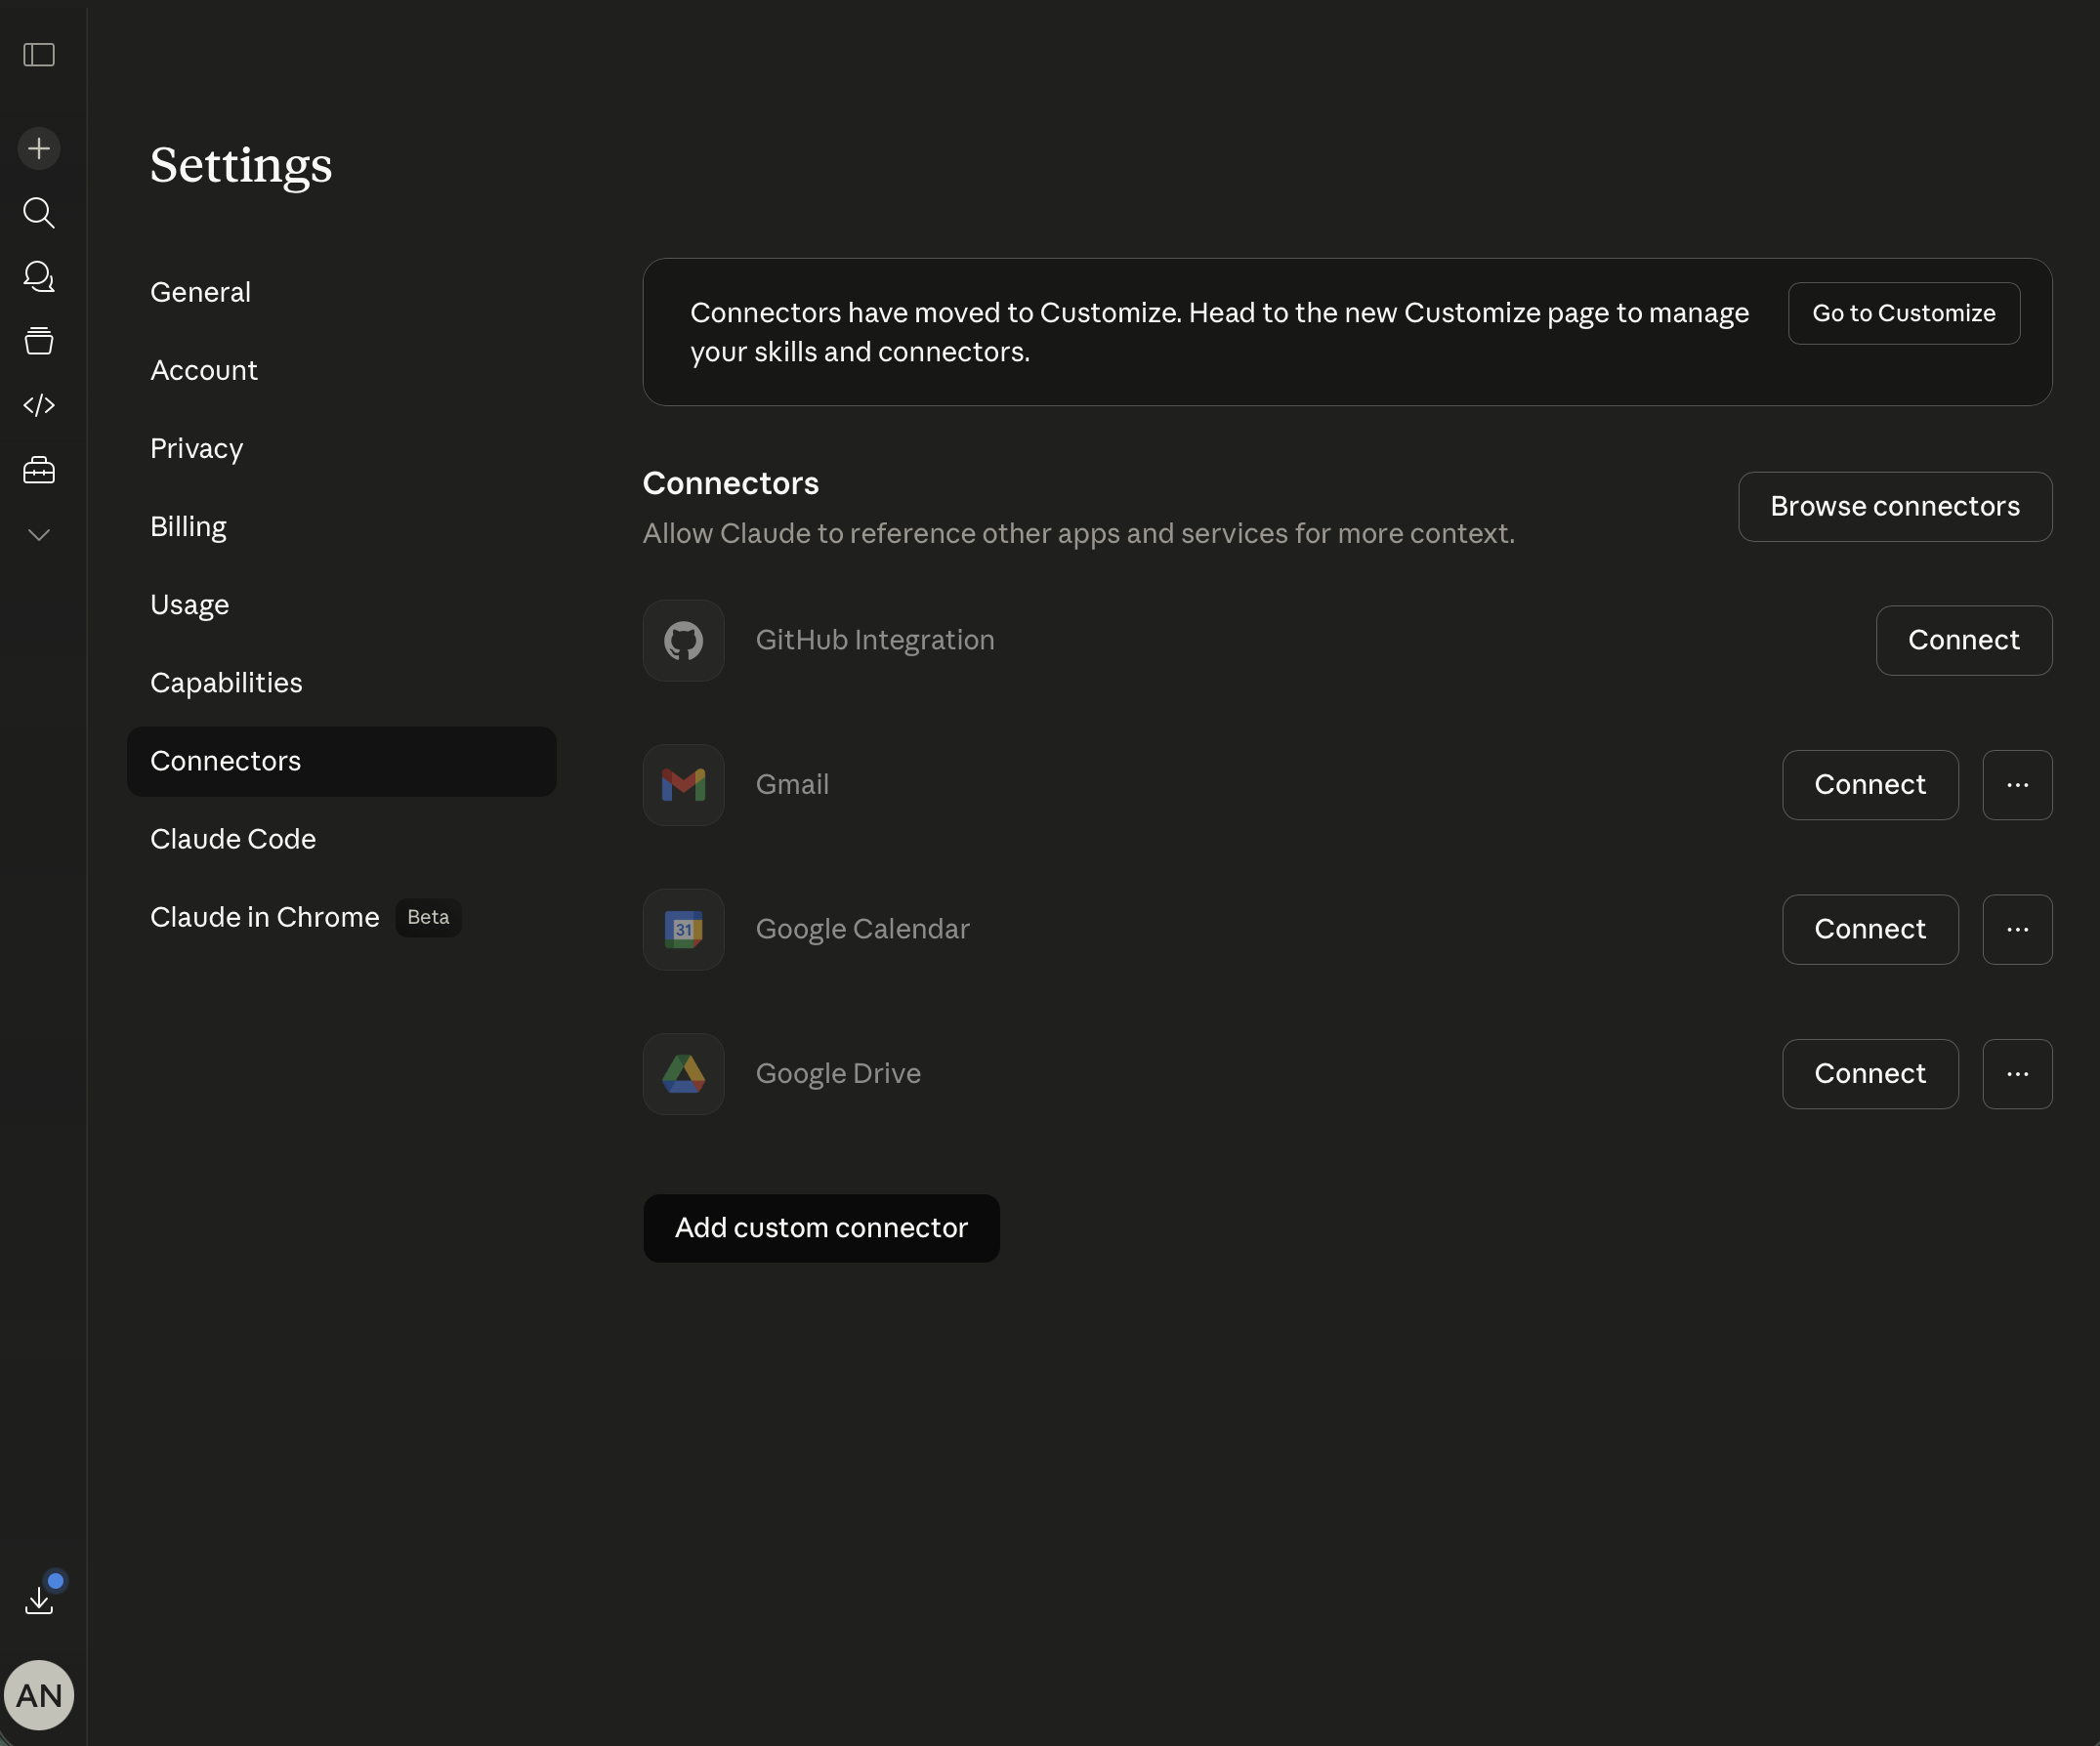
In Settings, open the **Connectors** tab. Scroll to the bottom and click **Add custom connector**.
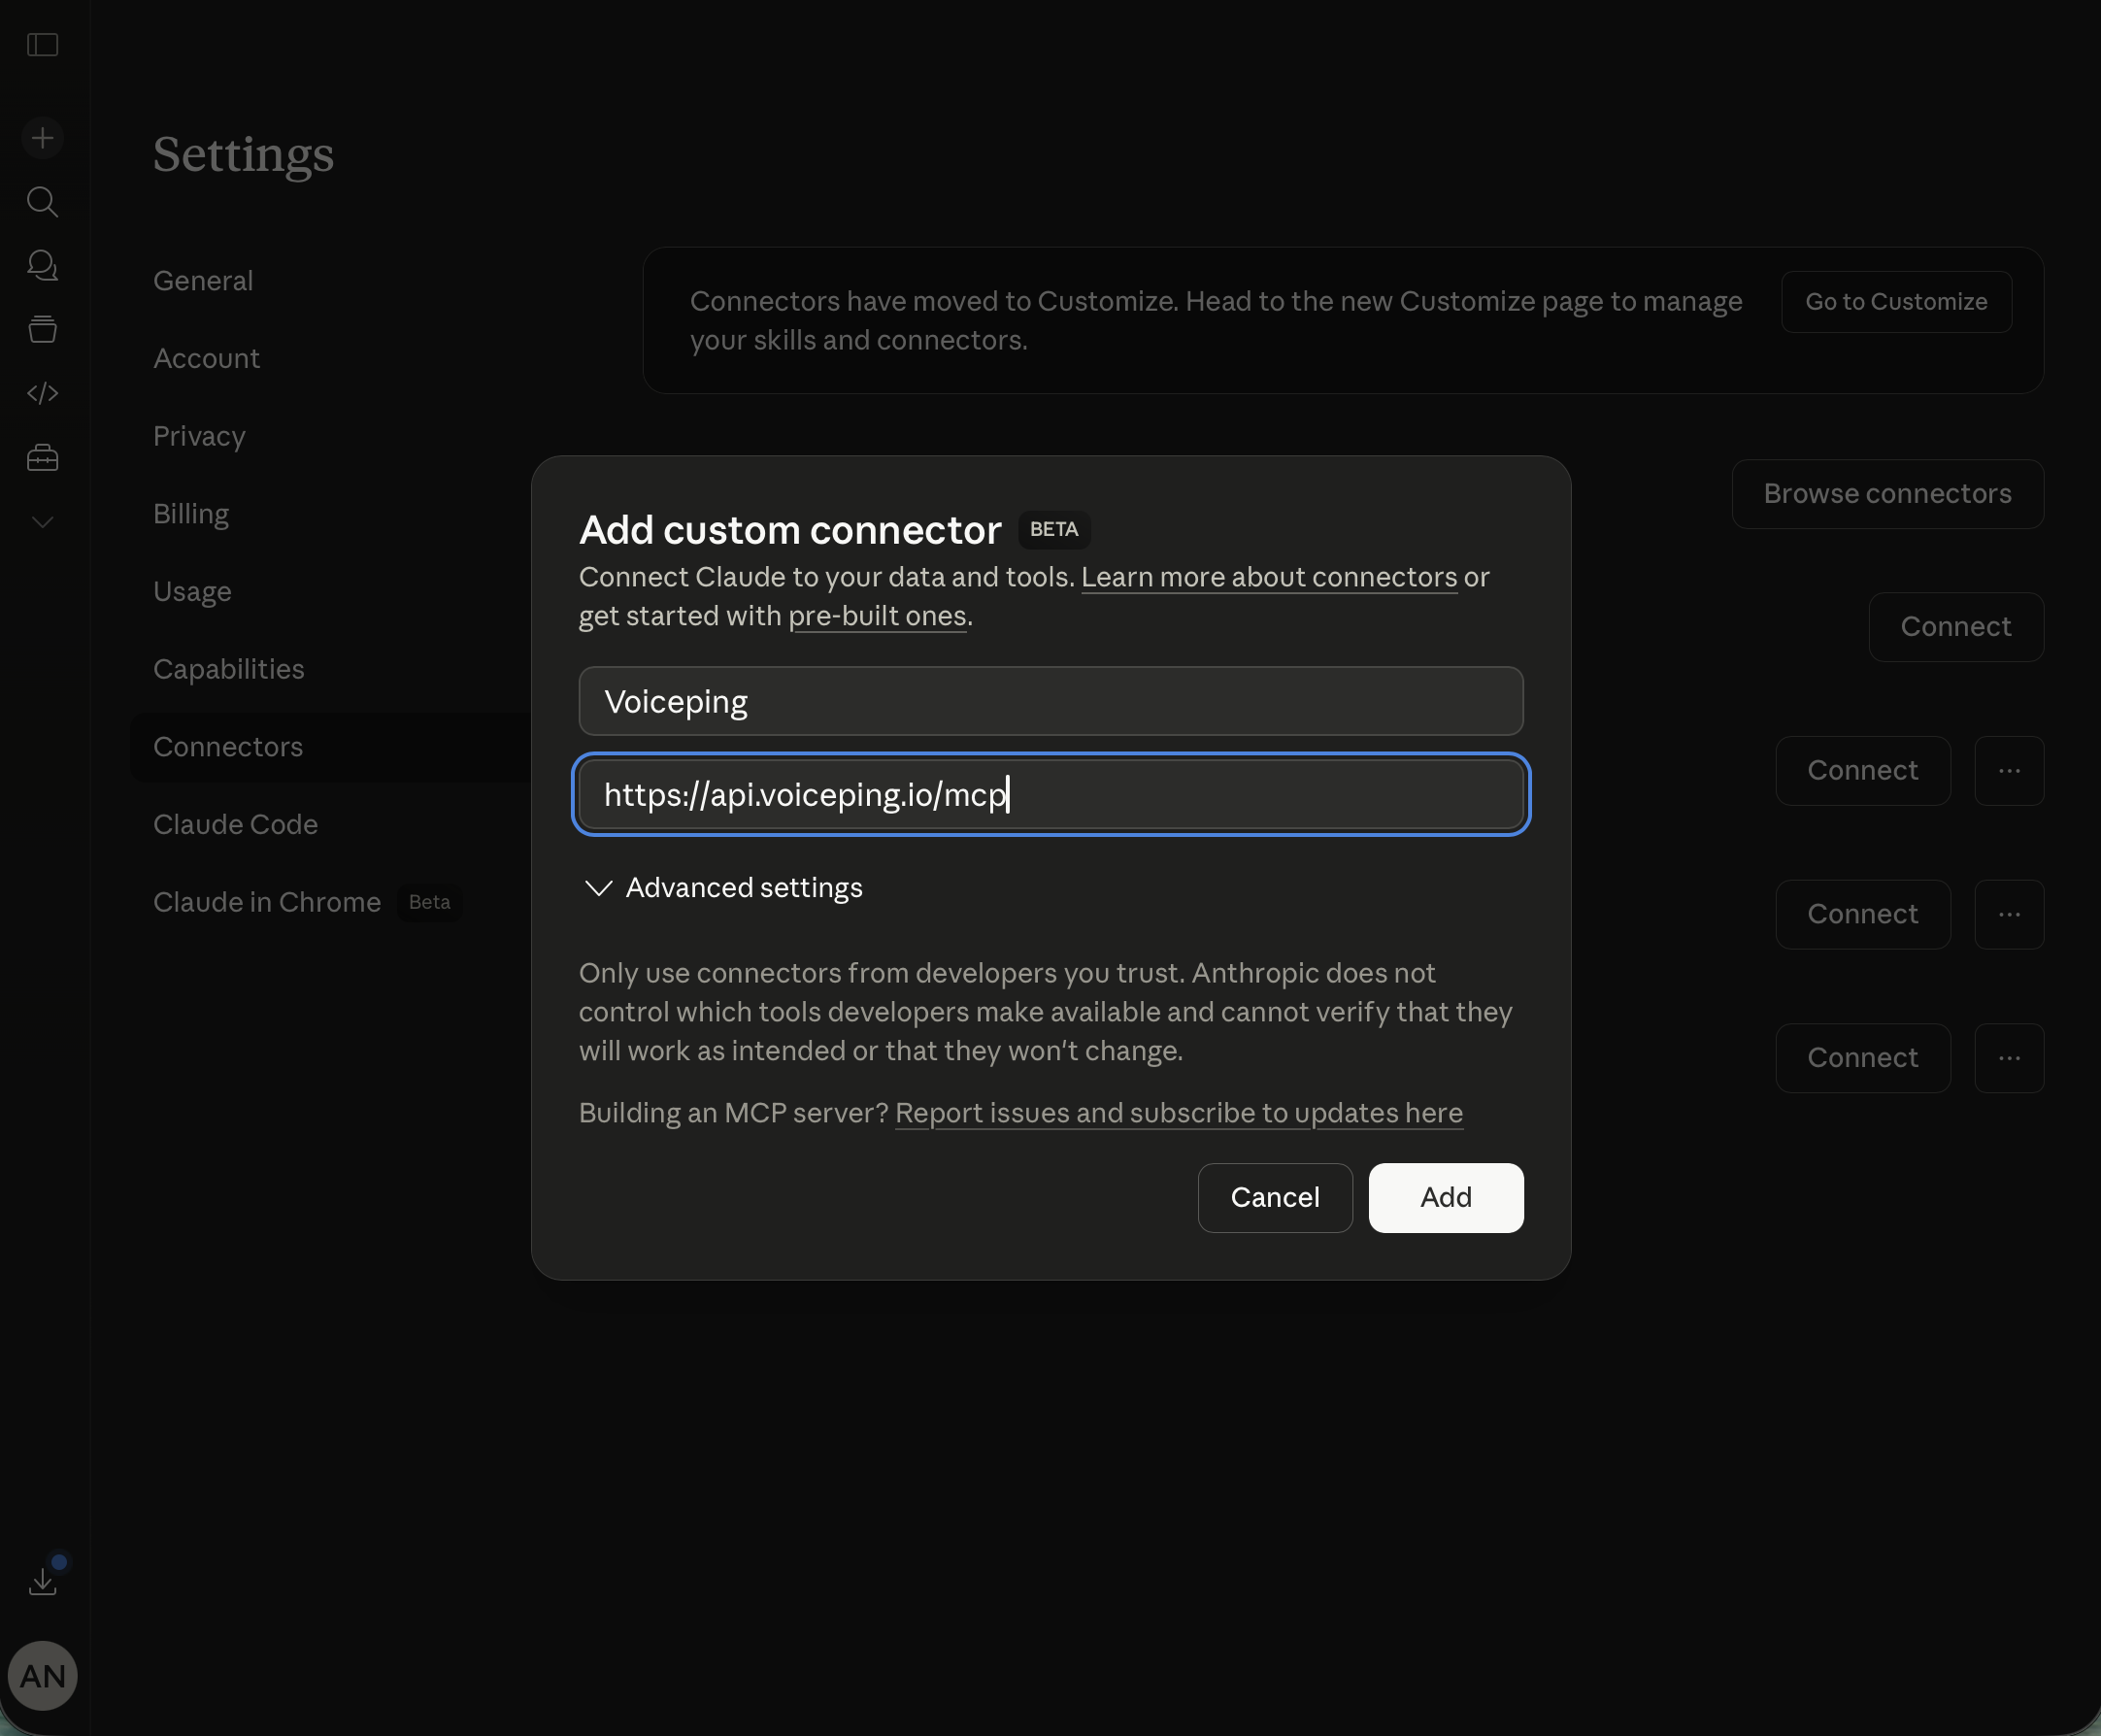
* **Name:** `Voiceping`
* **URL:** `https://api.voiceping.io/mcp`
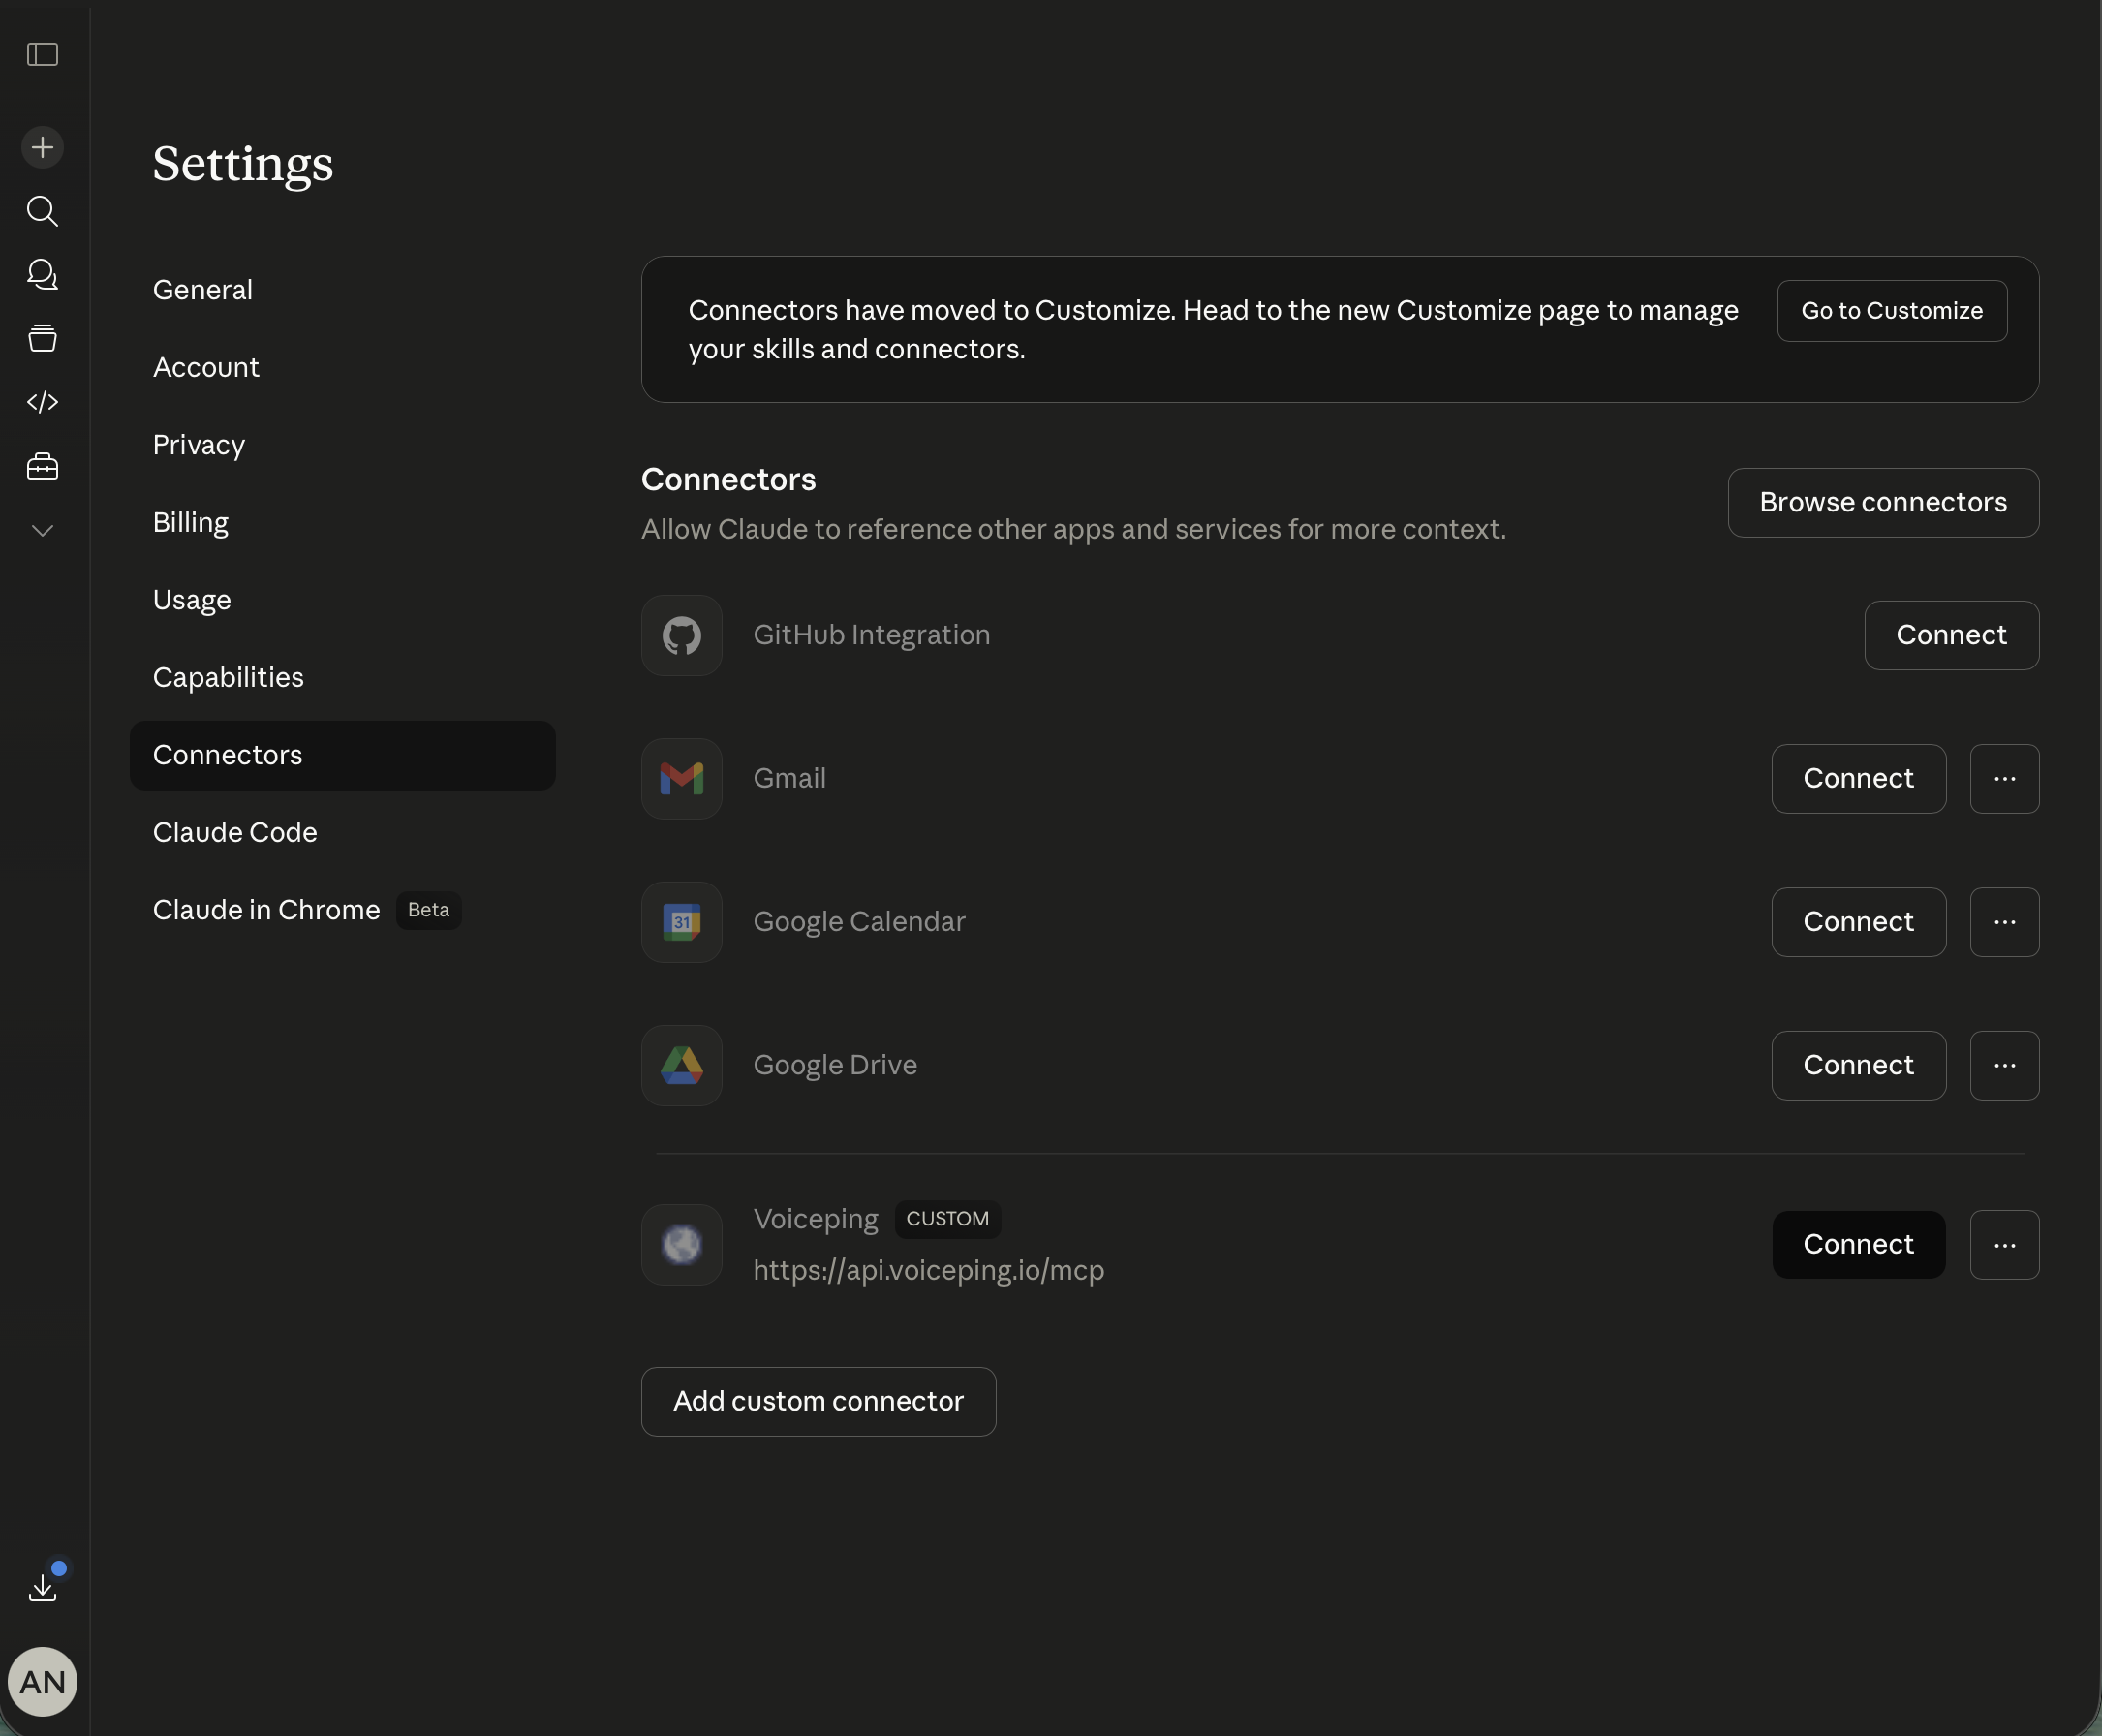
Click **Add**. Claude registers the connector but does not connect yet.
Unlike ChatGPT, Claude needs one extra click: find the new **Voiceping** entry in the connectors list and click **Connect** to start the OAuth flow. Approve the transcript scopes in your VoicePing workspace to finish.
For every other supported client, use its official guide:
| Client | Official MCP setup docs |
| -------------------------- | ---------------------------------------------------------------------------------------------------------------------------------------------------------------------------------------------------------------------------------------------------------------- |
| **Claude (Desktop / Web)** | [Getting started with MCP servers on Claude](https://support.claude.com/en/articles/10949351-getting-started-with-local-mcp-servers-on-claude-desktop) · [Remote MCP servers](https://platform.claude.com/docs/en/agents-and-tools/remote-mcp-servers) |
| **ChatGPT** | [Developer Mode and full MCP connectors in ChatGPT](https://help.openai.com/en/articles/12584461-developer-mode-apps-and-full-mcp-connectors-in-chatgpt-beta) · [Connect from ChatGPT — Apps SDK](https://developers.openai.com/apps-sdk/deploy/connect-chatgpt) |
| **Claude Code** | [Connect Claude Code to tools via MCP](https://code.claude.com/docs/en/mcp) |
| **Codex CLI** | [Model Context Protocol — Codex](https://developers.openai.com/codex/mcp) |
| **Gemini CLI** | [MCP servers with Gemini CLI](https://github.com/google-gemini/gemini-cli/blob/main/docs/tools/mcp-server.md) |
| **Other clients** | [modelcontextprotocol.io — Connect to servers](https://modelcontextprotocol.io/docs/develop/connect-local-servers) |
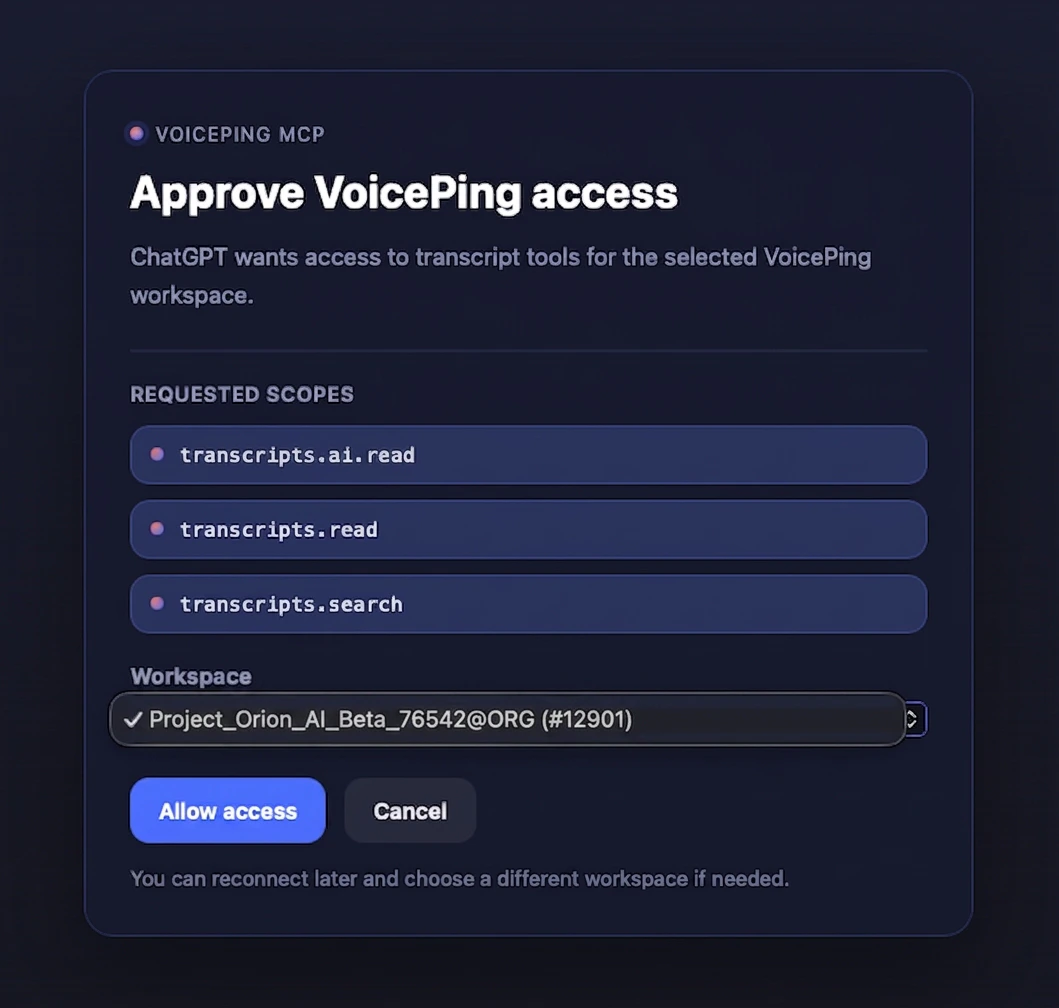
Sign in, select your VoicePing workspace, and approve the transcript scopes the client is requesting. Only the scopes you approve are granted.
Open your MCP-compatible AI client (Claude, ChatGPT, Codex, Claude Code, Gemini CLI, or another MCP tool) and add the VoicePing MCP server.
The VoicePing MCP server URL is:
```text theme={null}
https://api.voiceping.io/mcp
```
Expand the guide for your tool — ChatGPT and Claude are covered below with step-by-step screenshots. For other clients, use the official docs table that follows.
Prerequisite: ChatGPT Pro or Plus with **Developer Mode** enabled (Settings → Connectors → Advanced → Developer Mode).
In ChatGPT (Developer Mode), click your account avatar in the bottom-left and choose **Settings**.
In Settings, open the **Apps** tab, then under **Advanced settings** click **Create app**.
* **Name:** `Voiceping`
* **MCP Server URL:** `https://api.voiceping.io/mcp`
* **Authentication:** `OAuth`
* Tick the **"I understand and want to continue"** checkbox
* Click **Create**
ChatGPT will open the VoicePing OAuth flow automatically — approve the transcript scopes to finish the connection.
Works in Claude Desktop and Claude on the web.
Click your account avatar in the bottom-left and choose **Settings**.
In Settings, open the **Connectors** tab. Scroll to the bottom and click **Add custom connector**.
* **Name:** `Voiceping`
* **URL:** `https://api.voiceping.io/mcp`
Click **Add**. Claude registers the connector but does not connect yet.
Unlike ChatGPT, Claude needs one extra click: find the new **Voiceping** entry in the connectors list and click **Connect** to start the OAuth flow. Approve the transcript scopes in your VoicePing workspace to finish.
For every other supported client, use its official guide:
| Client | Official MCP setup docs |
| -------------------------- | ---------------------------------------------------------------------------------------------------------------------------------------------------------------------------------------------------------------------------------------------------------------- |
| **Claude (Desktop / Web)** | [Getting started with MCP servers on Claude](https://support.claude.com/en/articles/10949351-getting-started-with-local-mcp-servers-on-claude-desktop) · [Remote MCP servers](https://platform.claude.com/docs/en/agents-and-tools/remote-mcp-servers) |
| **ChatGPT** | [Developer Mode and full MCP connectors in ChatGPT](https://help.openai.com/en/articles/12584461-developer-mode-apps-and-full-mcp-connectors-in-chatgpt-beta) · [Connect from ChatGPT — Apps SDK](https://developers.openai.com/apps-sdk/deploy/connect-chatgpt) |
| **Claude Code** | [Connect Claude Code to tools via MCP](https://code.claude.com/docs/en/mcp) |
| **Codex CLI** | [Model Context Protocol — Codex](https://developers.openai.com/codex/mcp) |
| **Gemini CLI** | [MCP servers with Gemini CLI](https://github.com/google-gemini/gemini-cli/blob/main/docs/tools/mcp-server.md) |
| **Other clients** | [modelcontextprotocol.io — Connect to servers](https://modelcontextprotocol.io/docs/develop/connect-local-servers) |
Sign in, select your VoicePing workspace, and approve the transcript scopes the client is requesting. Only the scopes you approve are granted.
 You're connected. Open any of the five workflow pages linked above and copy-paste the first prompt.
***
## Next steps
Back to scopes, lifecycle controls, and event logs that apply to both MCP and API.
If a server (not a person) is fetching transcripts, use API Access with a bearer token instead.
You're connected. Open any of the five workflow pages linked above and copy-paste the first prompt.
***
## Next steps
Back to scopes, lifecycle controls, and event logs that apply to both MCP and API.
If a server (not a person) is fetching transcripts, use API Access with a bearer token instead.