> ## Documentation Index
> Fetch the complete documentation index at: https://manual.voiceping.net/llms.txt
> Use this file to discover all available pages before exploring further.
# Time Tracking Management (Work Limits, Screenshots, etc.)
> How to manage member working hours and configure capture features
export const FeedbackEn = () => <>
Have an idea or request about this feature? Send it to the team via Product Feedback.
Official Links
Visit our official website
Follow us on X
Like us on Facebook
Connect on LinkedIn
;
## What is Time Tracking
Time tracking is a feature that allows you to check which projects each member worked on, what tasks they performed, and how many hours they spent.
## How to Open the Time Tracking Settings
1. Open **Time Tracking Admin** from the left sidebar (managers only)
2. Click the **Timetracking Setting** tab
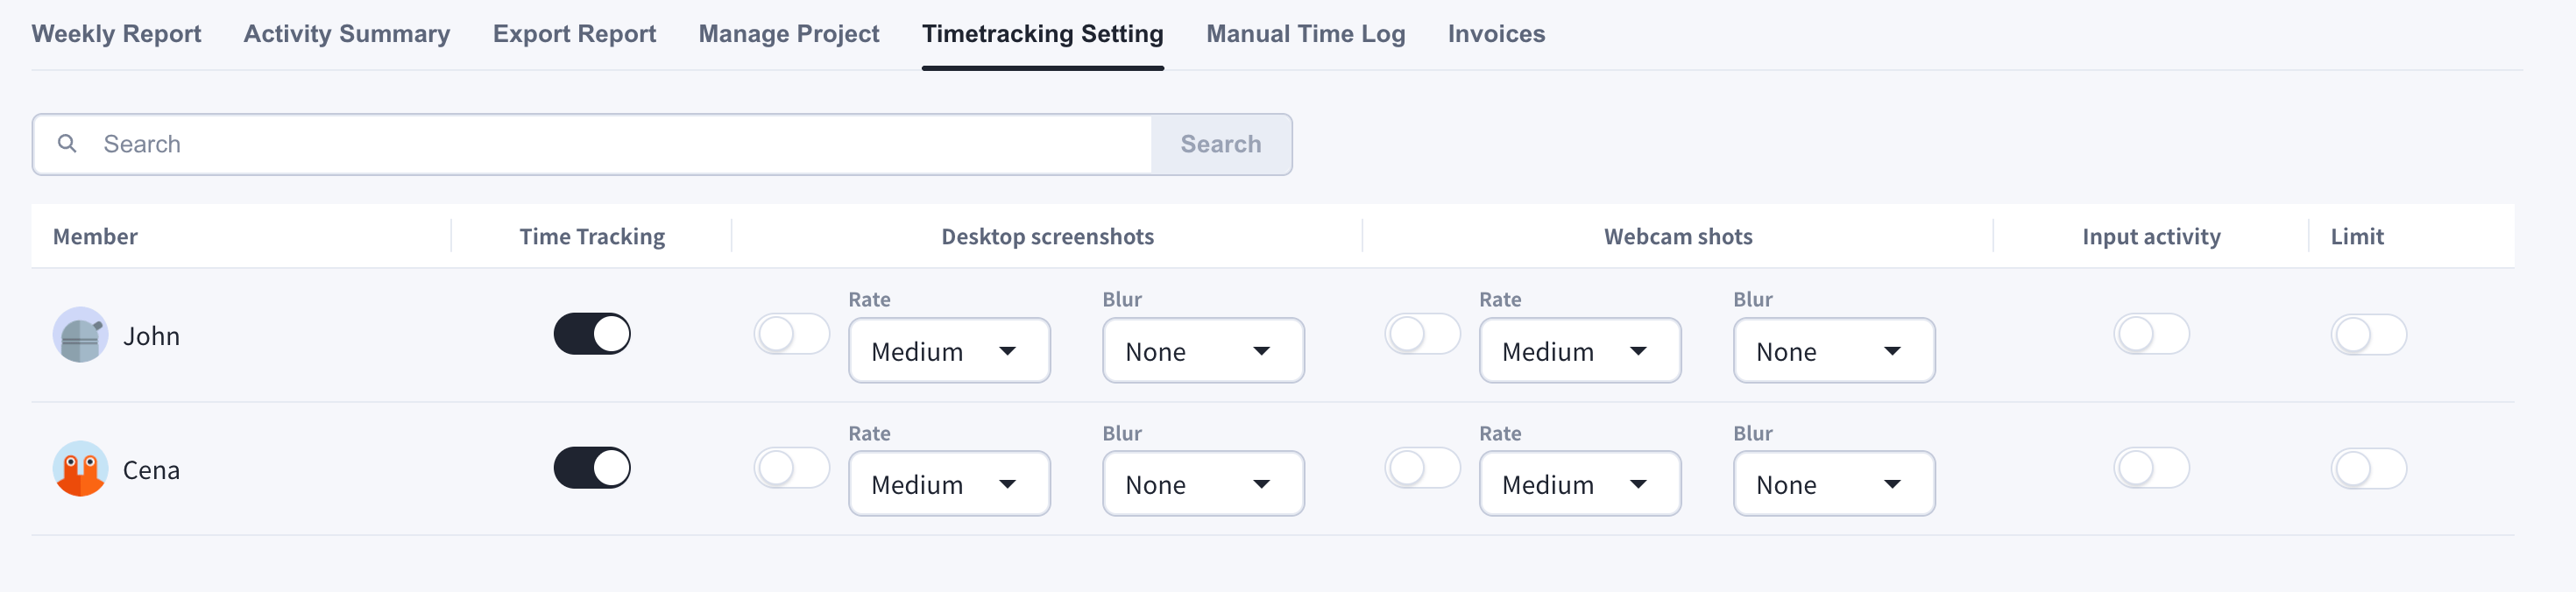 ## What You Can Configure per Member
### 1. Turn Member Time Tracking On/Off
Click the **Time Tracking** toggle for a member to turn the time tracking feature on or off.
### 2. Desktop Screenshots
When enabled, screenshots of the member's desktop are automatically saved while the work timer is running, and recorded in the work logs so each member's work status can be viewed at a glance. Multi-display setups are captured per screen.
* **Rate**: capture interval — Low (every 15 minutes), Medium (every 10 minutes, default), or High (every 5 minutes)
* **Blur**: privacy blur applied to captured images — None / Low / Medium / High
### 3. Webcam Shots
When enabled, webcam captures are saved at the configured rate while the member is tracking time. The member can choose which camera to use on their Time Tracking page. Webcam shots have their own **Rate** and **Blur** settings.
If webcam capture is turned on while a member is already tracking, capture can start immediately. Other capture setting changes apply from the next capture tick.
### 4. Input Activity
When enabled, keyboard and mouse activity levels are recorded for each time slot and shown in the Activity Summary, alongside screenshots.
### 5. Work Hours Limit
Click the **Limit** toggle to set limits on a member's working hours:
* Daily, weekly, and monthly hour caps
* Days of the week the member is allowed to work
* Working shifts (start/end times with timezone support)
This limit system makes it easy to manage team working hours.
## What the Captured Data Looks Like
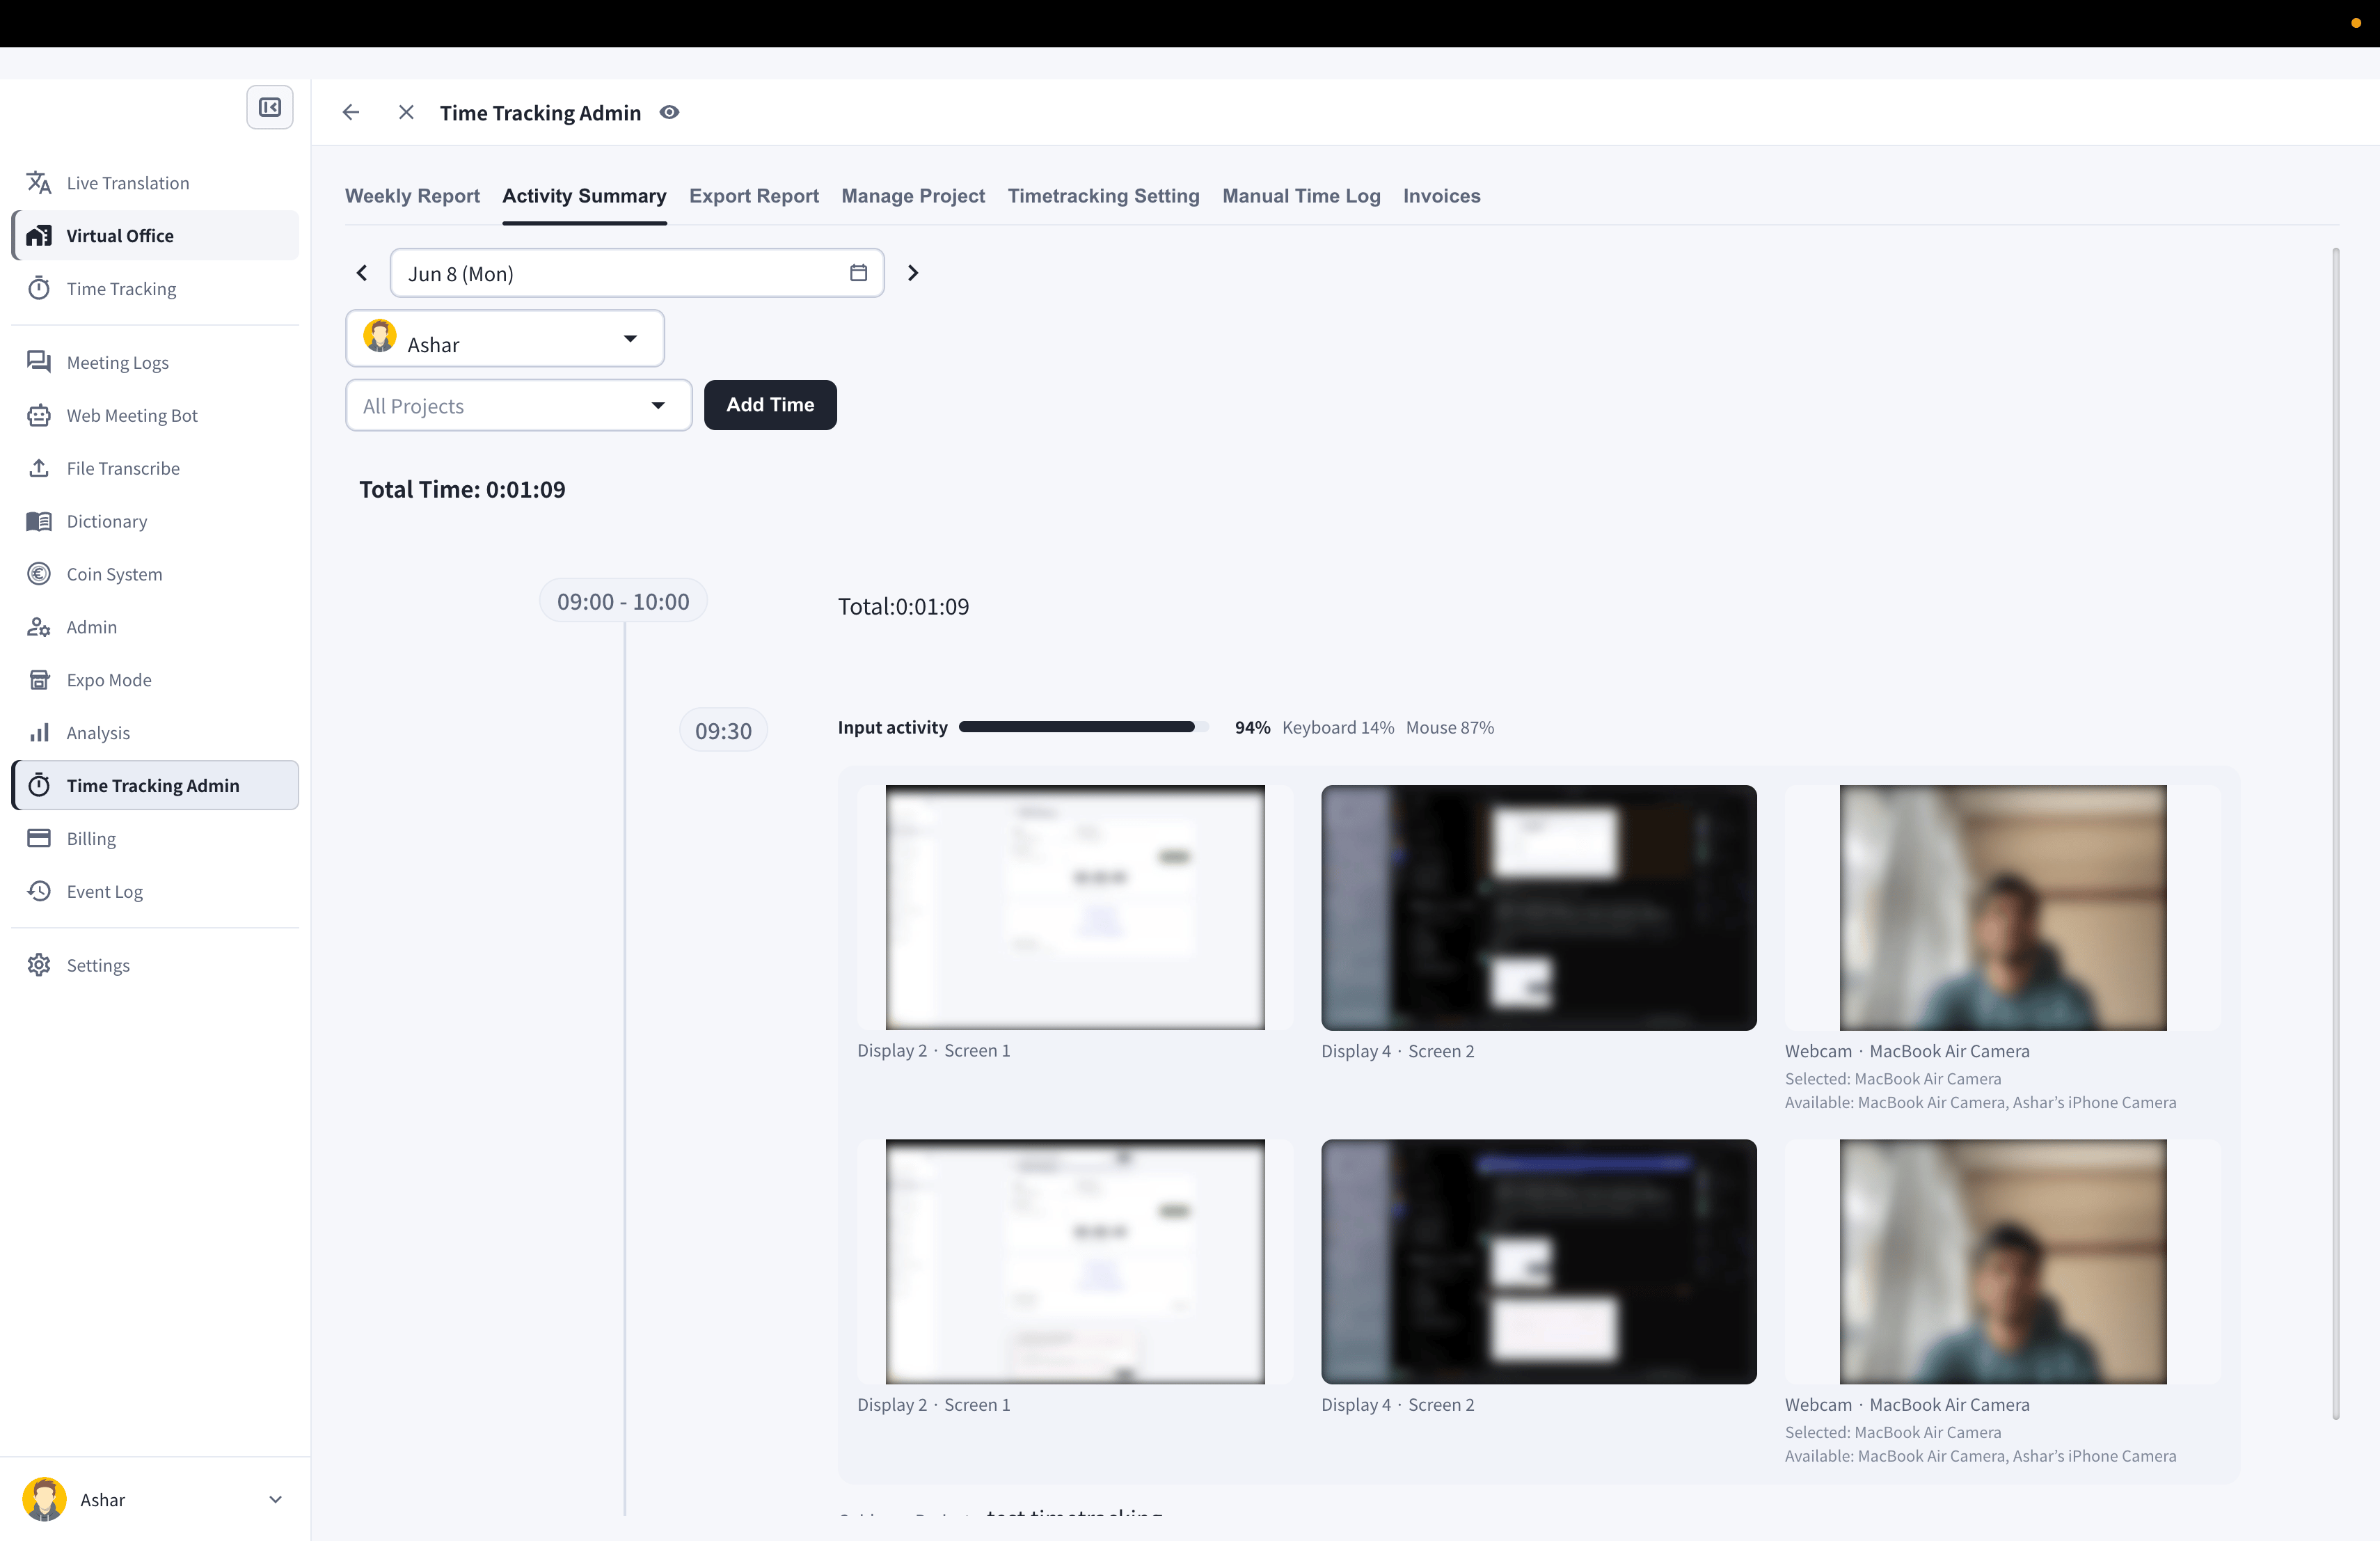
Captured screenshots, webcam shots, and input activity appear in the **Activity Summary** tab, organized in 10-minute slots:
## What You Can Configure per Member
### 1. Turn Member Time Tracking On/Off
Click the **Time Tracking** toggle for a member to turn the time tracking feature on or off.
### 2. Desktop Screenshots
When enabled, screenshots of the member's desktop are automatically saved while the work timer is running, and recorded in the work logs so each member's work status can be viewed at a glance. Multi-display setups are captured per screen.
* **Rate**: capture interval — Low (every 15 minutes), Medium (every 10 minutes, default), or High (every 5 minutes)
* **Blur**: privacy blur applied to captured images — None / Low / Medium / High
### 3. Webcam Shots
When enabled, webcam captures are saved at the configured rate while the member is tracking time. The member can choose which camera to use on their Time Tracking page. Webcam shots have their own **Rate** and **Blur** settings.
If webcam capture is turned on while a member is already tracking, capture can start immediately. Other capture setting changes apply from the next capture tick.
### 4. Input Activity
When enabled, keyboard and mouse activity levels are recorded for each time slot and shown in the Activity Summary, alongside screenshots.
### 5. Work Hours Limit
Click the **Limit** toggle to set limits on a member's working hours:
* Daily, weekly, and monthly hour caps
* Days of the week the member is allowed to work
* Working shifts (start/end times with timezone support)
This limit system makes it easy to manage team working hours.
## What the Captured Data Looks Like
Captured screenshots, webcam shots, and input activity appear in the **Activity Summary** tab, organized in 10-minute slots: