သင့် Backend မှ VoicePing Transcript များကို Query လုပ်ပါ
API Access သည် server-to-server workflow များအတွက်ဖြစ်သည် — အချိန်သတ်မှတ်ထားသော export များ၊ CRM sync, dashboard များ၊ compliance archive များ။ သင့် workspace တွင် API key တစ်ခု ဖန်တီးပြီး၊ scope အစုတစ်ခုကို ခွင့်ပြုပါ၊ ထို့နောက် သင့် backend သည် စံ bearer token ဖြင့် VoicePing API ကို ခေါ်ဆိုသည်။ လူတစ်ဦး က AI client မှတစ်ဆင့် မေးခွန်းမေးနေပါက ၎င်းအစား MCP Access ကို အသုံးပြုပါ။API Access ကို မည်သည့်အခါ အသုံးပြုမည်နည်း
| အသုံးပြုပုံ | ဥပမာ |
|---|---|
| အချိန်သတ်မှတ် export များ | သောကြာတိုင်း ဤအပတ်၏ transcript များကို export လုပ်ပါ |
| အတွင်းပိုင်း reporting | အပတ်စဉ် အစည်းအဝေးအကျဉ်း အစီရင်ခံစာ ဖန်တီးပါ |
| CRM သို့မဟုတ် PM workflow များ | transcript အကျဉ်းချုပ်များကို Salesforce သို့မဟုတ် Asana သို့ တွန်းထည့်ပါ |
| Compliance archive များ | အစည်းအဝေးမှတ်တမ်းများကို အတည်ပြုထားသော storage တွင် သိမ်းဆည်းပါ |
| Dashboard များ | transcript metadata ကို analytics system များသို့ ပေးပို့ပါ |
API key တစ်ခု ဖန်တီးပါ
- workspace settings → External Access → API Access ကို ဖွင့်ပါ။
- API Access Mode ဖွင့်ထားခြင်းမရှိပါက enable လုပ်ပါ။
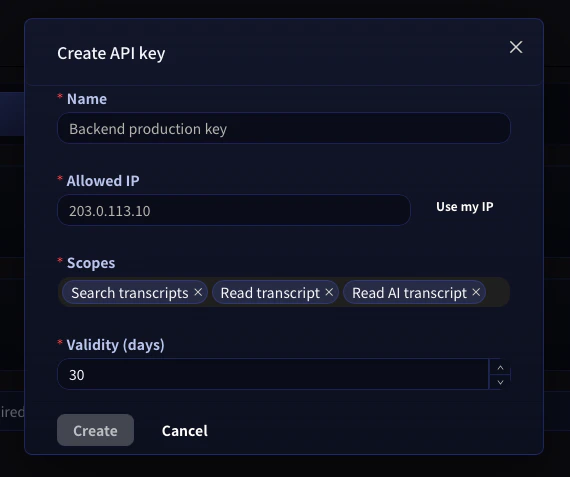
- Create API key ကို နှိပ်ပါ။
- အမည်တစ်ခု၊ ခွင့်ပြုထားသော IP address (အကြံပြု)၊ key အတွက် လိုအပ်သော scope များနှင့် သက်တမ်းကို ရွေးပါ။
- ထုတ်ပေးလိုက်သော key ကို ချက်ချင်း copy လုပ်ပြီး သင့် secret manager တွင် သိမ်းဆည်းပါ။ key အပြည့်အစုံကို တစ်ကြိမ်သာ ပြသမည်ဖြစ်သည်။
API key များကို ဘယ်တော့မှ commit မလုပ်ပါနှင့်။ ၎င်းတို့ကို environment variable သို့မဟုတ် သင့် secret manager တွင်သာ ထားရှိပါ။ လုံခြုံမှုပိုမိုရှိစေရန် key တစ်ခုစီကို create-key modal တွင် သီးခြား ခွင့်ပြုထားသော IP address တစ်ခုသို့ ချိတ်လိုက်ပါ — key ပေါက်ကြားသွားသော်လည်း အခြား IP မှ တောင်းဆိုမှုမှန်သမျှ ပယ်ချခံရမည်ဖြစ်သည်။
တောင်းဆိုမှုများကို အတည်ပြုခြင်း
တောင်းဆိုမှုတိုင်းသည်https://api.voiceping.io ကို bearer token ဖြင့် authenticate လုပ်သည်-
VOICEPING_API_KEY environment variable အဖြစ် တစ်ကြိမ်သာ သတ်မှတ်လိုက်ပါ — အောက်ပါ နမူနာများသည် ၎င်းကို အလိုအလျောက် ယူသုံးမည်ဖြစ်သည်။
Quickstart — သင်အသုံးပြုသော ဘာသာစကားဖြင့် API ကို ခေါ်ဆိုပါ
အဆင့်နှစ်ဆင့် flow တူညီသည် — transcript များကို ရှာပါ၊ ထို့နောက် တစ်ခုကို ဆွဲယူပါ — ဘာသာစကားလေးမျိုးဖြင့်။ TypeScript ကို ဦးစွာ ပြထားသည်။ သင့် stack အတွက် tab များကို ပြောင်းကြည့်ပါ။နောက်ထပ် အဆင့်များ
External Access ခြုံငုံမှု
MCP နှင့် API နှစ်ခုလုံးတွင် သက်ရောက်သော scope များ၊ lifecycle ထိန်းချုပ်မှုများနှင့် event log များသို့ ပြန်သွားပါ။
AI client များအတွက် MCP Access
Claude, ChatGPT, Codex, Claude Code သို့မဟုတ် Gemini CLI မှတစ်ဆင့် လူတစ်ဦးက မေးခွန်းမေးနေပါက ၎င်းအစား MCP Access ကို အသုံးပြုပါ။