
သင့် AI Client ကို VoicePing Transcript များသို့ ချိတ်ဆက်ပါ
MCP Access သည် သင့် VoicePing workspace ကို MCP နှင့် တွဲဖက်အသုံးပြုနိုင်သော မည်သည့် AI client မဆို ဖတ်ယူနိုင်သော data source တစ်ခုအဖြစ် ပြောင်းလဲပေးသည်။ တစ်ကြိမ်သာ ချိတ်ဆက်ပြီး scope များကို ခွင့်ပြုလိုက်ရုံဖြင့်၊ ပုံမှန်အားဖြင့် transcript များကို ကိုယ်တိုင်ဖွင့်ကြည့်ပြီး ဖြေရှင်းရမည့် မေးခွန်းမှန်သမျှကို chat တွင် မေးရုံသာလိုတော့သည်။ ဤစာမျက်နှာသည် setup ကိုသာ ဖော်ပြထားသည်။ ချိတ်ဆက်ပြီးသည်နှင့် copy-paste လုပ်နိုင်သော prompt flow များအတွက် အောက်ပါ workflow စာမျက်နှာများကို ကြည့်ပါ-Client-ready agenda ရေးဆွဲပါ
customer တစ်ဦးနှင့် လွန်ခဲ့သော အစည်းအဝေး 3–4 ခုကို အချိန်ကန့်သတ် agenda တစ်ခုအဖြစ် ပြောင်းပါ။
အစည်းအဝေးတစ်ခုမှ proposal မူကြမ်း ရေးပါ
ရည်မှန်းချက်များ၊ အခက်အခဲများ၊ timeline ကို ထုတ်ယူ — executive-ready proposal မူကြမ်း ထုတ်လုပ်ပါ။
30 စက္ကန့်အတွင်း follow-up email ပို့ပါ
ဆုံးဖြတ်ချက်များကို ပြန်လည်ဖော်ပြပါ၊ ပိုင်ရှင်များ သတ်မှတ်ပါ၊ ပရော်ဖက်ရှင်နယ်ဆန်သော follow-up တစ်ခုကို ပို့ပါ။
အဖွဲ့ KPI များကို အဖွဲ့ဝင်များအတွင်း ခြေရာခံပါ
အဖွဲ့ဝင်အစုတစ်စုက လုပ်ဆောင်သော အစည်းအဝေးတိုင်းကို ဆွဲထုတ်ပြီး KPI အစီရင်ခံစာ ထုတ်လုပ်ပါ။
deal များတွင် အဟန့်အတား များကို ရှာဖွေပါ
ထပ်ခါထပ်ခါ ပေါ်လာသော အတားအဆီးများကို ဖော်ထုတ်ပြီး ဦးစားပေးသော လုပ်ဆောင်ချက်အစီအစဉ်တစ်ခု ထုတ်လုပ်ပါ။
MCP Access ကို မည်ကဲ့သို့ ဖွင့်မည်နည်း
သင့် VoicePing workspace တွင် MCP Access ကို တစ်ကြိမ်သာ ဖွင့်ရန် လိုအပ်ပြီး၊ ထို့နောက် သင်ရွေးချယ်သော AI client သို့ ချိတ်ဆက်ရန်ဖြစ်သည်။VoicePing တွင် MCP Access ကို ဖွင့်ပါ
workspace settings → External Access ကို ဖွင့်ပြီး MCP Access ကို enable လုပ်ပါ။ ချိတ်ဆက်လာသော client တိုင်း ပေါ်လာမည့် active connection ဧရိယာကို သင်တွေ့ရမည်။
သင့် AI Client ကို ချိတ်ဆက်ပါ
သင်၏ MCP နှင့် တွဲဖက်အသုံးပြုနိုင်သော AI client (Claude, ChatGPT, Codex, Claude Code, Gemini CLI, သို့မဟုတ် အခြား MCP tool) ကို ဖွင့်ပြီး VoicePing MCP server ကို ထည့်ပါ။VoicePing MCP server URL မှာ-သင့် tool အတွက် လမ်းညွှန်ချက်ကို ချဲ့ကြည့်ပါ — ChatGPT နှင့် Claude ကို အဆင့်ဆင့် screenshot များဖြင့် အောက်တွင် ဖော်ပြထားသည်။ အခြား client များအတွက် နောက်ပါ တရားဝင် docs ဇယားကို အသုံးပြုပါ။
ပံ့ပိုးပေးထားသော အခြား client တိုင်းအတွက် ၎င်းတို့၏ တရားဝင်လမ်းညွှန်ကို အသုံးပြုပါ-
ChatGPT — VoicePing ကို custom MCP app အဖြစ် ထည့်ပါ
ChatGPT — VoicePing ကို custom MCP app အဖြစ် ထည့်ပါ
လိုအပ်ချက်- ChatGPT Pro သို့မဟုတ် Plus တွင် Developer Mode ဖွင့်ထားခြင်း (Settings → Connectors → Advanced → Developer Mode)။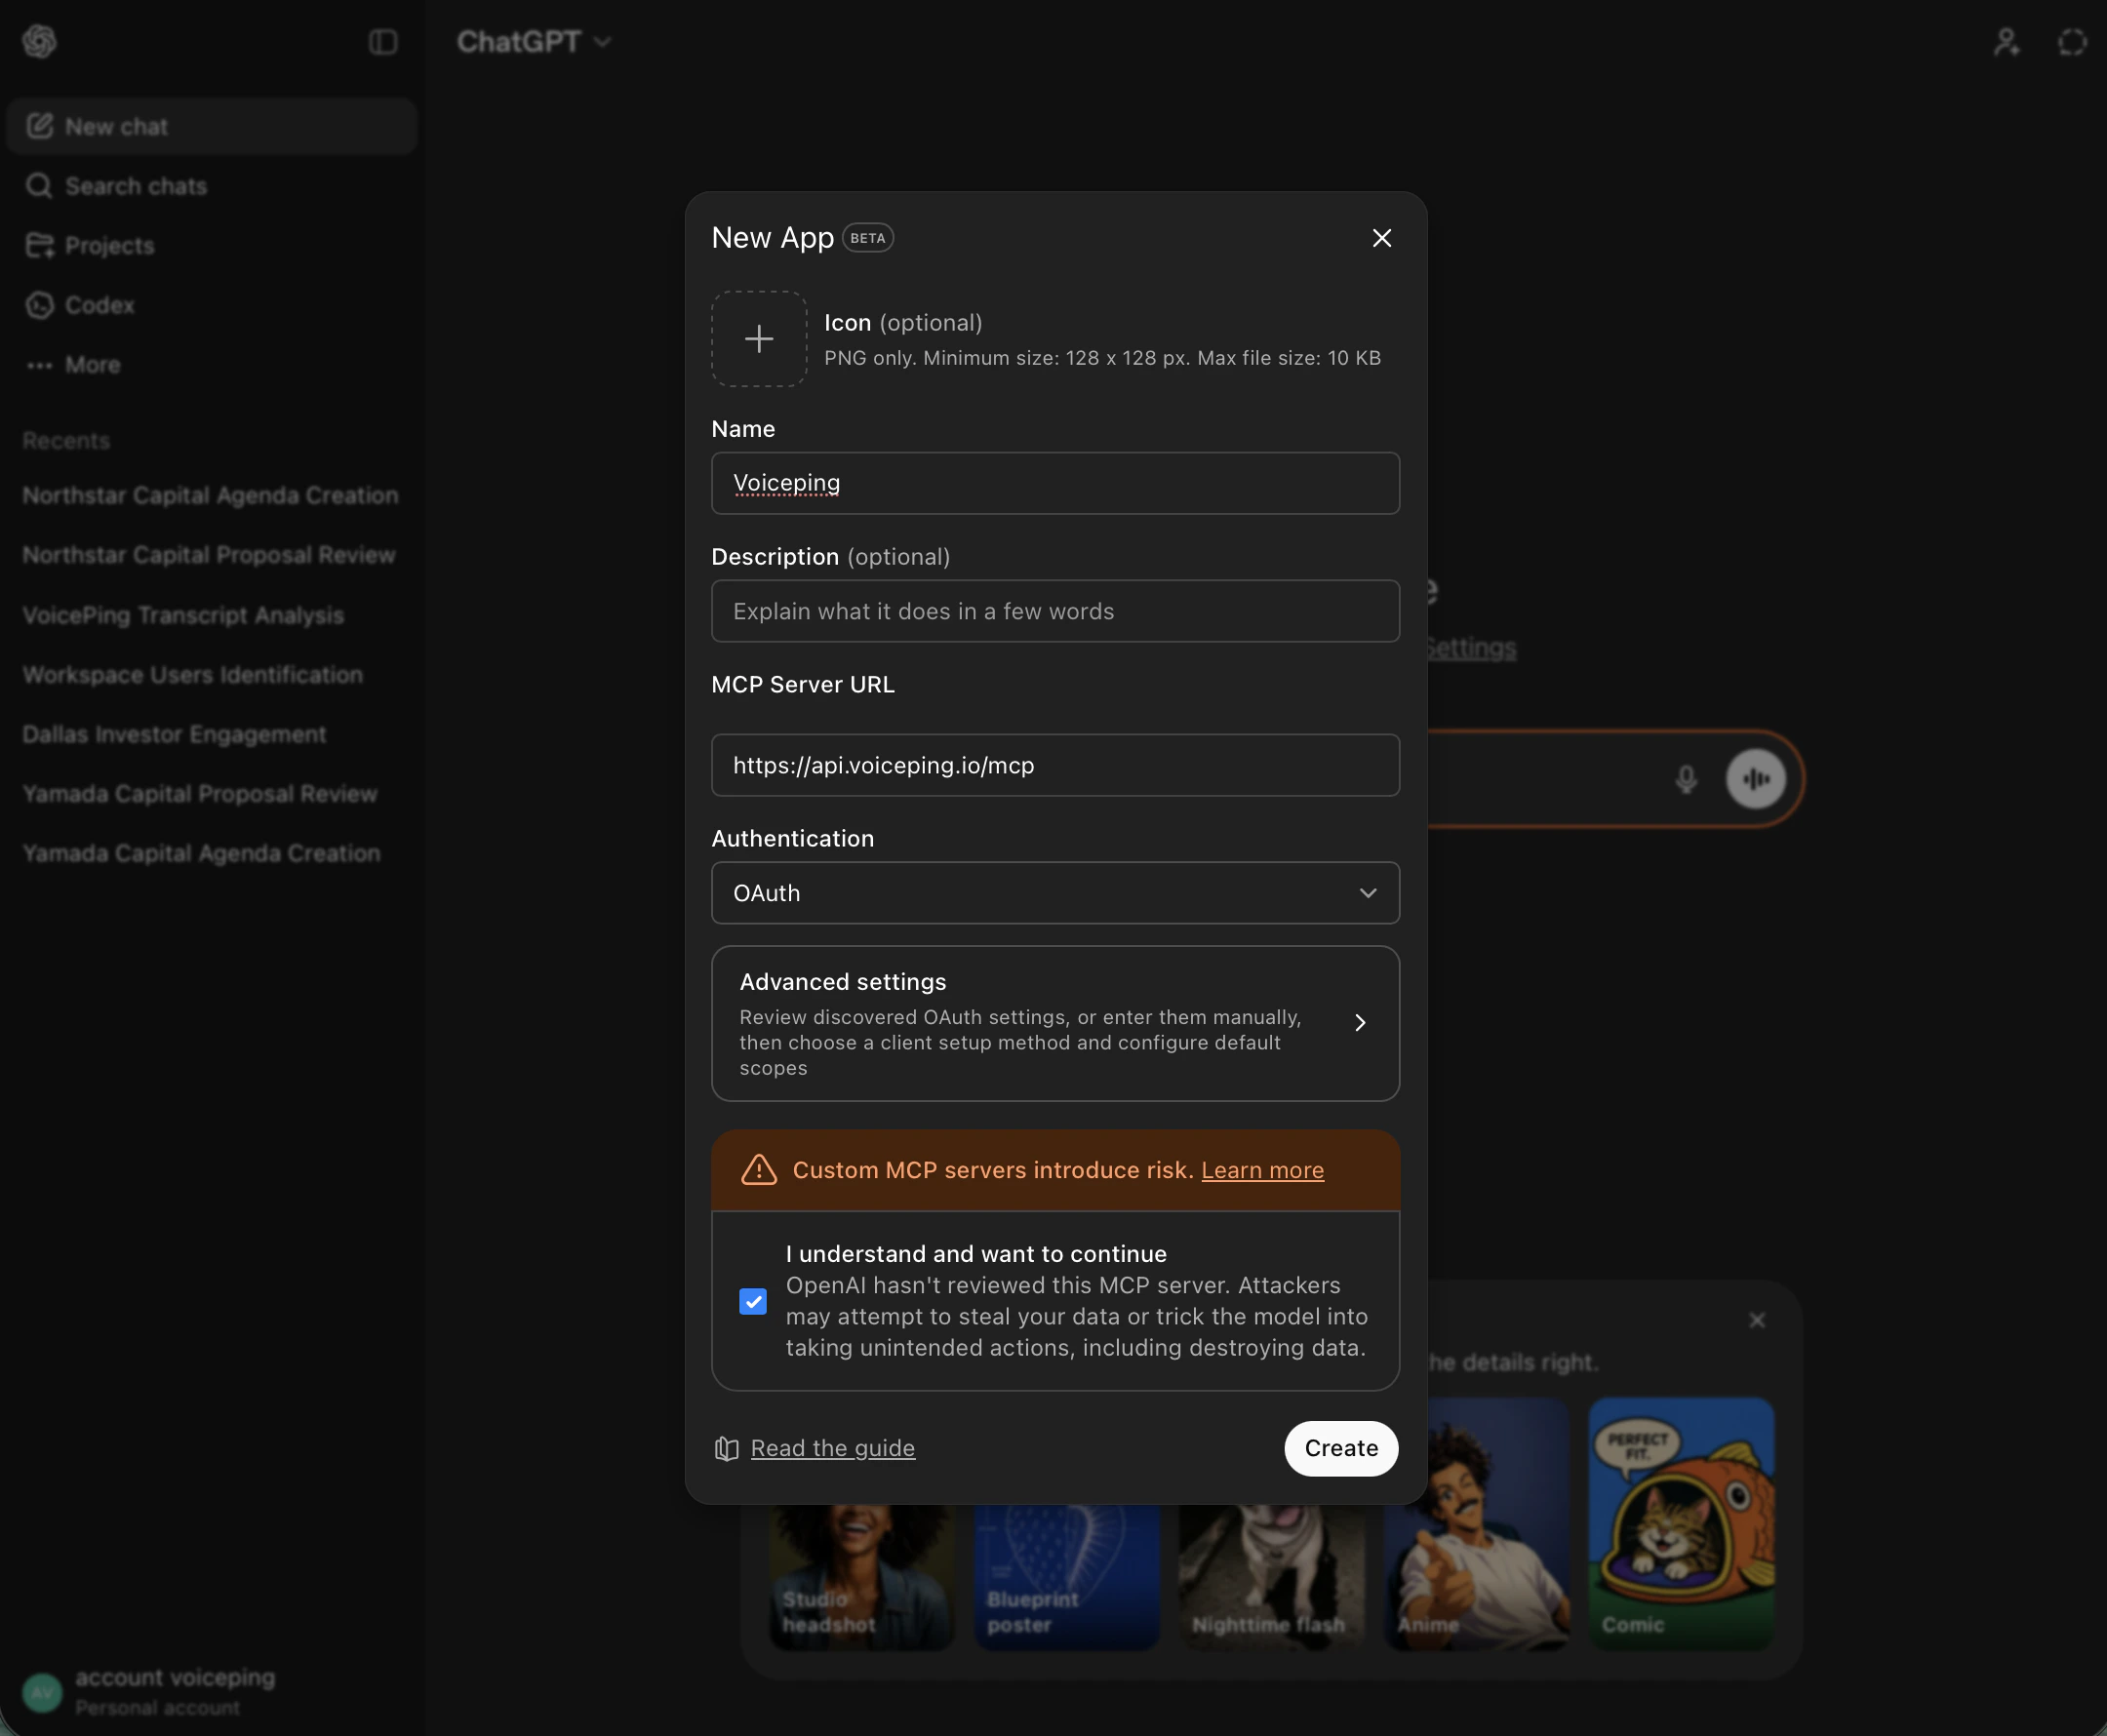
account menu မှ Settings ကို ဖွင့်ပါ
ChatGPT (Developer Mode) တွင် အောက်ဘယ်ဖက်ရှိ သင့် account avatar ကို နှိပ်ပြီး Settings ကို ရွေးပါ။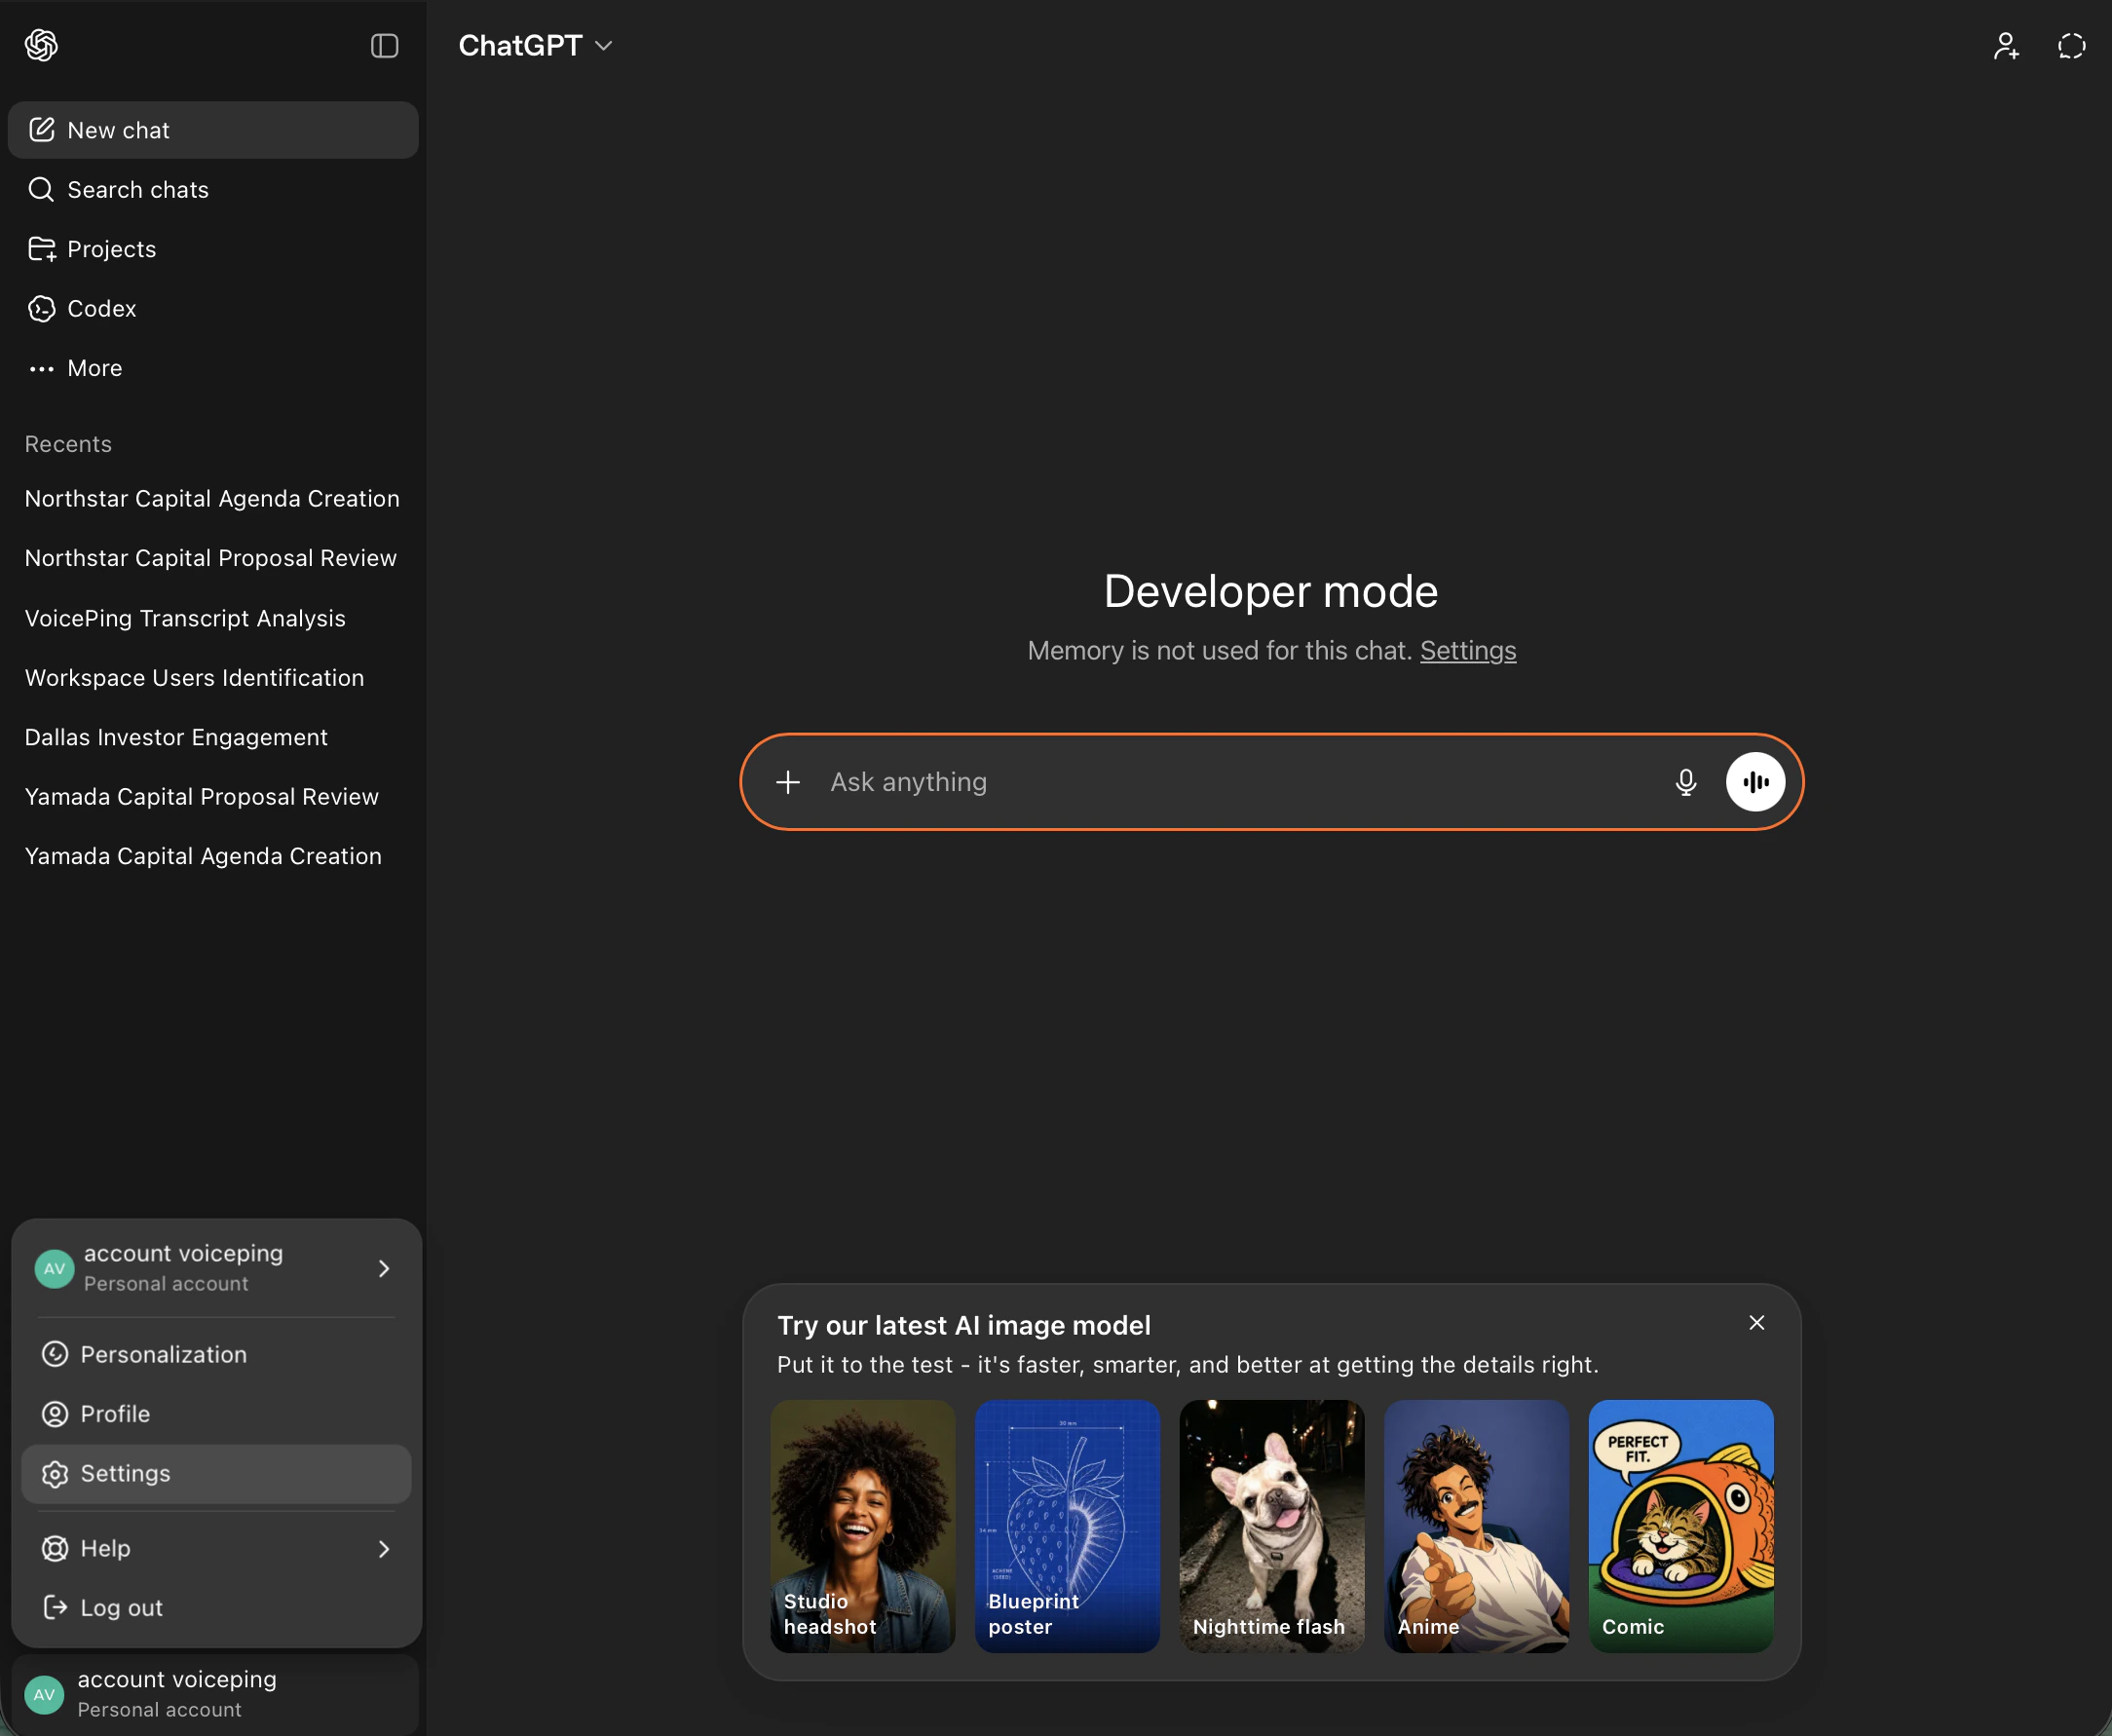
Apps → Create app သို့ သွားပါ
Settings တွင် Apps tab ကို ဖွင့်ပြီး၊ Advanced settings အောက်ရှိ Create app ကို နှိပ်ပါ။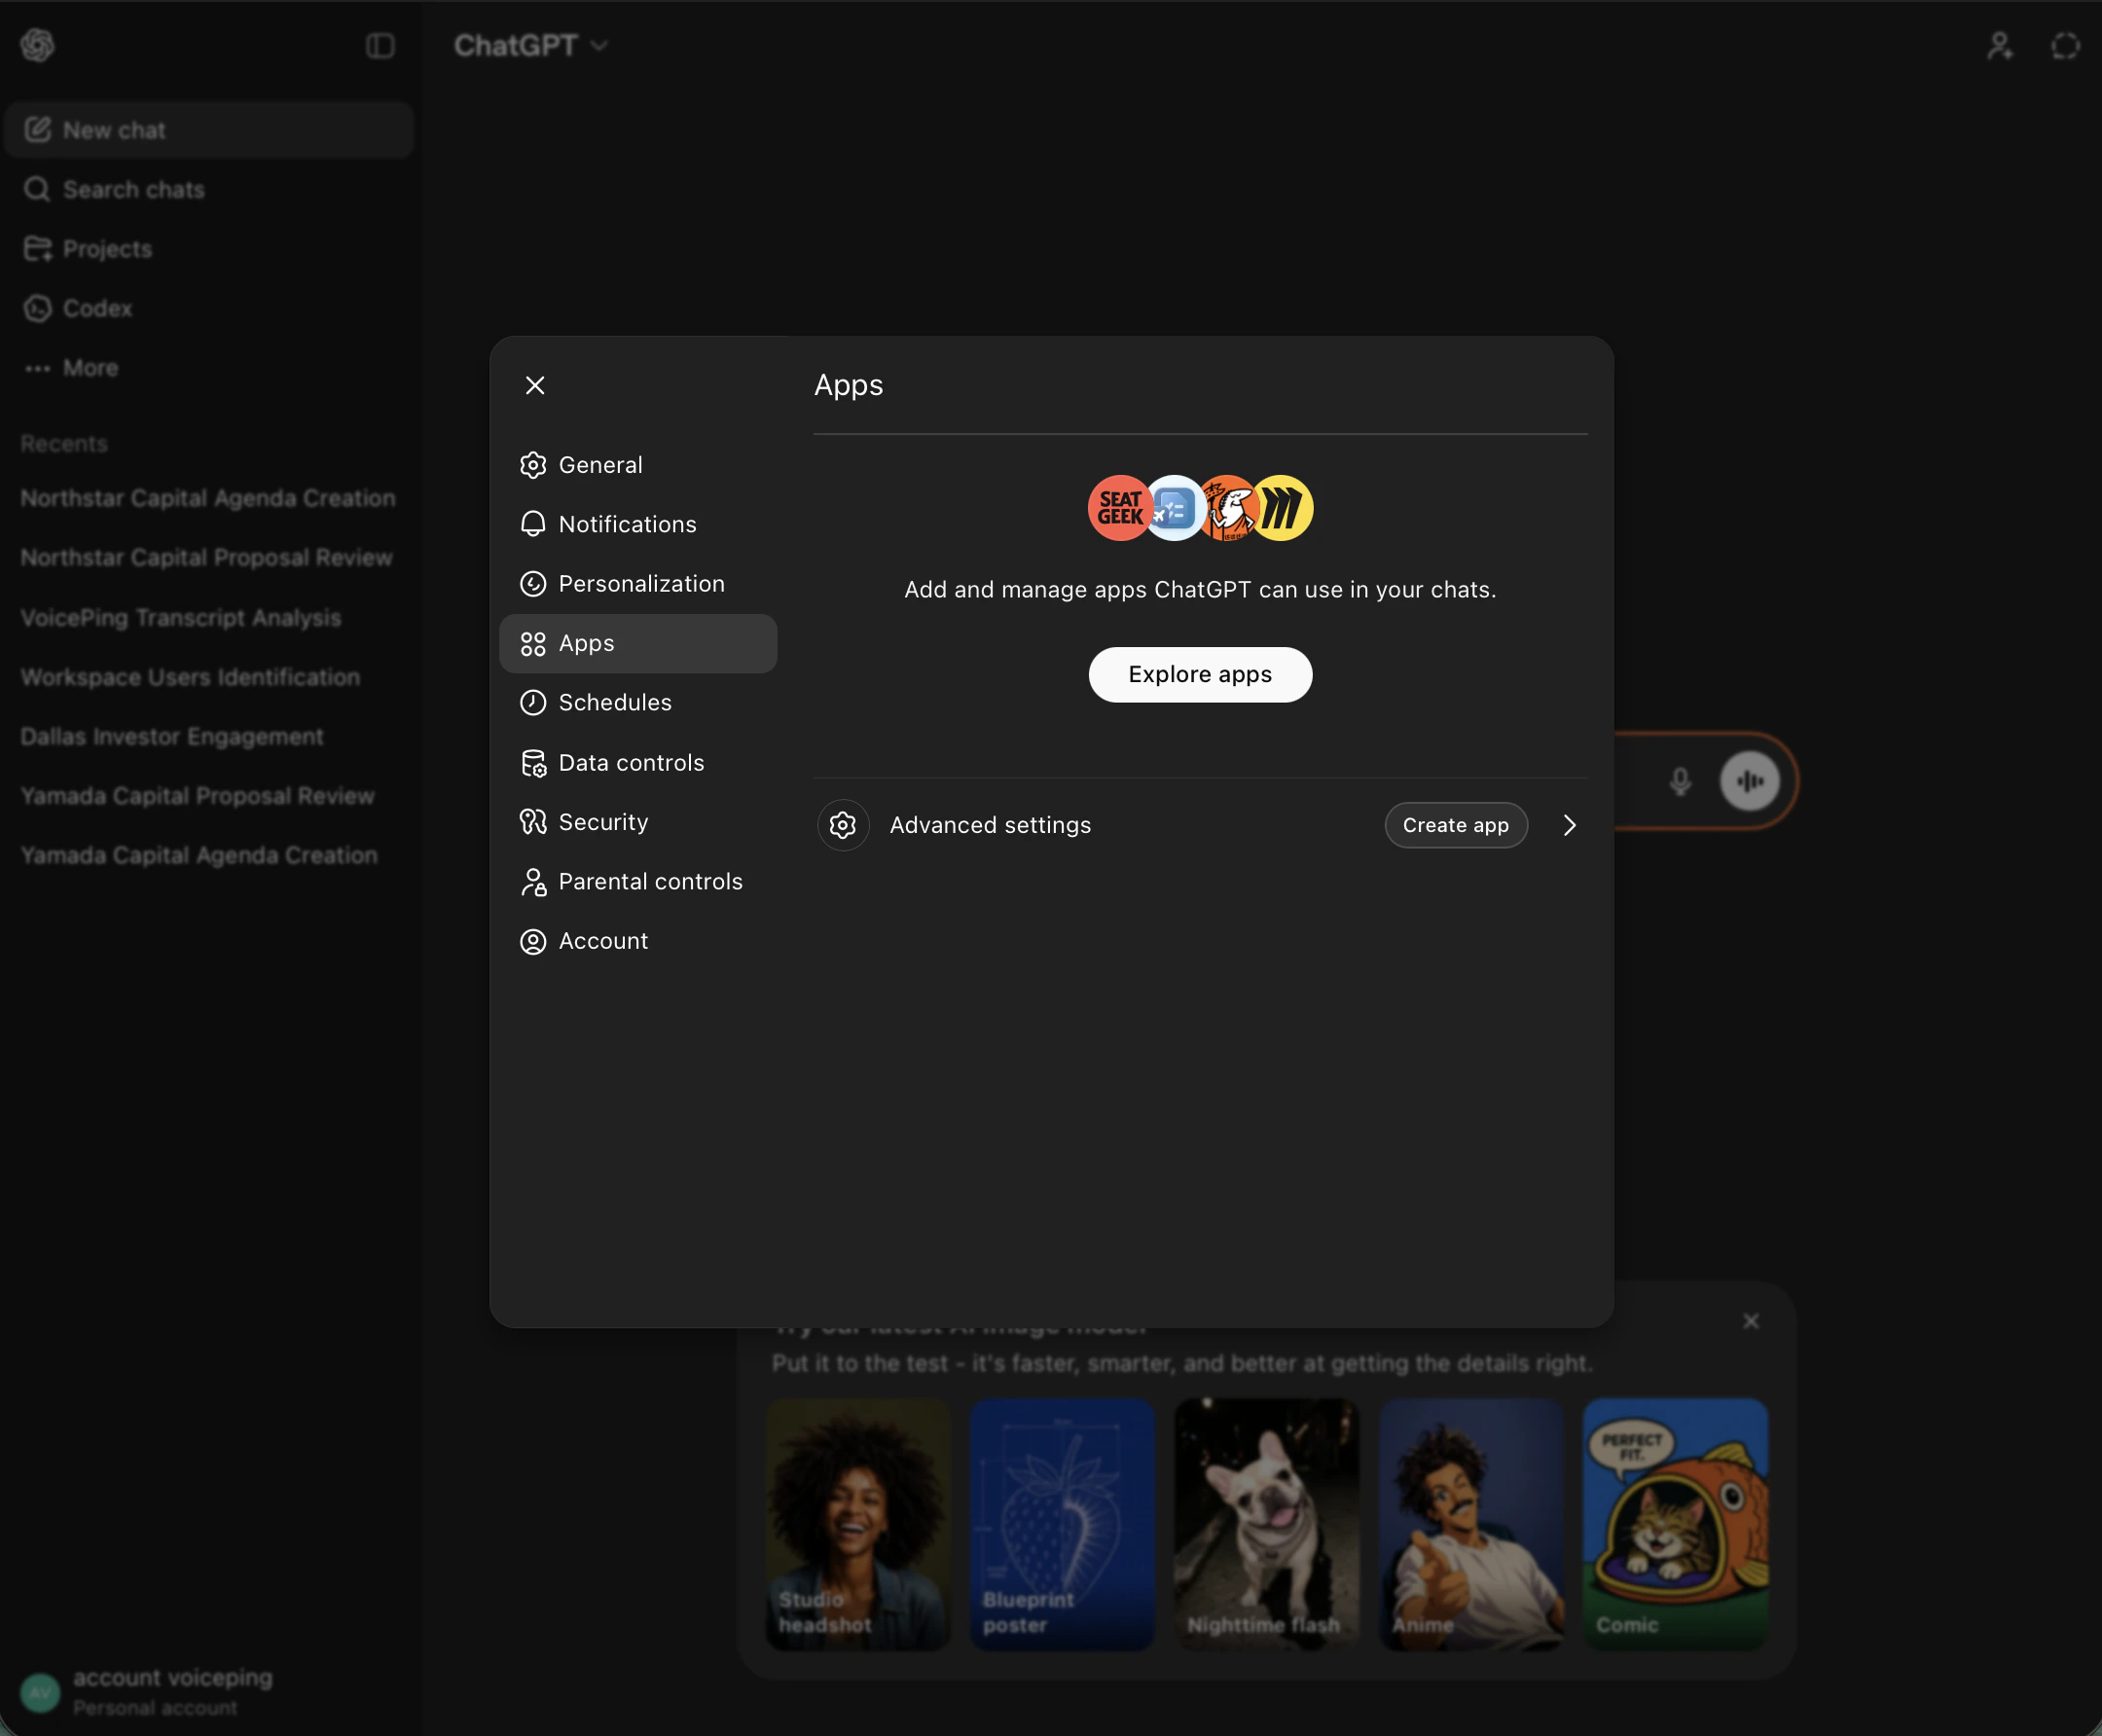
New App form ကို ဖြည့်ပြီး Create ကို နှိပ်ပါ
- Name:
Voiceping - MCP Server URL:
https://api.voiceping.io/mcp - Authentication:
OAuth - “I understand and want to continue” checkbox ကို အမှန်ခြစ်ပါ
- Create ကို နှိပ်ပါ
Claude — VoicePing ကို custom connector အဖြစ် ထည့်ပါ
Claude — VoicePing ကို custom connector အဖြစ် ထည့်ပါ
Claude Desktop နှင့် Claude web တွင် အလုပ်လုပ်သည်။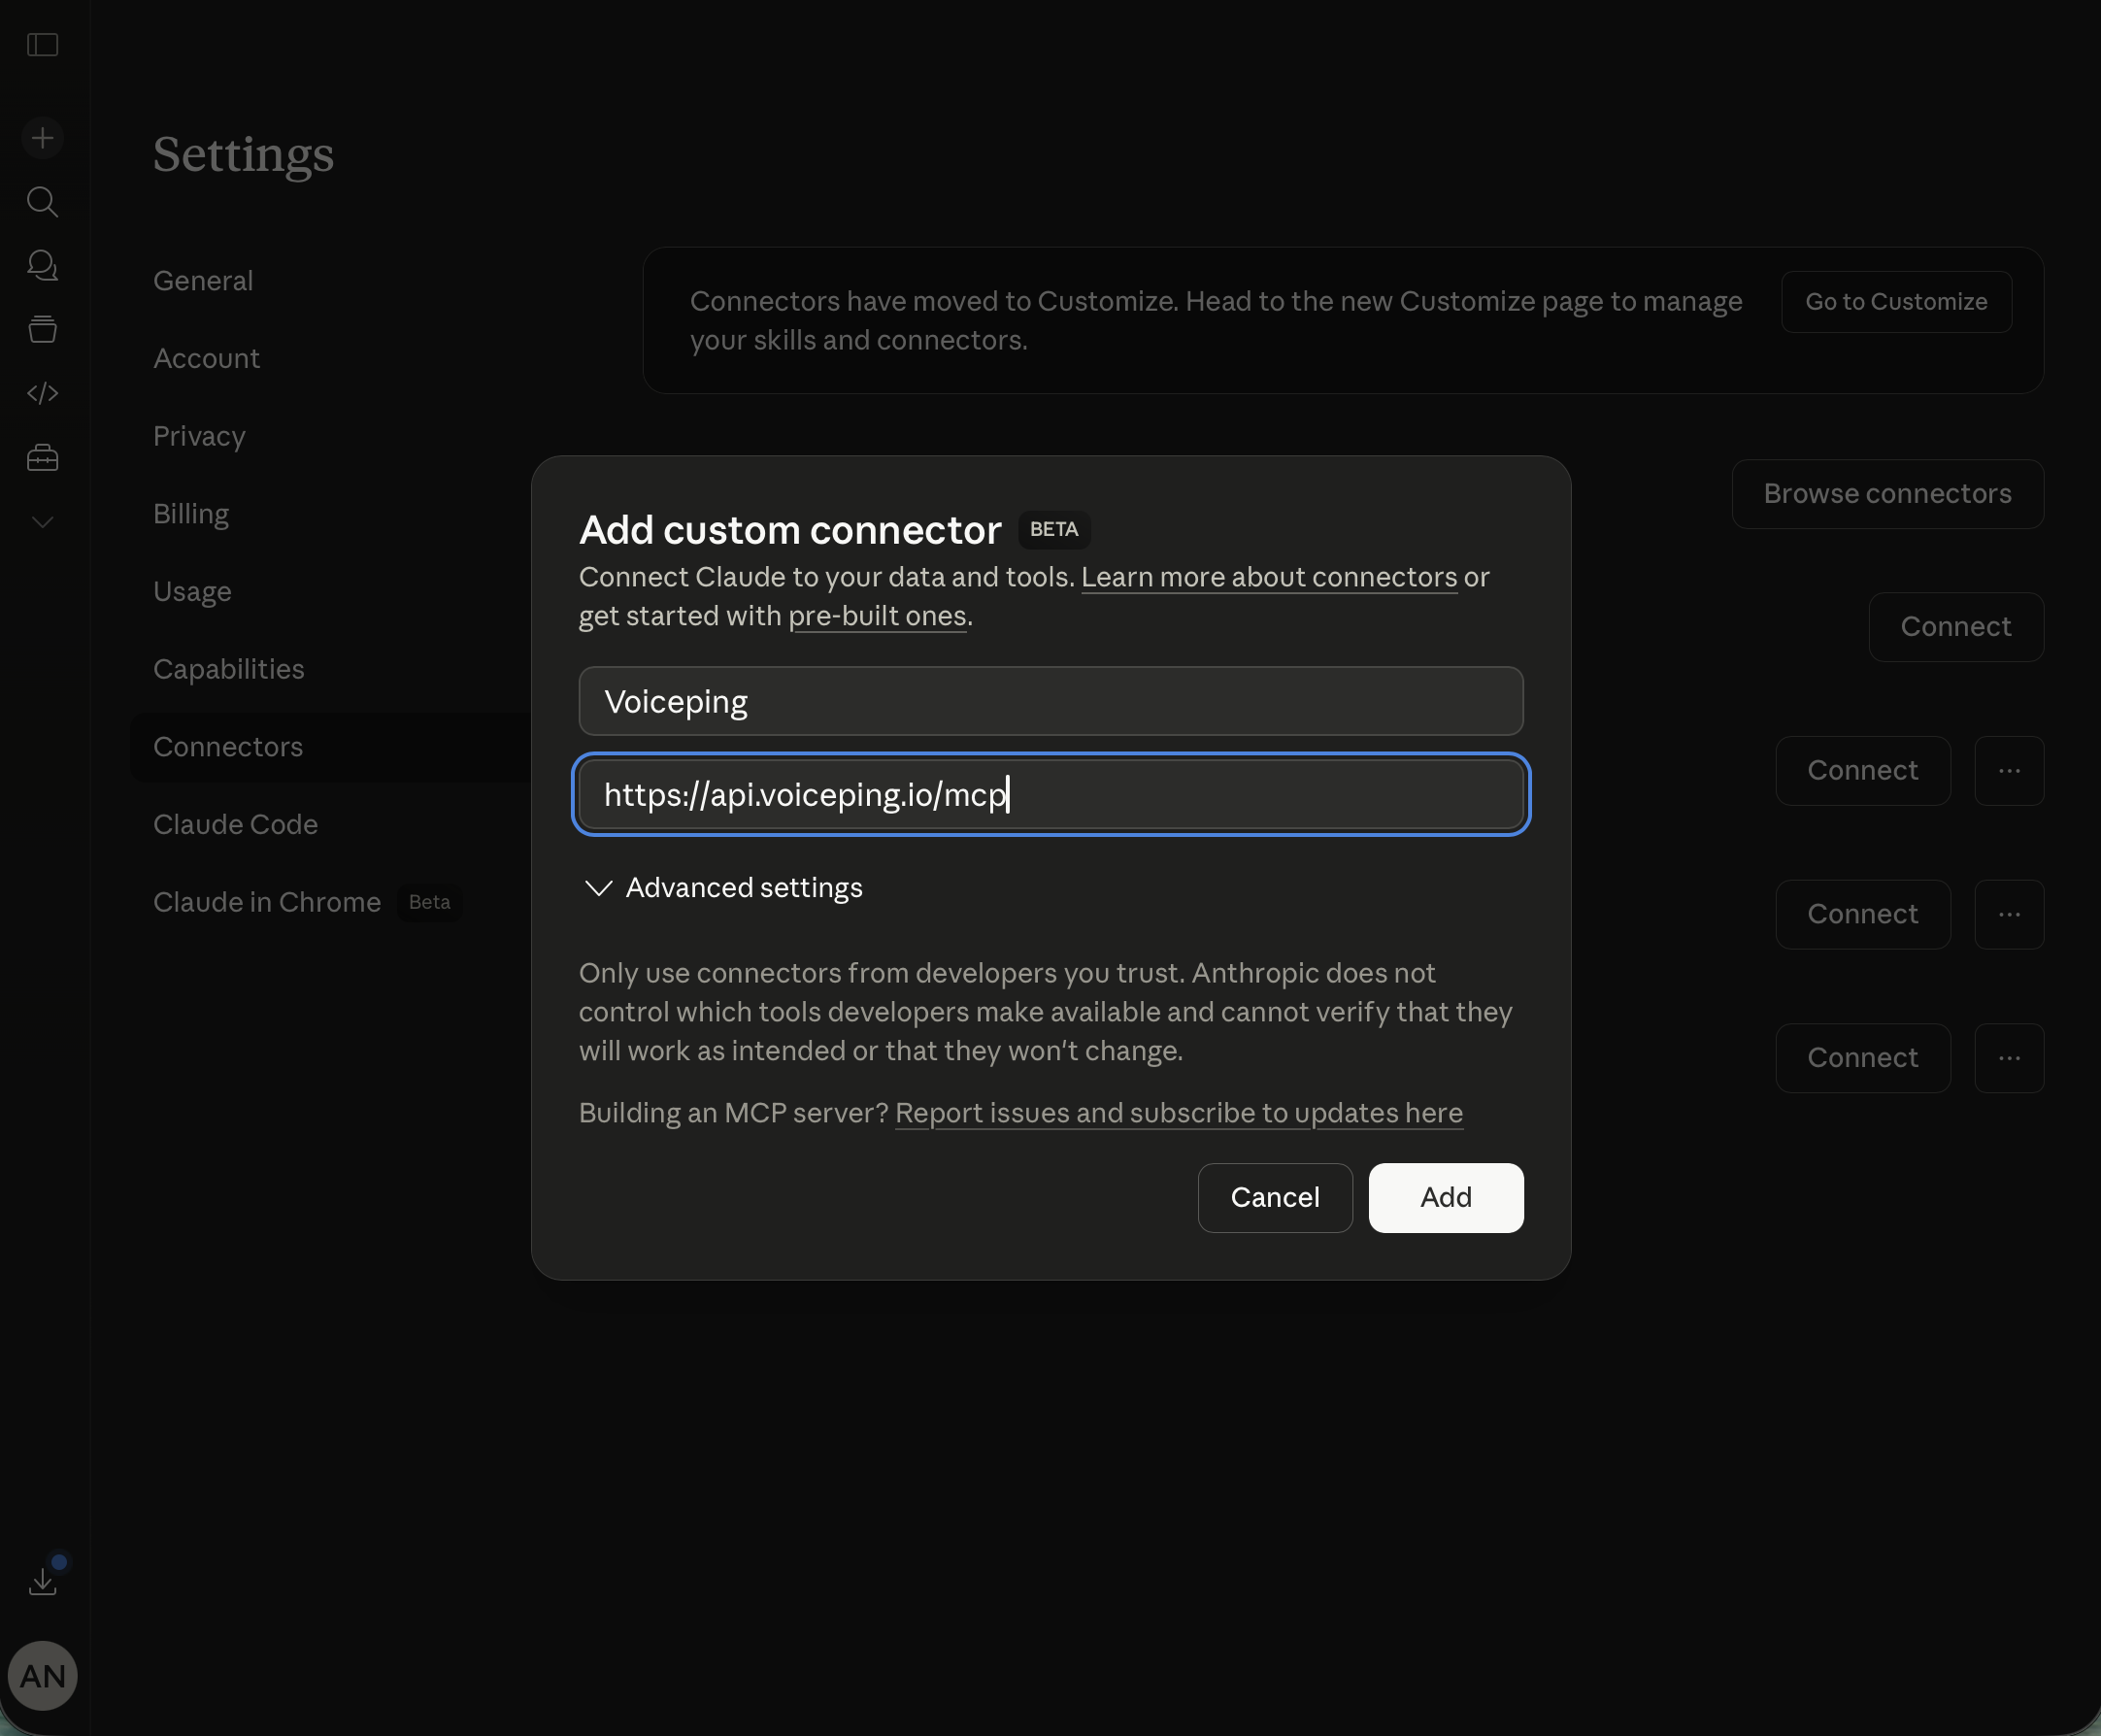
account menu မှ Settings ကို ဖွင့်ပါ
အောက်ဘယ်ဖက်ရှိ သင့် account avatar ကို နှိပ်ပြီး Settings ကို ရွေးပါ။
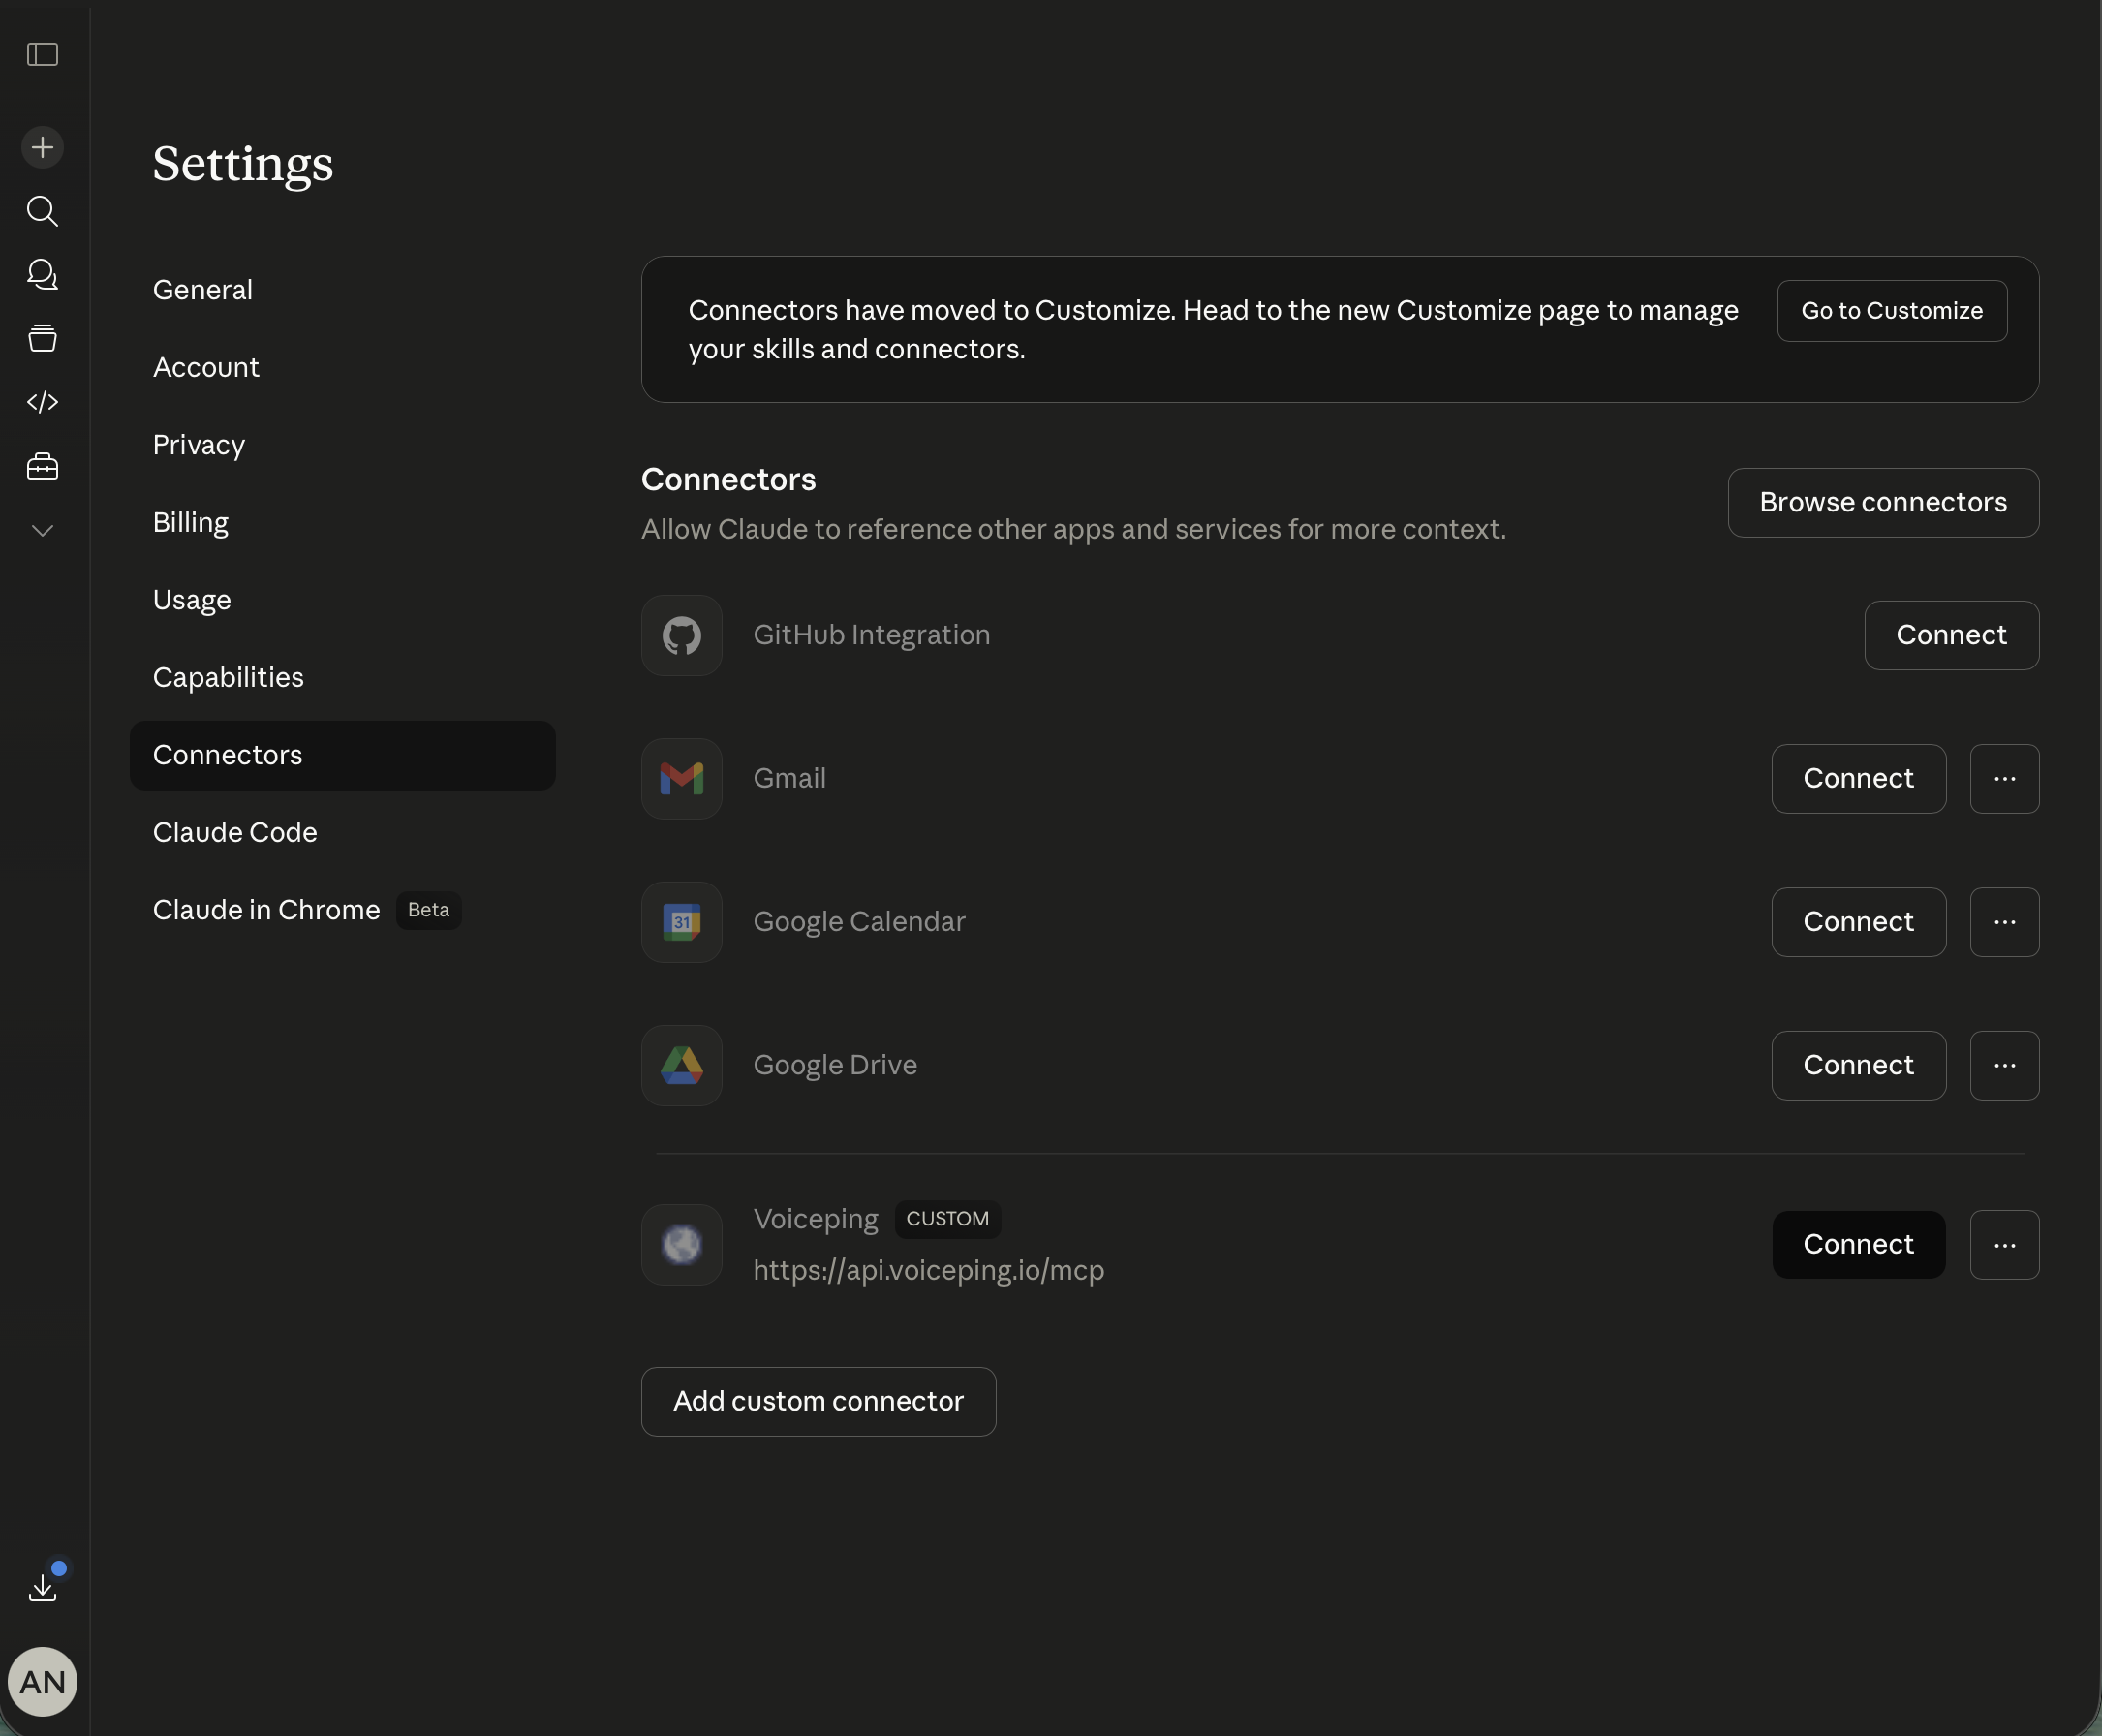
Connectors → Add custom connector ကို ဖွင့်ပါ
Settings တွင် Connectors tab ကို ဖွင့်ပါ။ အောက်ဆုံးသို့ scroll ပြုလုပ်ပြီး Add custom connector ကို နှိပ်ပါ။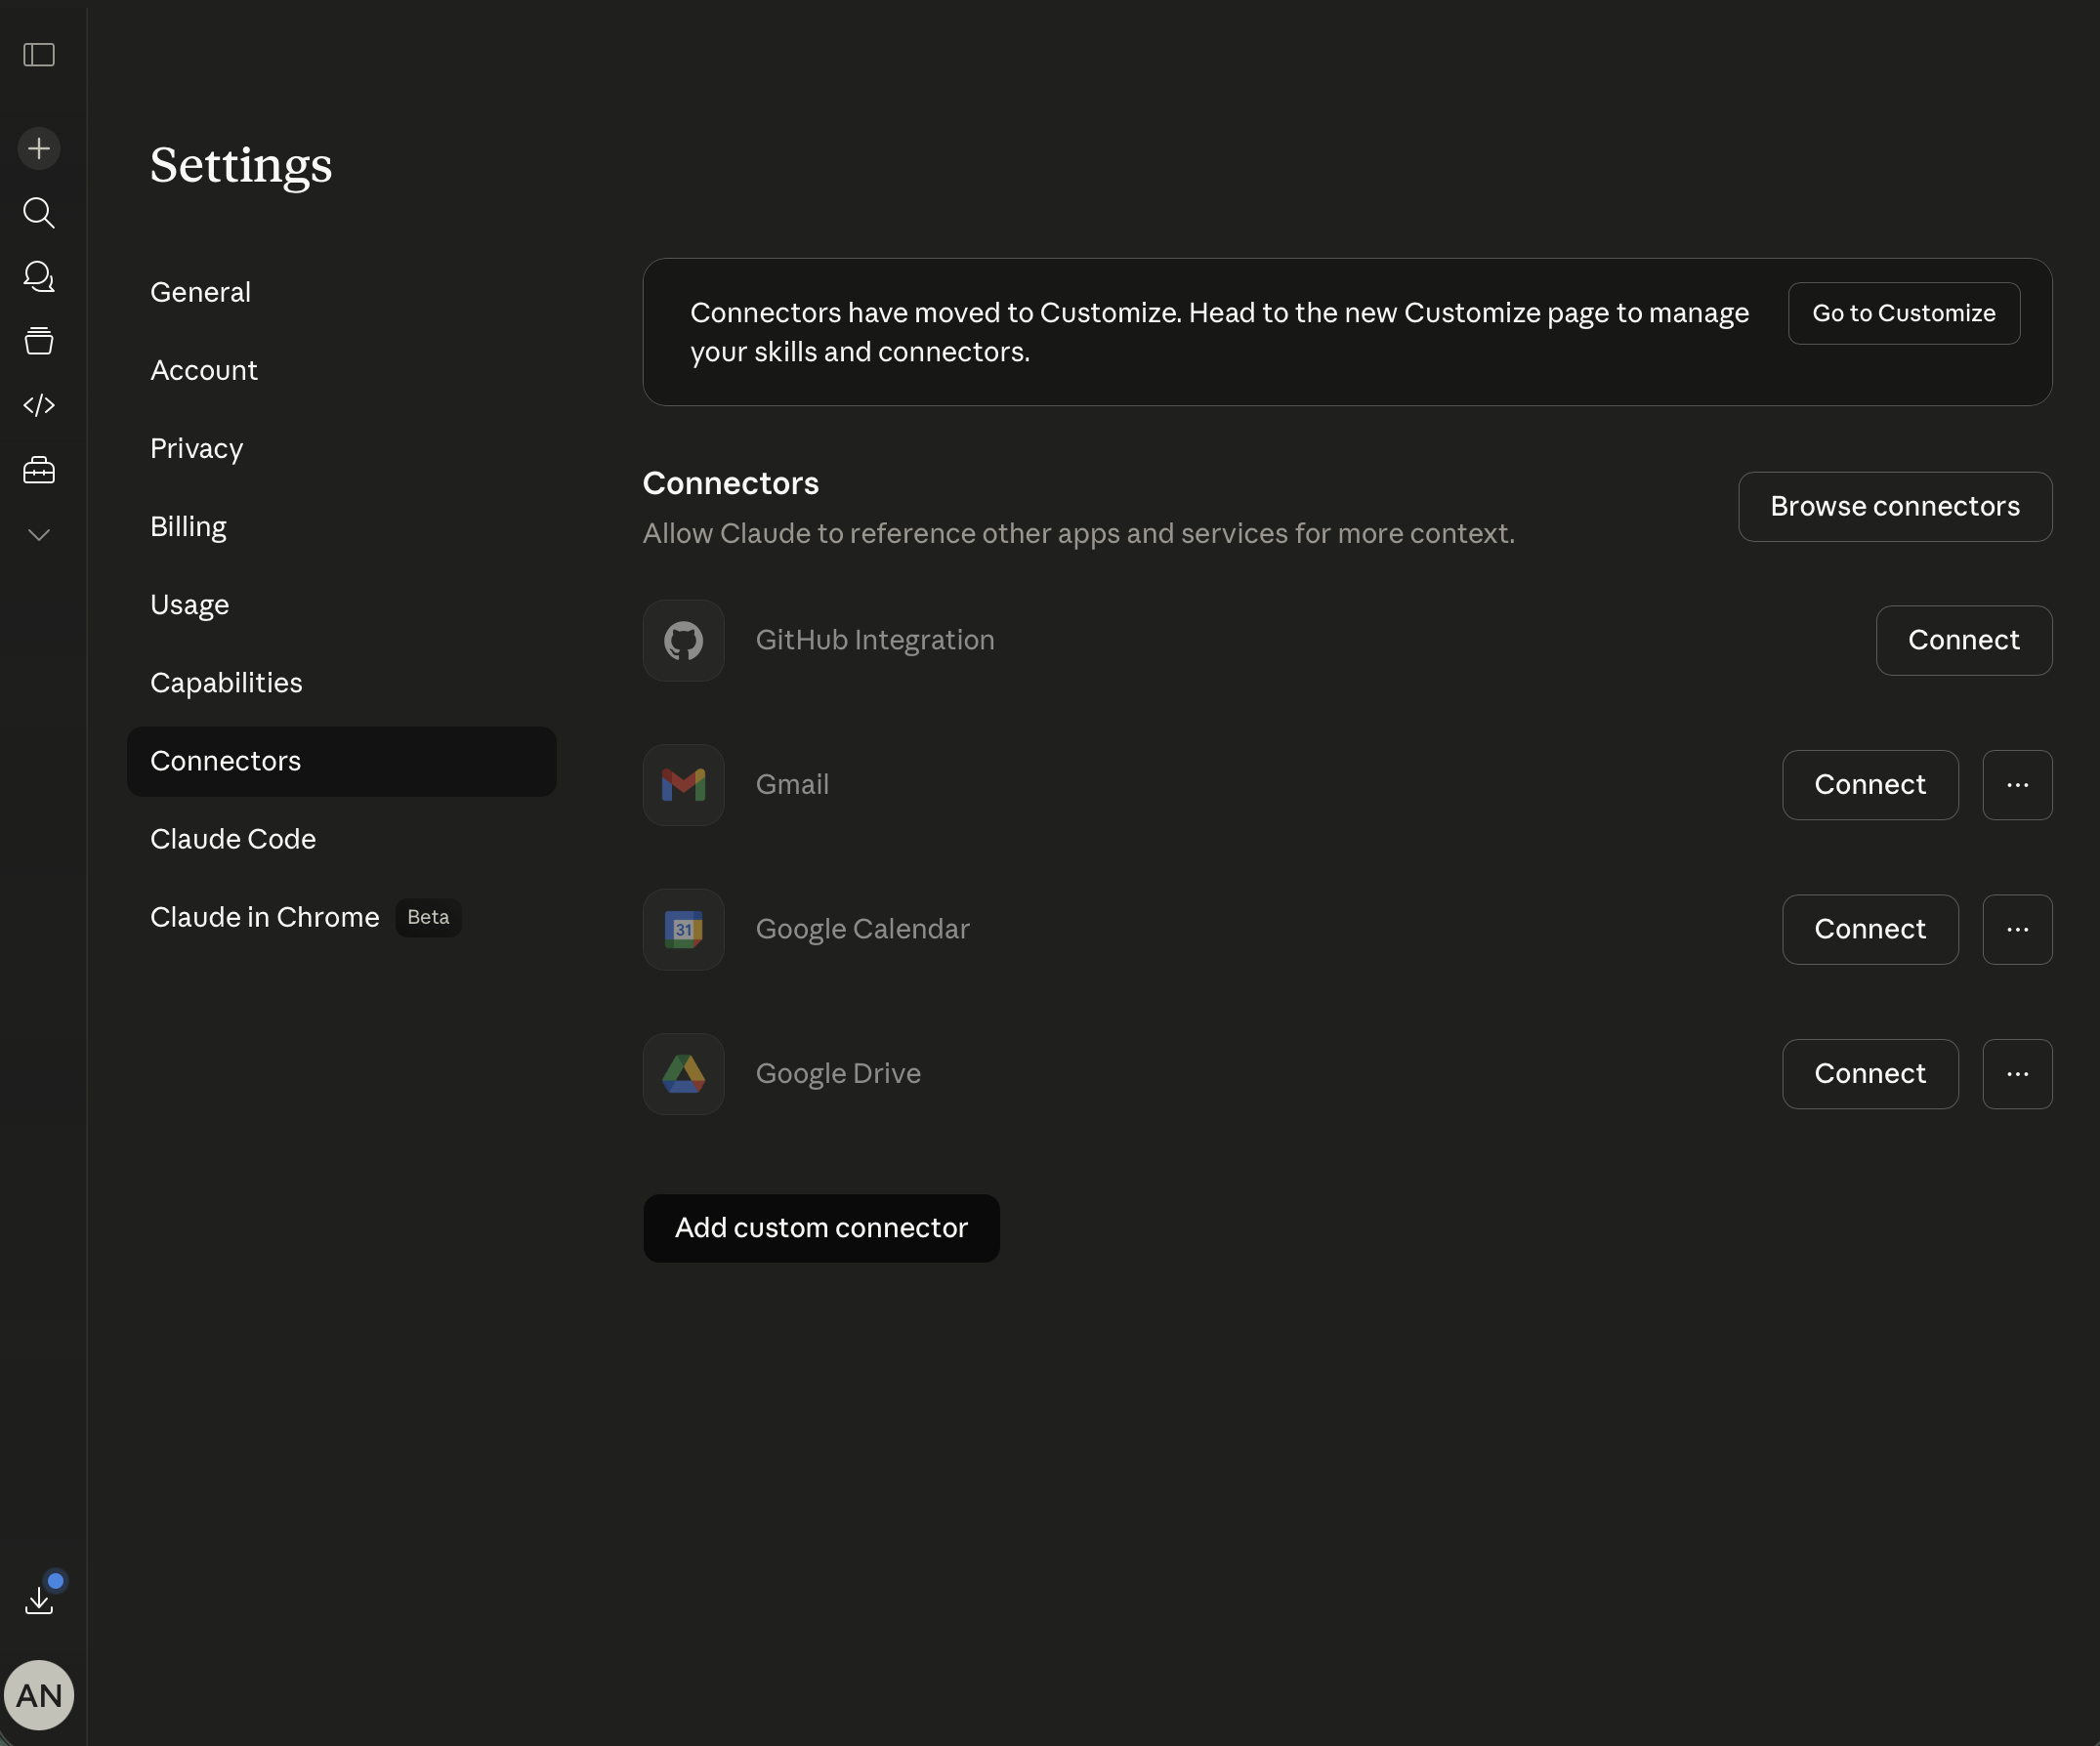
connector အသေးစိတ်ကို ဖြည့်ပြီး Add ကို နှိပ်ပါ
- Name:
Voiceping - URL:
https://api.voiceping.io/mcp
| Client | တရားဝင် MCP setup docs |
|---|---|
| Claude (Desktop / Web) | Getting started with MCP servers on Claude · Remote MCP servers |
| ChatGPT | Developer Mode and full MCP connectors in ChatGPT · Connect from ChatGPT — Apps SDK |
| Claude Code | Connect Claude Code to tools via MCP |
| Codex CLI | Model Context Protocol — Codex |
| Gemini CLI | MCP servers with Gemini CLI |
| အခြား client များ | modelcontextprotocol.io — Connect to servers |
transcript scope များကို ခွင့်ပြုပါ
sign in ဝင်ပါ၊ သင့် VoicePing workspace ကို ရွေးပြီး client က တောင်းဆိုနေသော transcript scope များကို ခွင့်ပြုပါ။ သင်ခွင့်ပြုသော scope များကိုသာ ပေးအပ်မည်ဖြစ်သည်။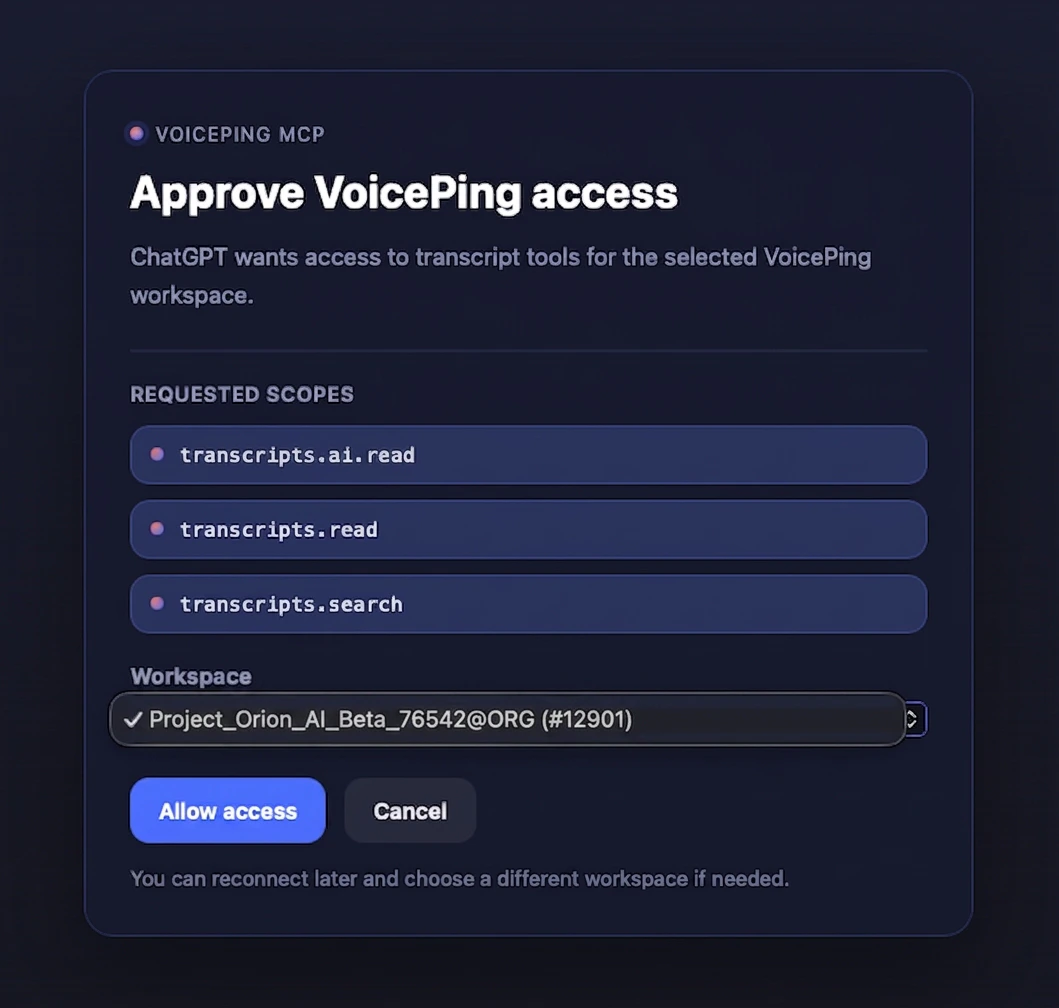
နောက်ထပ် အဆင့်များ
External Access ခြုံငုံမှု
MCP နှင့် API နှစ်ခုလုံးတွင် သက်ရောက်သော scope များ၊ lifecycle ထိန်းချုပ်မှုများနှင့် event log များသို့ ပြန်သွားပါ။
သင့် code မှ API ကို အသုံးပြုပါ
လူတစ်ဦးမဟုတ်ဘဲ server တစ်ခုက transcript များကို ဆွဲယူနေပါက ၎င်းအစား bearer token ဖြင့် API Access ကို အသုံးပြုပါ။